Getting started
WhaTap monitoring starts with the following steps:
Step 1. Sign up
Step 2. Select a product
Step 3. Create a project
Step 4. Check the access key
After confirming the supported environment, proceed to the agent installation step.
Sign up
To use the WhaTap monitoring service, you must first sign up. For more information about signing up, see the Account Management > Sign Up documentation.
Select a product
-
Log in to the WhaTap Monitoring Service.
-
Select
 All Projects >
  Project.
 -
On the Select product screen, select the Go product to monitor and then click the Create button.
Create a project
Understanding the Kubernetes project structure
To start Kubernetes monitoring, first create a cluster project. If your cluster has many namespaces and a high number of containers and pods, you can additionally create namespace projects to split the monitoring scope.
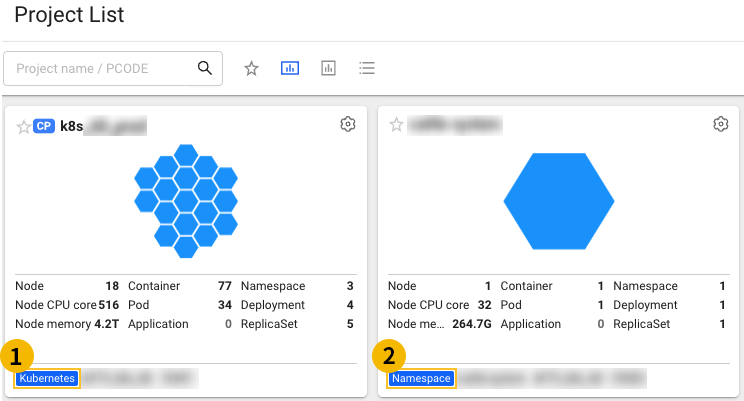
 Cluster project
-
The project that monitors all resources in a Kubernetes cluster.
-
Master and node agents are installed in the cluster project.
-
In the project list, the cluster project shows a
CPtag next to its name and aKubernetestag at the bottom. -
For details on how to create one, see the Getting started document.
 Namespace project
-
A project that monitors resources and application containers at the Kubernetes namespace level.
-
In the project list, the namespace project shows a
Namespacetag at the bottom. -
For details on how to manage one, see the Manage namespace projects document.
Creating a Kubernetes project
After selecting the product to monitor, create a project before installing the agent.
-
On the Create project screen, enter or select the following items to create a project:
-
Project name (required): Enter the project name.
-
Data server region (required): Select the region where the data server is located. A region is a collection of data centers that provide cloud services. Your data is stored in the selected region.
-
Time zone (required): Set the time zone that serves as the reference for generating alerts and reports.
-
Notification language setting (required): Set the language for alert notification messages generated in the project (supports Korean and English).
-
Project groups: You can group and manage multiple projects. Select a group if there is one to join.
-
Project description: Enter an additional description for the project.
-
-
After completing all settings, click the Creating a project button.
When adding a project with an organization selected, you must set the Groups of organization as required. For more information about groups, see the following documentation.
Check the access key
The access key is a unique ID for activating the WhaTap service.
In the installation guide section, select the Getting the access key button. After automatically issuing the access key, proceed to the next step.
The access key cannot be used duplicately in other projects, and a separate access key is required for namespace projects as well.
After creating a project, you are automatically redirected to the Agent installation page. If you are not redirected to the Agent installation page, select Management > Agent installation from the left menu.