Organization Management
An organization is a parent group to which groups can belong. In most situations, projects and groups are enough. However, in case of a business that specializes in the operations management service, multiple companies exist as a group. The number of groups and projects can be great. In this case, the group concept is not enough. We need one more concept to integrate groups for management. Use the organization concept.
A professional maintenance service company can group multiple subgroups into a single organization at a parent level. Grant each group member the corresponding roles. Members who have been granted roles can manage the group independently.
Create Organization
-
Select the profile icon on the upper right of the screen. A drop-down menu appears.
-
Select Create organization.
-
Enter values for Organization name, Logo, and Description, and then select Next.
-
In the group list, select a group to add in the organization and then click Complete.
If the Created organization successfully. message appears, the organization has been created successfully.
-
Organization name is required. Even if you have not entered the Logo and Description, the organization can be created.
-
The group with the editing permission can be added to an organization.
-
If there is no editing permission, the group cannot be selected.
-
If you do not select a group, an organization can be created.
-
If invited to the group without editing permission, it does not have editing permission for the group.
-
It cannot be deleted by the upper group or cannot be moved to another group.
-
The recommended size of the organization Logo image is 102 pixels wide and 102 pixels high.
-
The organization Logo images can allow png, jpg, or jpeg file extensions of 3 MB or less.
-
For more information about the member roles, see the following.
Checking the groups and projects in the organization
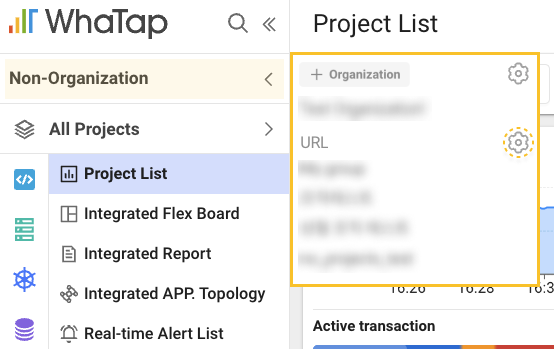
On the upper left of Home screen, select Non-Organization. If the organization list appears, select a desired organization. You can see the groups that belong to the organization under All Projects. In Project List, you can see the projects of all groups that belong to the organization.
Organization management
-
In Home screen select Non-Organization on the upper left.

-
When the list of organizations appears, hover your mouse pointer over the name of the organization to manage.
-
Select
, if displayed.
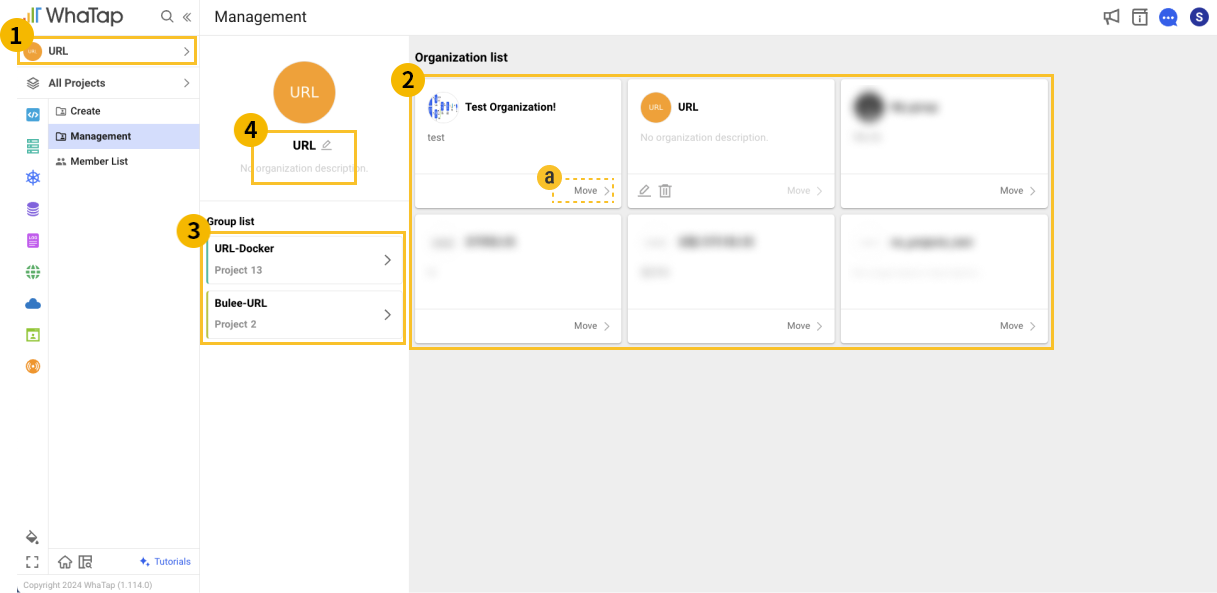
The Management menu appears.

-
Organization name area
To see the list of organizations to which you belong, select the
organization name area. If the Organization list appears, select another organization or Return to Non-Organizational List to return to the project list.
-
Organization list
-
All organizations to which you belong appear in the panel list. To change the organization, select
Move.
-
To modify the organization name, logo, and description, click
.
-
To delete an organization, click
. The groups and projects to which you belong are moved to a group that is not part of the organization.
-
Without editing permission, the Edit and Delete buttons do not appear.
-
-
Group list
All groups belonging to the selected organization appear in a list. If you click
, the management screen of the selected group appears.
-
Edit Organization
To modify the basic information of the selected organization, select
. If the Edit organization window appears, you can modify the organization name, logo, and description. After modification, select Save.
Inviting organization members
-
Go to Management.
-
In the side menu, select Member List.
-
Select Invite Member on the upper right of the screen.
-
You can also add members by selecting a sub group and a project in Organization.
-
In User role, set the roles of the user to invite and then select Apply.
-
In the Email input field, enter the email address of the user to invite, and then select Add. You can continue to add other users.
-
After adding users to invite, select Complete.
-
The member visiting feature can be used only by the users with the Member management role. For more information about the member roles, see the following. For more information about the member roles, see the following.
-
The accounts that have not signed up for the WhaTap monitoring service display the
New accounttag and send emails for sign up. -
If there are invited members to cancel before completion, in List of members to invite, select
.
-
You cannot invite any by entering email addresses that are not in the desired email format.
-
The members who have already been invited cannot be invited again, and the members in the parent organization or group are automatically added.
Checking the organization members

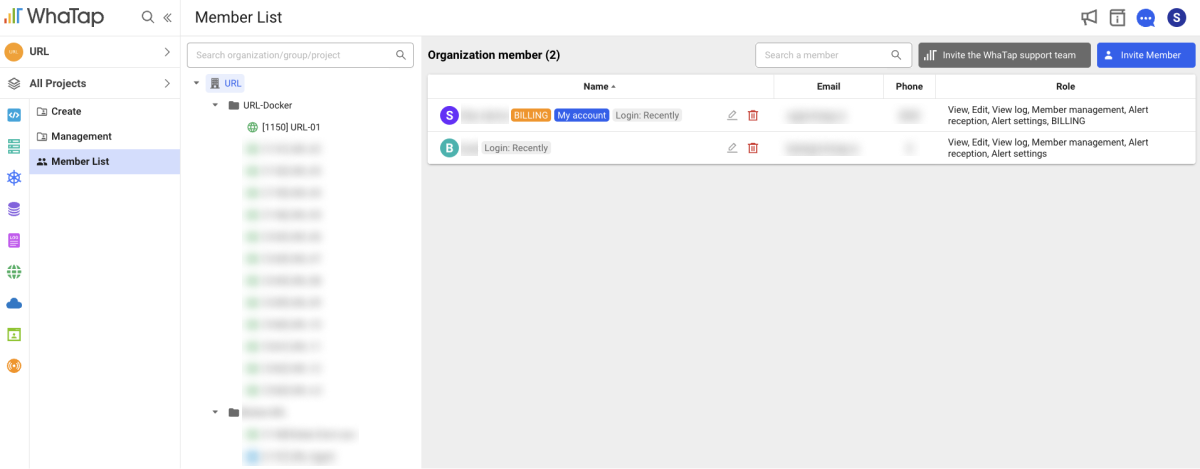
In the Organization menu, select Member List. You can select a group or project in the organization tree structure. You can check the members belonging to each selected group or project. You can also add or delete members, and modify roles for each selected group or project.
Modifying an organization member role
-
Go to Management.
-
In the side menu, select Member List.
-
In the Organization member list, select
on the right of the member to modify.
-
If the Edit member role window appears, set the values for Member role and User role per group.
- Member role: You can set the roles for the organization and the groups in the organization.
- User role per group: You can set the roles for the selected members for each group in your organization.
-
After all settings are finished, select Apply.
-
In the organization tree structure, you can select a group or project to modify the roles of the members belonging to each group or project. Depending on the selected group or project, the scope of the applicable roles may differ.
-
Member role editing can be used only by the users with the Member management role. For more information about the member roles, see the following.
Deleting an organization member
-
Go to Management.
-
In the side menu, select Member List.
-
In the Organization member list, select
on the right of the member to delete.
-
If the message window appears, select Delete.
-
To delete members under subordinate groups and projects, click the checkbox in the message window and then select Delete.
-
In the organization tree structure, you can select a group or project to delete the members belonging to each group or project.
-
If you have not the Member management role, you cannot delete other members. For more information about member roles, see the following.
Downloading the member list
To download the member list as a CSV format file, keep the following steps:
-
Go to Management.
-
In the side menu, select Member List.
-
Select
on the upper right of the screen.
Save the member list to the local disk in a CSV format file.
Member role downloading can be used only by the users with the Member management role. For more information about the member roles, see the following.