Installation
WhaTap Amazon CloudWatch monitoring collects metrics periodically through API integration. It collects the target stats every 5 minutes from the CloudWatch namespace of the desired service. When you start monitoring, you can search for user resources in all regions and start monitoring with one click. You can use it safely and conveniently with role-based authentication.
To use the WhaTap monitoring service, after signing up Sign up, create a project. For more information about registration, see the following.
Role
Edit role is required for installation.
Project Creation
Create a project before installing the agent.
-
Log in WhaTap monitoring service.
-
To create a project, on the left of the screen, select All Projects > + Project.
-
Select a product in Select product for installation.
-
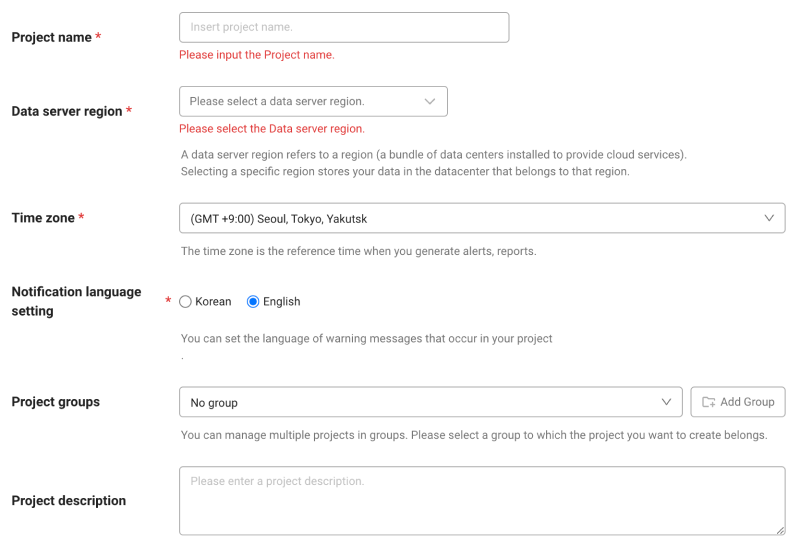
Set items for Project name, Data server region, Time zone, and more in order.
-
In Notification language setting, select the language for alert messages.
-
After all settings are finished, select Creating a project.
-
A Data server region refers to a region (a bundle of data centers installed to provide cloud services). Selecting a specific region stores your data in the datacenter that belongs to that region.
-
Time zone is the reference time for generating alerts and reports.
- To group multiple projects for management, select a group from Project groups or add a group. For more information about grouping, see the following.
- To add a project with an organization selected, Groups of organization must be set.
After a project has been created, the Management > Agent Installation page appears automatically. If the Agent Installation does not appear, select All Projects on the left and then select a newly created project.
Preliminary inspection
Check the required permissions and recommended policies.
| Resouce | Role |
|---|---|
| CloudWatch | Read |
| EC2 | Read |
| ElasticCache | Read |
| CloudFront | Read |
| Dynammodb | Read |
| ElasticBeansTalk | Read |
| AutoScaling | Read |
| EFS | Read |
| RDS | Read |
- Recommended policy
- arn:aws:iam::aws:policy/ReadOnlyAccess
Monitoring procedure
- Enter the Amazon authentication data.
- Select values for Cloudwatch namespace and collection cycle.
- Select values for region, metric, and stat.
After installation, extra charge may be incurred in the cloud depending on the usage, separate from the WhaTap fee. Before installation, check the pricing policy of the active cloud service in the following.
Entry of authentication data
Installation method using Role ARN is supported. The WhaTap AWS account (911937781722) collects Cloudwatch data by directly assuming the user role. Role assuming is safe and convenient because it does not require access key issuance.
Configuration using the role is recommended. The access key is available only to existing access key users.
Create a role
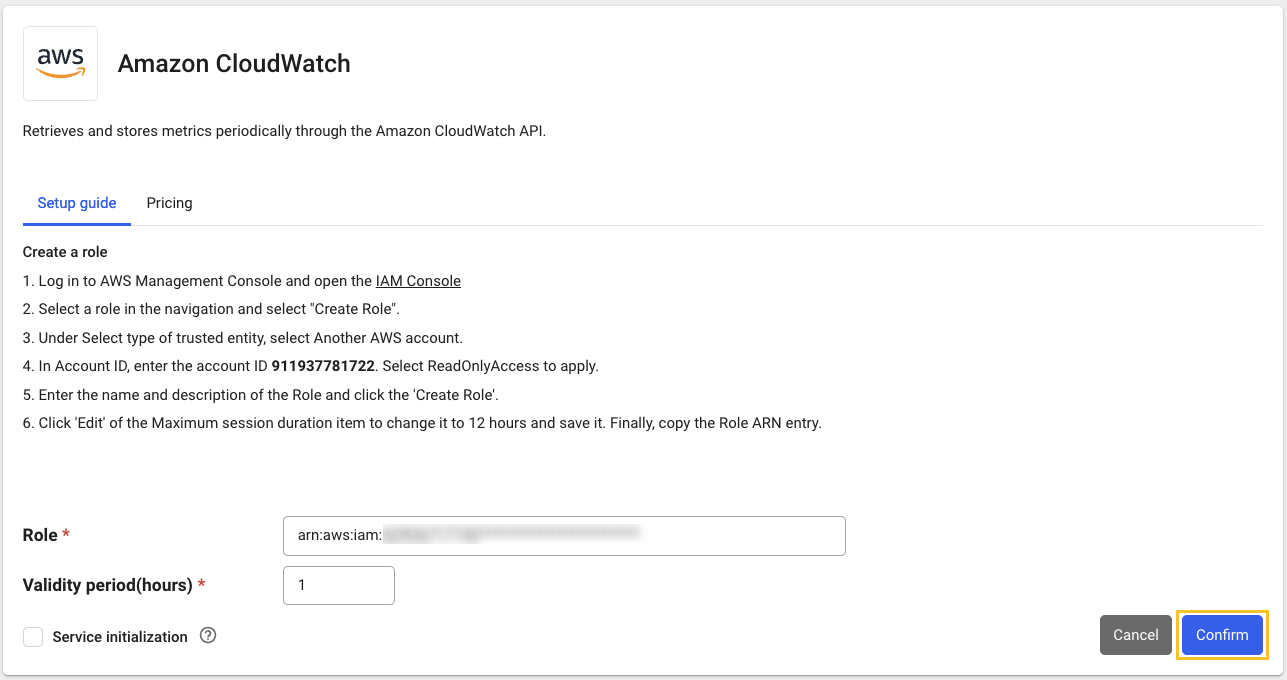
- Log in to the AWS management console and open the IAM console.
- In the console navigation pane, select roles and then select Create Role.
- In Select type of trusted entity, select an AWS account.
- Select a different AWS account, enter the WhaTap ID, 911937781722 in Account ID, and then click Next.
- Select an AWS management position in the filtering-based type.
- Select the ReadOnlyAccess checkbox from the list for application, and then click Next.
- Enter a name and description for the role and then click Create Role.
- Select a role created from the role list and then click Edit in Summary.
- Change the Maximum session duration to 12 hours and then save it.
- Copy the Role ARN item.
- Return to the WhaTap Management > Agent Installation page. Paste the copied Role ARN into the Role ARN window, and then click OK.
Selecting the namespace and collection cycle
After installation, you can select a namespace and a data collection cycle in Management > Agent Installation.
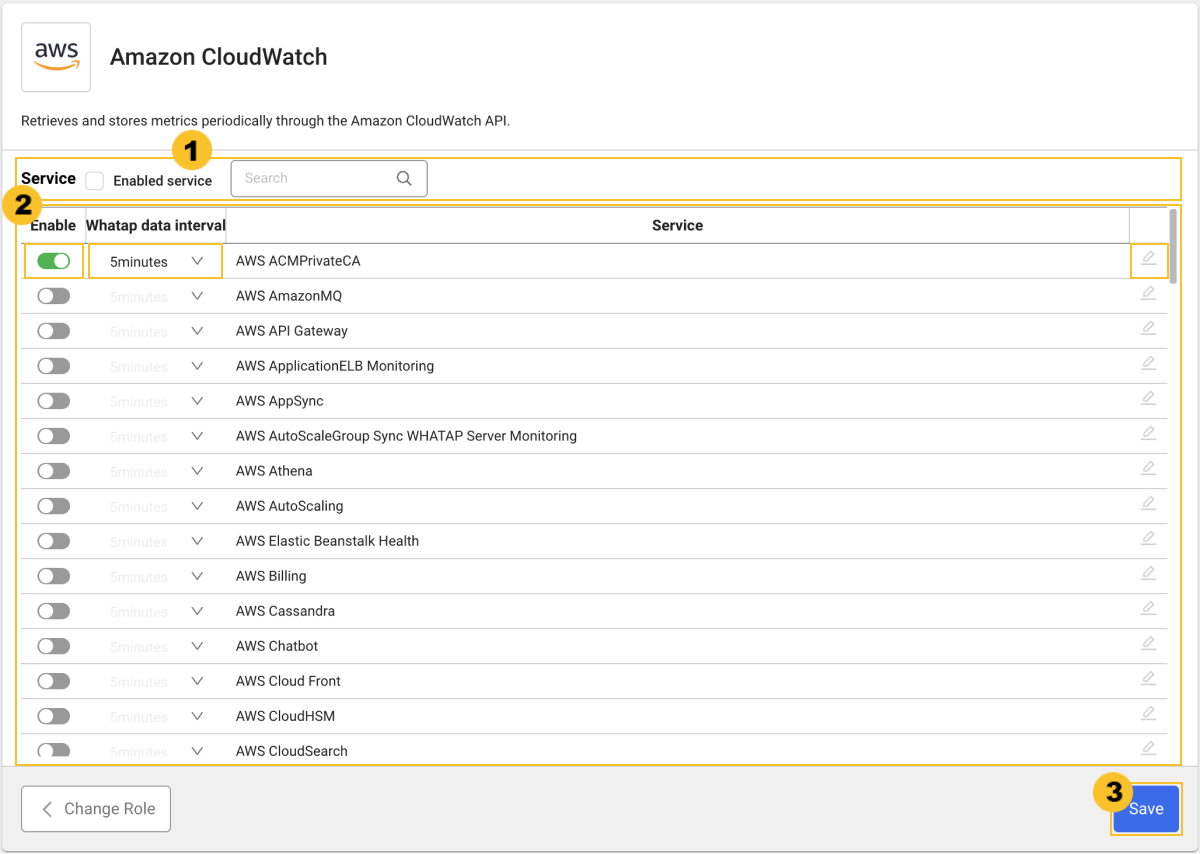
- If you check in
Active Service, you can see active namespaces in
.
- If you enter a keyword in the
field, you can search any namespace in
.
You can set the data collection cycle for each namespace and whether or not to enable data collection.
- Select
in the Whatap Data Interval column to set the data collection cycle.
- If you select the toggle button in the Enable column, you can enable data collection
or disable it
.
- Select
- Select
Save to save the settings.
Whatap Data Interval
WhaTap collection cycle indicates the cycle in which the cloud service performance metrics are viewed and stored in the WhaTap monitoring system. By default, it is set to collect every 5 minutes, you can increase the collection interval up to 3 hours.
-
1 Minute
-
5 Minutes
-
10 Minutes
-
15 Minutes
-
30Min
-
60 Minutes
-
180 Minutes
Namespace
- AWS ACMPrivateCA
- AWS AmazonMQ
- AWS ApplicationELB Monitoring
- AWS AppSync
- AWS Athena
- AWS AutoScaling
- AWS Elastic Beanstalk Health
- AWS Billing
- AWS Cassandra
- AWS Chatbot
- AWS Cloud Front
- AWS CloudHSM
- AWS CloudSearch
- AWS CodeBuild
- AWS CodeGuruProfiler
- AWS Cognito
- AWS Connect
- AWS ContainerInsights Monitoring
- AWS DataSync
- AWS DAX
- AWS DDoSProtection
- AWS DMS
- AWS DocDB
- AWS DX
- AWS Dynamo DB
- AWS Ebs Usage
- AWS EC2 Monitoring
- AWS EC2 Alert Config
- AWS EC2Spot
- AWS ECS
- AWS EFS
- AWS ElastiCache Usage
- AWS ElasticGPUs
- AWS ElasticInference
- AWS ElasticMapReduce
- AWS ElasticTranscoder
- AWS Classic ELB Monitoring
- AWS ES
- AWS Events
- AWS Firehose
- AWS FSx
- AWS GameLift
- AWS GatewayELB
- AWS Glue
- AWS GroundStation
- AWS Health
- AWS Inspector
- AWS IoT
- AWS IoTAnalytics
- AWS IoTSiteWise
- AWS IVS
- AWS Kafka
- AWS Kinesis
- AWS KinesisAnalytics
- AWS KinesisVideo
- AWS KMS
- AWS Lambda
- AWS Lex
- AWS Location
- AWS Logs
- AWS LookoutMetrics
- AWS MediaConnect
- AWS MediaConvert
- AWS MediaPackage
- AWS MediaStore
- AWS MediaTailor
- AWS ML
- AWS NATGateway
- AWS Neptune
- AWS NetworkELB
- AWS NetworkFirewall
- AWS OpsWorks
- AWS Polly
- AWS QLDB
- AWS RDS Monitoring
- AWS Redshift
- AWS Robomaker
- AWS Route53
- AWS S3
- AWS SageMaker
- AWS SDKMetrics
- AWS ServiceCatalog
- AWS SES
- AWS SNS
- AWS SQS
- AWS SQS Message
- AWS SSM-RunCommand
- AWS States
- AWS StorageGateway
- AWS SWF
- AWS Textract
- AWS ThingsGraph
- AWS Timestream
- AWS Transfer
- AWS TransitGateway
- AWS Translate
- AWS TrustedAdvisor
- AWS API Usage
- AWS VPN Monitoring
- AWS WAF
- AWS WorkMail
- AWS WorkSpaces
Selecting the region, metric, and stat
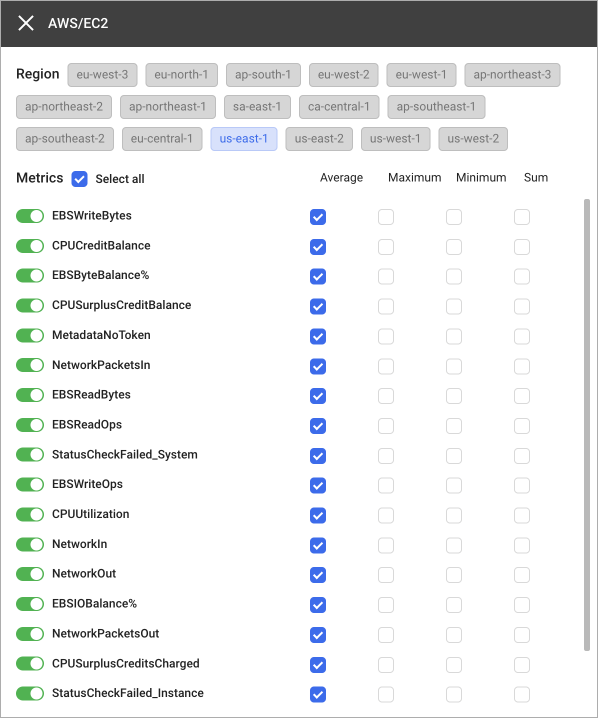
When you click Edit on the right of the namespace checked for collection, you can select values for Region, Metrics, and Stat to collect.
Service initialization and deactivation of data collection
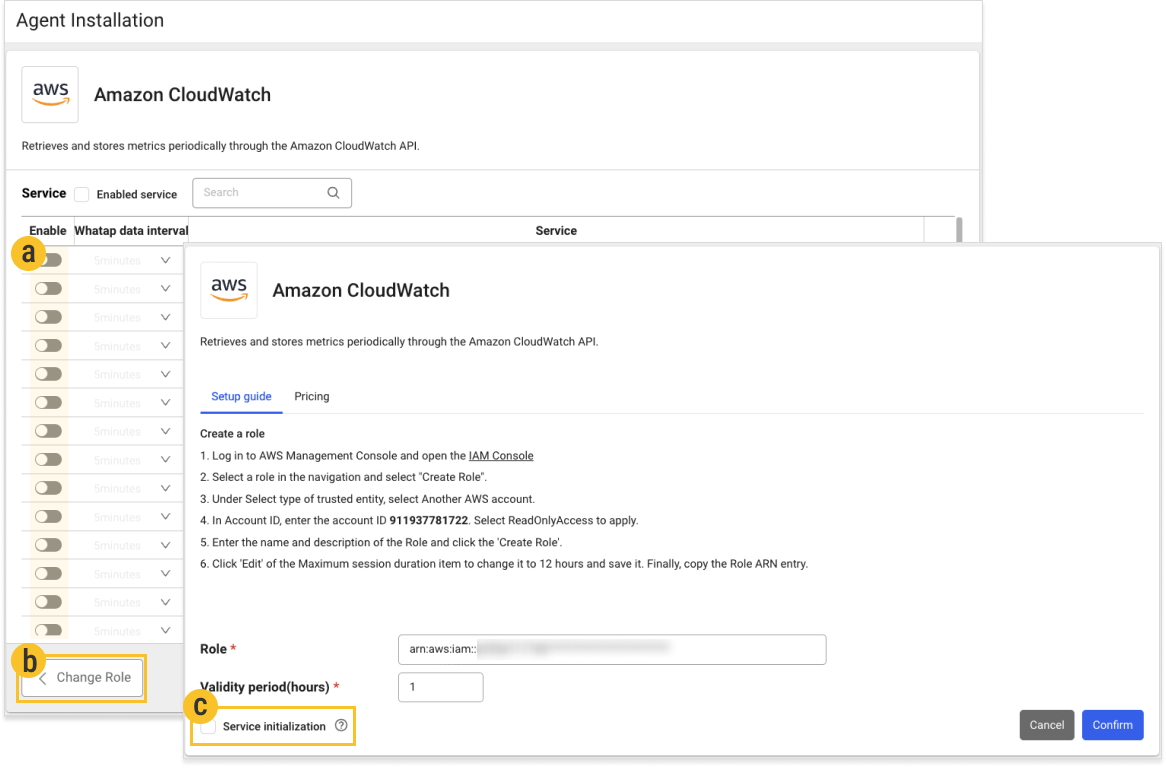
-
When the collection toggle
is disabled, the data collection is stopped.
-
Select Change Role to disable all services that are collecting metrics by selecting
Service initialization on the Agent installation screen.
-
To completely avoid incurring costs, you must remove the Role from the AWS IAM console.