Group Management
You can group multiple projects for management. A user can own multiple projects. To manage multiple projects, the concept, "Group" has been provided. If there are multiple projects, it is cumbersome to add users or grant permissions for each project. In this case, you can group two projects into a group and manage users by the group.
- A project can belong to a group.
- A project may not belong to a group.
Project users can inherit group users, and the users can monitor all projects in the group. A user who is granted the role only on the project can monitor only the project, regardless of whether the user is in a group or not.
Adding a group
-
From the side menu, select All Projects >
 Group.
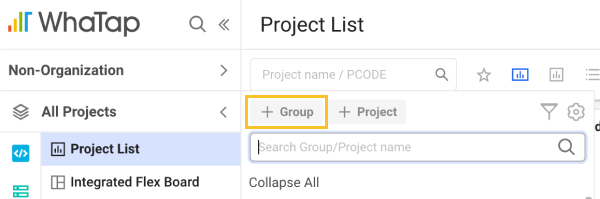
-
On the Add a Group screen, enter the name of the group to create in Group name.
-
Enter the group description in Group description. The Group description field is optional.
-
Select a project to add to the group in Add project. You can search a desired project for addition.
-
After adding the project, select Add Group.
The projects that can be added to the group are the ones with Edit permission or not part of the group.
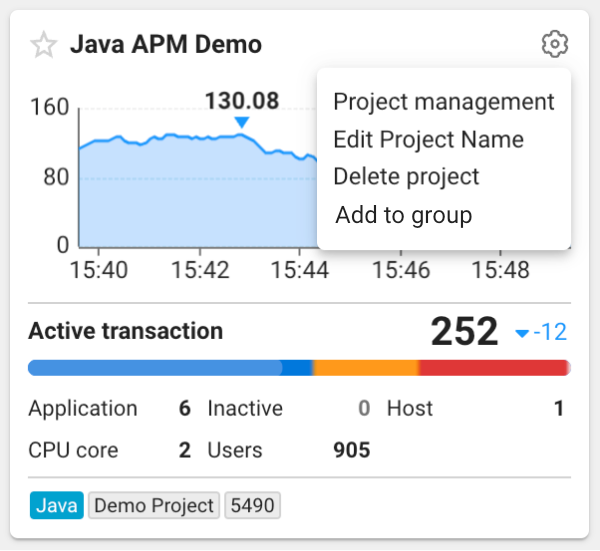
Adding a project into a group
-
On the upper right of a project entry in the Project List of Home screen, select
 .
.
-
Select Add to group.
-
Select a group to add a project in.
-
Select Add to group.
Viewing the project list in the selected group

-
By selecting All Projects in the side menu, open the group and project list panel.
-
In the panel, select the
 button on the right of the group to view.
Only the projects included in the selected group appear in the list. In this status, you can use the Group Member or Group Management menu.
-
To see the full list of projects again, select the
 Go to project list button at the bottom of the side menu.
To see the projects that are not part of the group, scroll down the list panel.
Excluding projects from the group
Excluding from Home screen
-
On the upper right of a project entry in the Project List of Home screen, select
.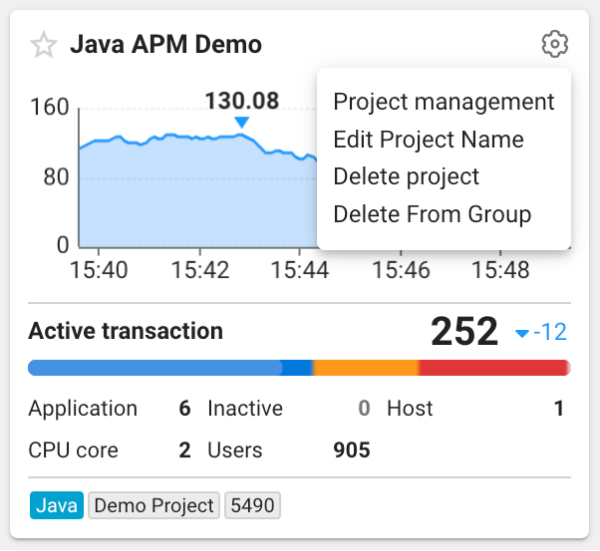
-
Select Delete From Group.
-
If the Delete project from group window appears, select OK.
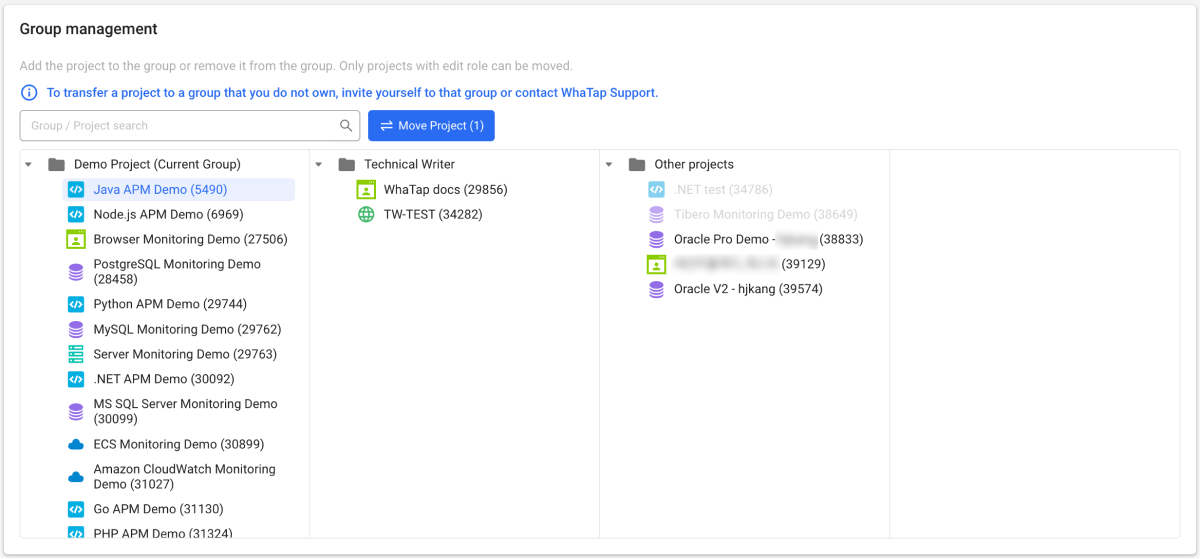
Excluding from group management
You can move projects in a group to other projects or exclude them.
-
By selecting All Projects in the side menu, open the group and project list panel.
-
In the panel, select the
button on the right of the group to delete. -
In the side menu, select Group Management.
-
In the Group management section, select projects to exclude.
-
If Move Project (N) is displayed, select the button.
-
When the Move Project window appears, in Select group, select a group to move or select Other projects.
-
Select Confirm.
If you select Other projects in Select group, the project is excluded from its group.
Deleting a group
-
By selecting All Projects in the side menu, open the group and project list panel.
-
In the panel, select the
button on the right of the group to delete. -
In the side menu, select Group Management.
-
In the Group Info section, select Delete group.
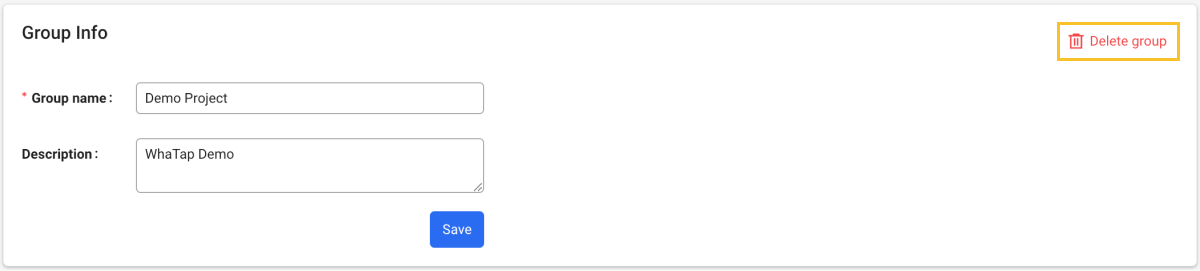
-
See the details of the Delete group message window, and then select Delete.
- To delete a group, the user list is also deleted.
- In case of the projects in the group, only the group information is deleted.
- The deleted information cannot be restored.
Inviting group member
-
By selecting All Projects in the side menu, open the group and project list panel.
-
In the panel, select the
button on the right of the group to invite members to. -
In the side menu, select Group Member.
-
Select Invite Member on the upper right of the screen.
-
You can also add members by selecting a sub project in Group.
-
In User role, set the roles of the user to invite and then select Apply.
-
In the Email input field, enter the email address of the user to invite, and then select Add. You can continue to add other users.
-
After adding users to invite, select Complete.
-
The member visiting feature can be used only by the users with the Member management role. For more information about the member roles, see the following. For more information about the member roles, see the following.
-
The accounts that have not signed up for the WhaTap monitoring service display the
New accounttag and send emails for sign up. -
If there are invited members to cancel before completion, in List of members to invite, select
 .
. -
You cannot invite any by entering email addresses that are not in the desired email format.
-
The members who have already been invited cannot be invited again, and the members in the parent organization or group are automatically added.
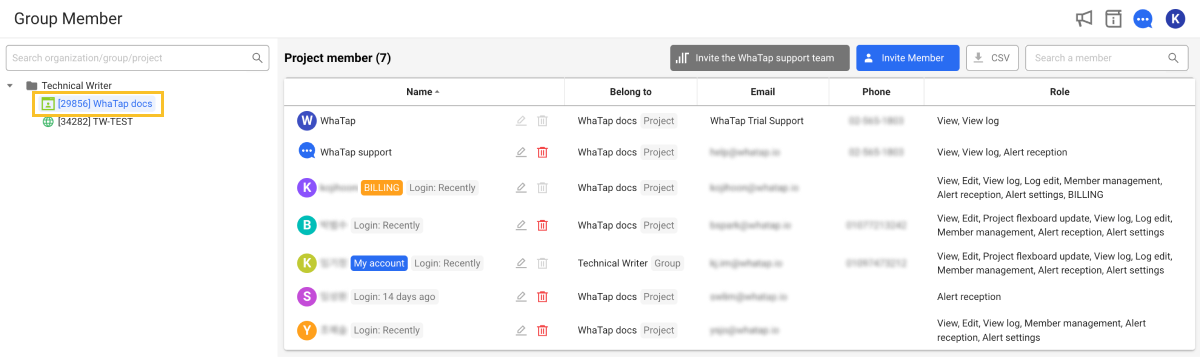
Checking members for each project
-
By selecting All Projects in the side menu, open the group and project list panel.
-
In the panel, select the
button on the right of the group to check members from. -
In the side menu, select Group Member.
-
If you select a project in the group, you can check the members in the project.
Modifying a group member role
-
By selecting All Projects in the side menu, open the group and project list panel.
-
In the panel, select the
button on the right of the group that includes the member whose role to be modified. -
In the side menu, select Group Member.
-
In the Group Member list, select
 on the right of the member to modify.
 -
If the Edit member role window appears, set the values for Member role and User role per project of a group.
- Member role: You can set the roles for the group and the projects in the group.
- User role per project of a group: Permissions of the selected members can be set for each project in the group.
-
After all settings are finished, select Apply.
Member role editing can be used only by the users with the Member management role. For more information about the member roles, see the following.
Deleting group members
-
By selecting All Projects in the side menu, open the group and project list panel.
-
In the panel, select the
button on the right of the group that include the member to delete. -
In the side menu, select Group Member.
-
In the Group Member list, select
on the right of the member to delete. -
If the message window appears, select Delete.
-
To delete members from subgroups, click any checkbox in the message window and then select Delete.
-
If you have not the Member management role, you cannot delete other members. For more information about member roles, see the following.
Downloading the member list
To download the member list as a CSV format file, keep the following steps:
-
By selecting All Projects in the side menu, open the group and project list panel.
-
In the panel, select the
button on the right of the group that include the member to delete. -
In the side menu, select Group Member.
-
Select
 on the upper right of the screen.
Save the member list to the local disk in a CSV format file.
Member role downloading can be used only by the users with the Member management role. For more information about the member roles, see the following.