Project Management
Learn more about the project from the following video clip: It is easy and quick to understand the project.
What is the project?
In the WhaTap monitoring service, the project means a monitoring unit. In addition to the monitoring unit being divided by project, the tenant role can also be managed.
First, projects are classified by monitoring elements as shown in the figure. The project follows the rules for each monitoring agent, such as application, server, and container.
Second, projects are classified by monitoring units. Even in Java applications, projects can be classified by the purposes, such as Front, Gateway, and API. Of course, you can also register applications without distinction of purpose within a project.
For more information about the project hierarchical structure, see the following.
Creating a project
Create a project before installing the agent.
-
Log in WhaTap monitoring service.
-
To create a project, on the left of the screen, select All Projects > + Project.
-
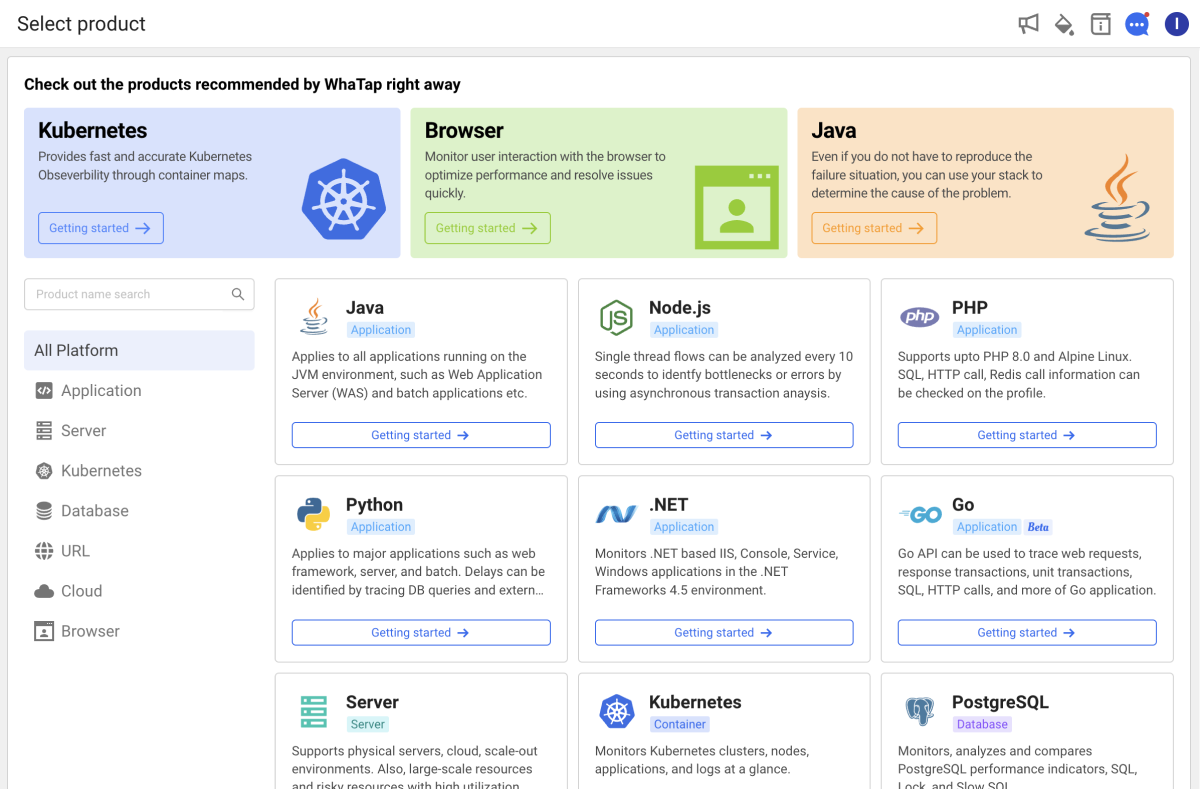
Select a product in Select product for installation.
-
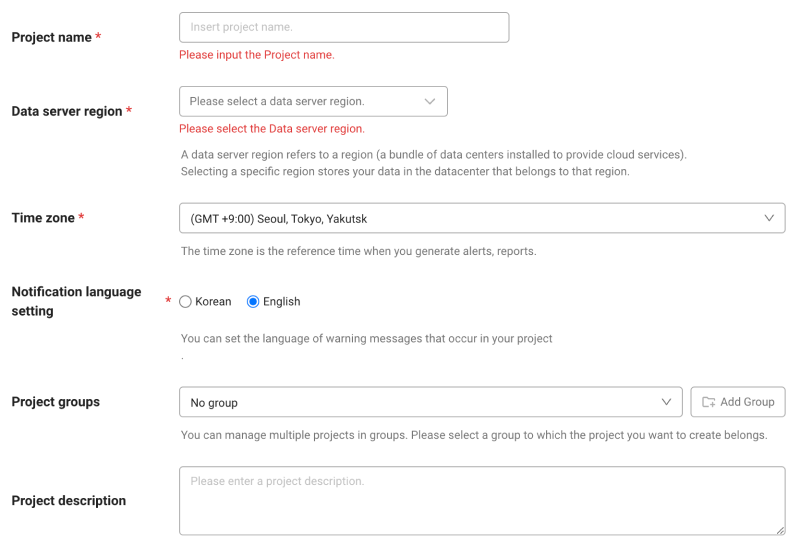
Configure the settings for Project name, Data server region, and Time zone.
-
In Notification language setting, select the language for alert messages.
-
After all settings are finished, select Creating a project.
-
A Data server region refers to a region (a bundle of data centers installed to provide cloud services). Selecting a specific region stores your data in the datacenter that belongs to that region.
-
Time zone is the reference time for generating alerts and reports.
-
To group multiple projects for management, select a group from Project groups or add a group. For more information about grouping, see the following.
-
To add a project with an organization selected, Groups of organization must be set.
Project management
Home > Select Project > Management > Project Management
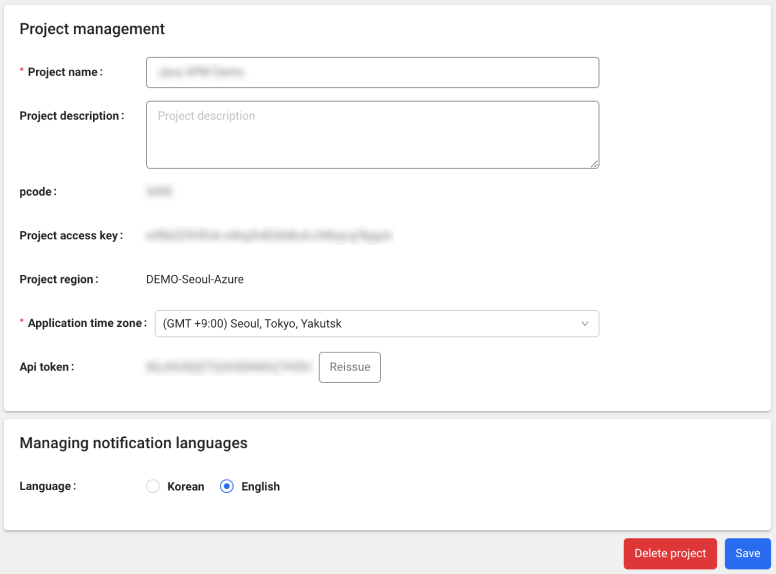
It is possible to check and manage the project overview, and provide the following functions. You need the role to modify the project.
-
Project name: You can modify the project name.
-
Project description: You can enter the description of the project.
-
pcode: Numeric code to identify the project
-
Application time zone: You can change the time zone.
-
Api token: You can reissue the API token by selecting Reissue.
-
Managing notification languages: You can change the language for alert messages that occur in the project.
After modification, select Save.
Delete project
You can delete a project in two different ways:
-
In the All Projects list under Home, on the upper right of the project to delete, select
 . In the drop-down menu, select Delete project.
 -
Go to Home > Select Project > Management > Project Management. Select Delete project on the lower right of the screen.
The user list and the collected data are all deleted. Deleted data cannot be restored.
Checking the project members
Home > Select Project > Management > Project Member
You can check the list of members belonging to the selected project.
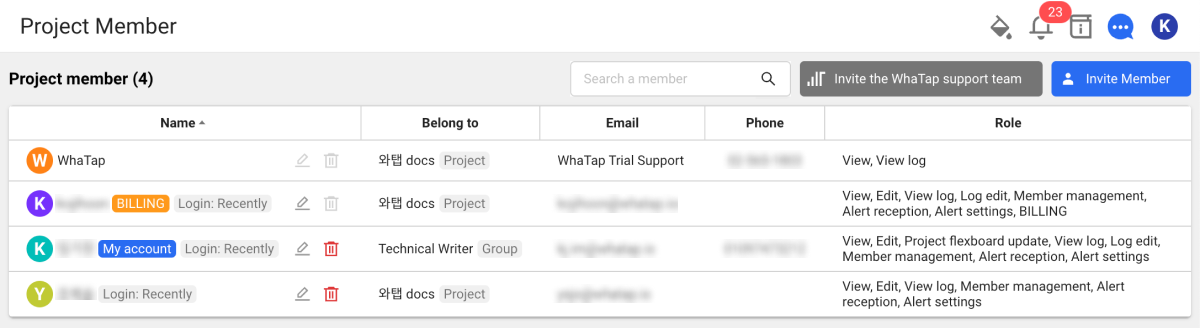
-
The
Login: ...tag on the right of the member name is the record of recent access. -
On the right of the name of the member with the billing role, the
BILLINGtag appears. -
On the right of the user account name, the
My accounttag appears. -
If you invite an account that has not signed up for the WhaTap monitoring service, the name appears as Waiting for an invitation. until the invitee signs up. To resend the invitation email, select Reinvite.
Inviting project members
-
Select a project to invite members to in Home screen.
-
In the side menu, select Management > Project Member.
-
Select Invite Member on the upper right of the screen.
-
In User role, set the roles of the user to invite and then select Apply.
-
Enter the email address of the user to visit in the Email field, and then select Add. You can add extra users continuously.
-
After adding users to invite, select Complete.
-
The member visiting feature can be used only by the users with the Member management role. For more information about the member roles, see the following. For more information about the member roles, see the following.
-
The accounts that have not signed up for the WhaTap monitoring service display the
New accounttag and send emails for sign up. -
If there are invited members to cancel before completion, in List of members to invite, select
 .
. -
You cannot invite any by entering email addresses that are not in the desired email format.
-
The members who have already been invited cannot be invited again, and the members in the parent organization or group are automatically added.
WhaTap Support
If you need any support for failures while using the WhaTap monitoring service, you can invite the WhaTap support team as a member to receive supports.
-
From the Project Member menu, select Invite the WhaTap support team on the upper right.
-
If the member invitation window appears, select a project in Project.
-
Select Complete.
-
You can add extra users continuously. Depending on the project type, there may be one or more support team accounts.
-
The Invite the WhaTap support team feature can be used only by the users with the Member management role. For more information about the member roles, see the following.
Modifying the project member role
-
Select a project in the Home screen.
-
In the side menu, select Management > Project Member.
-
In the Project member list, select
 on the right of the member to modify.
 -
If the Edit member role window appears, set the Edit member role. You can set the roles allowed by the project.
-
After all settings are finished, select Apply.
The member role modification feature can be used only by the users with the Member management role. For more information about the member roles, see the following.
Deleting project members
-
Select a project in the Home screen.
-
In the side menu, select Management > Project Member.
-
In the Project member list, select
on the right of the member to delete. -
If the message window appears, select Delete.
-
You cannot delete other members if you do not have the Member management role. For more information about the member roles, see the following.
-
You cannot delete other members if there is a single project member.
-
The members inherited from the parent group cannot be deleted.
-
A user's own account can be removed from a project regardless of roles.
-
The members with the billing roles cannot be deleted until the billing roles are transferred.
Downloading the member list
To download the member list as a CSV format file, keep the following steps:
-
Select a project in the Home screen.
-
In the side menu, select Management > Project Member.
-
Select
 on the upper right of the screen.
Save the member list to the local disk in a CSV format file.
The member list downloading feature can be used only by the users with the Member management role. For more information about the member roles, see the following.