Maintenance Plan
This document is for project administrators who want to announce maintenance work and block unnecessary alerts while it runs.
Register a maintenance plan to pause alerts for a set period. You can also manage recurring maintenance plans with repeat settings.
Selecting the maintenance plan menu opens the New screen. To switch to the Default screen, click the View Previous Version button. NPM provides only the New screen, so this button is not displayed. For the differences, see Default and New.
Permission
To add, modify, or delete a maintenance plan, you need the Edit permission or the Alert settings permission for the project. For more information about member permissions, see Project member.
How a maintenance plan works
During the maintenance period, a maintenance plan pauses alert delivery. Data collection continues. The Default maintenance plan for Server projects is the exception. See Default and New.
| Target | Behavior |
|---|---|
| Alert delivery | Paused. No alerts are sent during the maintenance period |
| Data collection | Continues. Agent operation is not affected |
Difference from similar features
Several features stop alerts. Each one stops something different.
| Feature | What it stops |
|---|---|
| Maintenance plan | Alert delivery |
| Maintenance plan (Server, Default) | Event creation itself. No record and no status color |
| Pause event creation | Event creation itself. No events accumulate |
| Work log registration | Repeat alerts (escalation). The first alert has already been sent |
Use a maintenance plan for scheduled work such as maintenance. Use Pause event creation when you do not want the events recorded at all.
Default and New
The Default maintenance plan behaves differently for Server and non-Server products. The following table compares the New maintenance plan with the Default maintenance plan for each product type.
| Item | New maintenance plan | Default (non-Server) | Default (Server) |
|---|---|---|---|
| Target selection | Available | Not available. Whole project | Available. Select agents |
| Repeat | 5 options | 5 options | Once only |
| What it stops | Alert delivery | Alert delivery | Event creation itself |
Only the Default maintenance plan for Server products creates no events at all. During that period no event is recorded and the server status color does not change. In the other two cases, only alert delivery stops.
To maintain specific servers only, select those agents in the New maintenance plan. You still receive alerts for the other agents.
The target selection area does not appear for some products, even in the New maintenance plan.
| Product | Target selection |
|---|---|
| APM, Server, DB, Log, NPM | Agent selector. Turn on Select all automatically to include agents added later |
| URL (URL Pro) | URL task selector |
| URL (standard), Kubernetes | No selection area. Whole project |
Data is not shared between the two screens. You can view and modify a plan only on the screen where you registered it. A plan created on one screen does not appear in the other list. If you registered a maintenance plan but cannot find it, check whether you registered it on the other screen.
The maintenance plan banner at the top of the screen and the dashboard widget both show plans from both screens. A plan can therefore appear in the banner but not in the list.
Registering a maintenance plan
The scope you can set differs by screen, so check Default and New first.
Default maintenance plan
On the New maintenance plan screen, click the View Previous Version button to move to the Default maintenance plan screen. To return to the New screen, click the View New Version button.

-
Click the + Add Plan button at the top right.
-
When the Add maintenance history window opens, enter Creator and Description in order.

-
Select a repeat interval in Repeat.
- Once: The maintenance plan runs once for the set period. Select this when you do not need a repeat setting.
- Daily: Repeats every day.
- Weekly: Repeats on the selected day of each week.
- Monthly: Repeats on the selected day of each month.
- Yearly: Repeats on the selected month and day each year.
-
Set the start time and the end time.
-
When you finish, click the OK button.
You can find the item you added in the maintenance plan list.
After you register a maintenance plan, a banner appears at the top of the screen while you use project menus if a plan is in progress or starts within an hour.

-
A plan in progress has an orange background, and a plan starting within an hour has a gray background.


-
Select the banner to open the Maintenance plan list on the right. It shows plans in progress or starting within an hour.
-
Select one of the plans to open the Maintenance plan details window. You cannot modify the plan in that window.
Server projects cannot use the Repeat option on the Default maintenance plan screen.
Disabling alerts with a maintenance plan
You can temporarily disable alerts while a maintenance plan runs. It blocks unnecessary alerts during scheduled work such as maintenance so that administrators can focus. Alerts stop during the maintenance period.
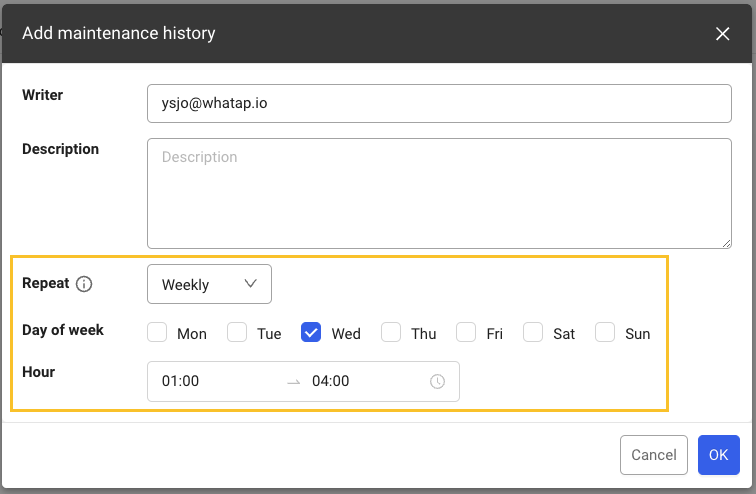
To turn off alerts only in a specific time range, set the repeat and time options when you add a maintenance plan. For example, to avoid alerts from 1 a.m. to 4 a.m. every Wednesday, set Repeat, Day, and Time to that range. See the example image.
New maintenance plan

Selecting the maintenance plan menu opens this screen. To move to the Default maintenance plan screen, click the View Previous Version button.
-
Click the + Add Plan button at the top right.
-
When the Add maintenance history window opens, enter Creator and Description in order.

-
Select the Target agent.
-
Auto-select all agents enabled
- Agents added after you set the maintenance plan are included automatically.
-
Auto-select all agents disabled
-
All agents installed in the project appear with their name and IP, whether active or inactive.
-
The agents you select in the Target agent list become the targets.
-
You can select up to 300 agents.
-
-
-
Select a repeat interval in Repeat.
- Once: The maintenance plan runs once for the set period. Select this when you do not need a repeat setting.
- Daily: Repeats every day.
- Weekly: Repeats on the selected day of each week.
- Monthly: Repeats on the selected day of each month.
- Yearly: Repeats on the selected month and day each year.
-
Set the start time and the end time in Date and time.
-
For a one-time plan, select 30 minutes, 1 hour, 2 hours, or 6 hours in the quick time options.
-
For a recurring plan (Daily, Weekly, Monthly, Yearly), the end time must be later than the start time. You cannot save a plan whose start time is later than its end time.
-
To run the plan until midnight of the same day, select 00:00 as the end time. For example, setting it from
18:00to00:00stops alerts from 6 p.m. until midnight that day. -
A period that crosses midnight cannot be one plan. To stop alerts from 6 p.m. to 9 a.m. the next day, register two plans, one from
18:00to00:00and another from00:00to09:00.
-
-
When you finish, click the OK button.
You can find the item you added in the maintenance plan list.
After you register a maintenance plan, a banner appears at the top of the screen while you use project menus if a plan is in progress or starts within an hour.

-
A plan in progress has an orange background, and a plan starting within an hour has a gray background.
-
Select the banner to open the Maintenance plan list on the right. It shows plans in progress or starting within an hour.
-
Select one of the plans to open the Maintenance plan details window. You cannot modify the plan in that window.
-
Kubernetes projects and URL projects cannot use the Target agent selection.
-
For Kubernetes projects and URL projects, agents installed after you set the maintenance plan are included automatically.
Disabling alerts with a maintenance plan
You can temporarily disable alerts while a maintenance plan runs. It blocks unnecessary alerts during scheduled work such as maintenance so that administrators can focus. Alerts stop during the maintenance period.
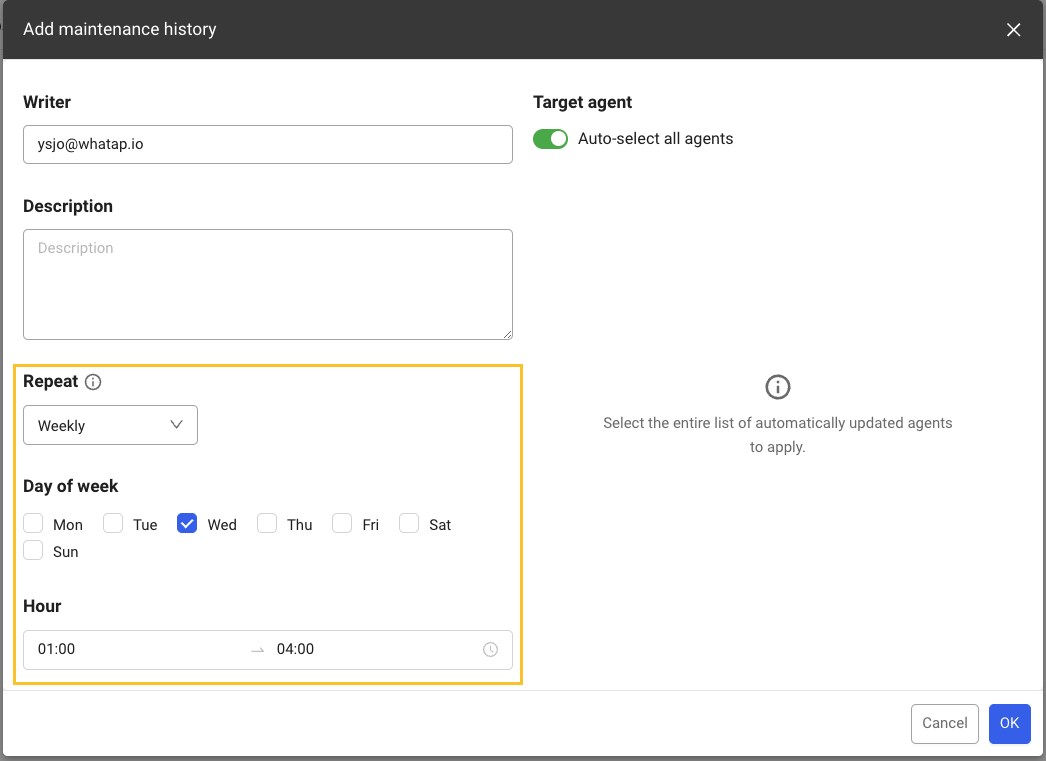
To turn off alerts only in a specific time range, set the repeat and time options when you add a maintenance plan. For example, to avoid alerts from 1 a.m. to 4 a.m. every Wednesday, set Repeat, Day, and Time to that range. See the example image.
Managing maintenance plans
The following tasks are the same in the Default and the New maintenance plan.
Modifying a maintenance plan
-
Click the
 button on the right of the item you want to modify in the Maintenance plan list.
-
When the Modify window opens, change the items you need.
-
When you finish, click the OK button.
Disabling a maintenance plan
Click the toggle button on the far right of an enabled item in the Maintenance plan list. That plan no longer runs.
Deleting a maintenance plan
-
Select the checkbox on the far left of the item you want to delete in the Maintenance plan list. You can select several items.
-
Click the Delete button at the top right. The selected plans are deleted.
-
To select every maintenance plan, select the checkbox at the far left of the list header.
-
No separate confirmation message appears. Check carefully before you delete.
Adding the maintenance plan widget to a dashboard
Flex Board provides a Maintenance plan widget as a widget template.

-
Go to Home > select a project > Dashboard > Flex Board, then select the dashboard to add the widget to in Dashboard list.
-
Select Edit Mode.
-
Select Maintenance plan in the Widget templates list.
-
Place the Maintenance plan widget where you want it.
-
Select an item in the Maintenance plan widget to open a window with the details. You cannot modify the plan in that window.
-
Click
 >
 at the top right of the Maintenance plan widget to move to the Management > Maintenance plan menu of that project.