Account Management
Membership registration
To use the WhaTap monitoring service, proceed with membership registration.
- Try WhaTap Monitoring for free for 15 days. For more information about the billing, see the following.
- The free trial starts from the date when the project access key has been granted after sign up for membership and creating a project.
- To continue using the service after the trial period ends, register your payment information and convert to a subscribed project.
- Go to the WhaTap website (http://www.whatap.io/).
- On the upper right area, select Get Started for free.
- Enter your name, email address, password, and company name in order.
- Select Sign up.
To receive alerts via SMS, log in the service and then select the profile icon > Manage Accounts on the upper right of the screen. Go to the User phone section and then enter your phone number.
Setting the password
Password must contain at least 9 digits long with a combination of upper case letters (A-Z) or lowercase letters(a-z), numbers(0-9), and special characters.
Changing the password
-
Log in the WhaTap monitoring service (https://service.whatap.io).
-
Select the profile icon on the upper right of the screen.
-
If a pop-up menu appears, select Manage Accounts.
-
In User password, enter a value for Current password and then enter values for New password and Confirm new password.
-
If Update Password is activated, select the button.
In case you forgot your password
-
On the login page of the WhaTap monitoring service (https://service.whatap.io/account/login), select Forgot password?.
-
Enter the registered email account and CAPTCHA code. A temporary password is sent to your email address.
-
Log in with your temporary password and proceed with the password update process.
If you cannot access the email account, contact WhaTap Labs Online Support (mailto:support@whatap.io).
Setting the alert reception
You can set the alert reception media such as email, SMS, and mobile device.
Adding to the SMS alert reception
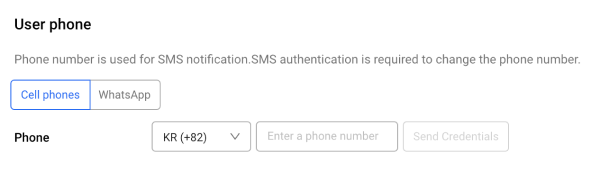
If SMS notification is required to be received, set the user phone number in Manage Accounts.
-
Select the profile icon on the upper right of the screen.
-
If a pop-up menu appears, select Manage Accounts.
-
In the User phone section, select Cell phones.
-
Enter the phone number to receive authentication numbers in Phone.
-
Select Send Credentials.
-
Enter a 6-digit authentication number on your mobile phone.
-
Select Verify.
-
For more information about changing the registered phone number, see the following.
-
Only Korean mobile phone numbers can be registered because they can receive SMS notifications.
Adding to receive WhatsApp notifications
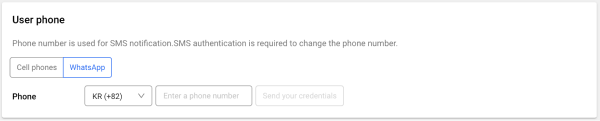
The notifications can be received through WhatsApp.
-
Select the profile icon on the upper right of the screen.
-
If a pop-up menu appears, select Manage Accounts.
-
In the User phone section, select WhatsApp.
-
Enter the phone number to receive authentication numbers in Phone.
-
Select Send Credentials.
-
Enter the 6-digit verification code sent through your WhatsApp application.
-
Select Verify.
For more information about changing the registered phone number, see the following.
Adding the alert reception on the mobile device
When you install the WhaTap mobile app on your mobile device, the alert settings for your mobile device are automatically added.
-
Test: You can check whether alerts are sent to your mobile device successfully. Connection may fail due to reasons such as app restoration and reinstallation on the mobile device. The failed mobile devices are automatically excluded from the targets.
-
 : You can delete the alerts for the registered mobile device.
For more information about the WhaTap mobile app, see the following.
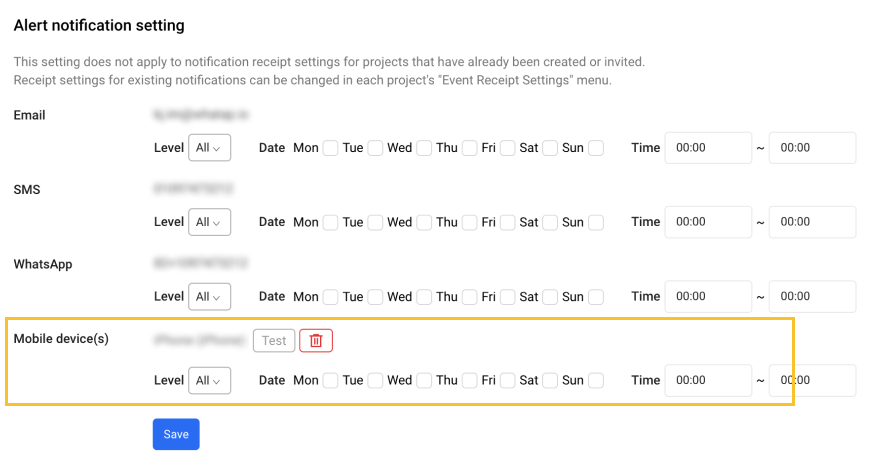
Setting the reception level and alerting time

To set the alerting time via email and SMS, select a desired level in Level of the Alert notification setting section.
-
All: All alerts can be received.
-
Fatal: Only fatal alerts can be received.
In Date and Time, you can set the date and time to receive alerts. After all settings are made, select Save.
These setting are not applied to alert reception by created or invited projects. The reception settings for previous alerts can be changed in Notification setting for each project.
Changing the user phone number
If you have changed your mobile number or WhatsApp number, you can change the registered phone number by the following steps:
-
Select the profile icon on the upper right of the screen.
-
If a pop-up menu appears, select Manage Accounts.
-
In the User phone section, select Cell phones or WhatsApp.
-
Select
 Change.
 -
When the confirmation message appears, select Change.
-
Enter a new phone number in the Phone field.
-
Select Send Credentials.
-
Enter the verification code sent to your phone or WhatsApp.
-
Select Verify.
Only Korean mobile phone numbers can be registered because they can receive SMS notifications.
Removing the user phone number
To delete a phone number registered to your user account, keep the following steps:
-
Select the profile icon on the upper right of the screen.
-
If a pop-up menu appears, select Manage Accounts.
-
In the User phone section, select Cell phones or WhatsApp.
-
Select
 Delete.
 -
When the confirmation message appears, select Delete.
-
If your phone number is deleted, you can no longer receive SMS or WhatsApp notifications.
-
Add your phone number to receive SMS or WhatsApp notifications on your mobile phone. For more information on how to add a phone number, see the following.
Checking the API token
The API token is a parameter required to extract monitoring data being collected through the open API. To reissue the token, select Reissue token.
For more information about the open API, see the following.
Setting up reception of marketing messages
You can opt out of receiving marketing messages from WhaTap. Go to the Marketing option section and then select Agree or Disagree. Select Save to apply the selected option.
Withdrawal
Membership withdrawal must be done manually while logged in to the WhaTap monitoring service.
-
Log in the WhaTap monitoring service (https://service.whatap.io).
-
Select the profile icon on the upper right of the screen.
-
If a pop-up menu appears, select Manage Accounts.
-
Scroll down to the bottom of the screen.
-
Select a Reason for withdrawal in the Withdrawal section.
-
Select the (Required) I agree to the deletion of personal information. (Your account information will be deleted from the WhaTap.) checkbox.
-
Select Withdrawal.
-
If the confirmation message of withdrawal appears, enter "membership withdrawal" in the input field.
-
Select OK.
For smooth withdrawal, check the following and then try again.
-
After withdrawal, all data such as project or promotion coupon are to be deleted and are not restored. It cannot be restored even after re-registration.
-
If there is any paid project, you can withdraw from the service only if there is no payment issue. You can check your unpaid amount in My usage > Billing History or My usage > Invoice Preview History.
-
If you have the billing role for the project, you can delegate the billing role to another member or delete the project for withdrawal. You can transfer the billing role to other members who have registered the billing information. For more information about the billing role transfer, see the following.
-
If only you have the Member Management role in the project, delegate the Member Management role to another member for withdrawal. For more information about role modification, see the following.
-
Be sure to decide carefully because the data of the deleted account cannot be reused or restored.