Using Flex board
You can build dashboards using various widget templates, including metrics widgets.
For details on the features and usage of each template, see the Widget template document.
Apply a preset template
Use a preset template to speed up the initial setup, then modify it as needed.
-
Select the Flex Board menu.
-
From the Template list on the left, select the template you want.
-
When the Flex board management window appears, enter a name in Rename.
- In Layout, select a widget and drag it to the position you want.
-
Click the Save button. A Flex board is created based on the selected template.
- You can check the created board in the board list of Flex Board.
Create a Flex board
You can create a Flex board and place widgets to build your own dashboard.
-
In Flex Board, click the Create Dashboard button at the top right.
-
When the Create Dashboard window appears, enter the dashboard Name in the input box.
-
Select a widget placement method, then click the Create Dashboard button.
-
Fixed layout flexboard: free widget placement with pixel basis
-
Responsive flexboard: responsive grid layout based on browser size
(configure the grid, then click the Create Dashboard button)
-
-
In the Widget templates selection screen, choose the widgets to place on the dashboard.
- To add metrics widgets, click the All Metrics button on the right of Widget templates.
Note- Widget templates: choose from a predefined widget list that summarizes key indicators commonly used in monitoring.
- All metrics: create widgets based on all metrics data collected in your project. For details about metrics widgets, see the following document.
-
Move the placed widgets or adjust their size.
-
When a crosshair cursor appears at the top of a widget, click and drag the widget to move it.
-
When an arrow cursor appears at the bottom right of a widget, click and drag to resize it.
-
-
After you finish placing widgets, select View mode to review the layout. To edit the layout again, select Edit Mode and adjust widget placement.
-
When all steps are complete, click the
 (Go to list) icon at the top right.
- You can check the created board in Flex Board under Dashboard list. Select the created board to view the new Flex board.
We plan to add dashboard templates or widgets based on customer feedback. If you need a specific dashboard template or widget, contact us at support@whatap.io.
Edit a Flex board
Flex board edit permissions
-
Home > Integrated Flex Board: this is a personal account dashboard, so permissions do not apply; however, dashboards shared as read only cannot be edited.
-
Home > Select project > Dashboard > Flex Board: users with project edit permission, project Flex board edit permission, or Site Admin permission can edit.
For details on member permissions, see the following document.
-
In Flex Board under Dashboard list, click the edit icon
 . The Flex board management window appears on the right.
 -
In the Flex board management window, configure Name, Project, Layout, widget.json, and option.json.
-
Rename: edit the dashboard name.
-
Project: select the project from which widgets will fetch data.
CautionYou can configure the Project option only in Home > Integrated Flex Board.
If you entered from Integrated Flex Board, you can select the data source project for each widget.-
Click the
 button at the top right of a widget, then search and select one or multiple projects.
 -
After selecting projects, click the Apply button.
-
-
Layout
-
Drag widgets to move them.
-
Click and drag the bottom right of a widget to resize it.
-
To delete a widget, click the
 icon at the top right of the widget.
-
-
Widget.json: import dashboard widget settings in JSON format. Click the
 icon to copy the JSON.
 -
Option.json: import dashboard option settings in JSON format. Click the
icon to copy the JSON.
-
Delete a Flex board
-
In Flex Board > Dashboard list, click the
icon for the item to delete. -
In the confirmation message, click the Delete button.
Dashboard deletion behavior differs for owners and shared users.
-
If the dashboard owner deletes a dashboard, it is deleted for all user accounts with whom it was shared.
-
If a user who received a shared dashboard deletes it, it is deleted only from that user’s Dashboard list. The original dashboard remains.
Share a Flex board
The Flex board sharing feature is available only in Home > Integrated Flex Board.
It is not provided in a project’s Flex board menu.
Difference between share and copy
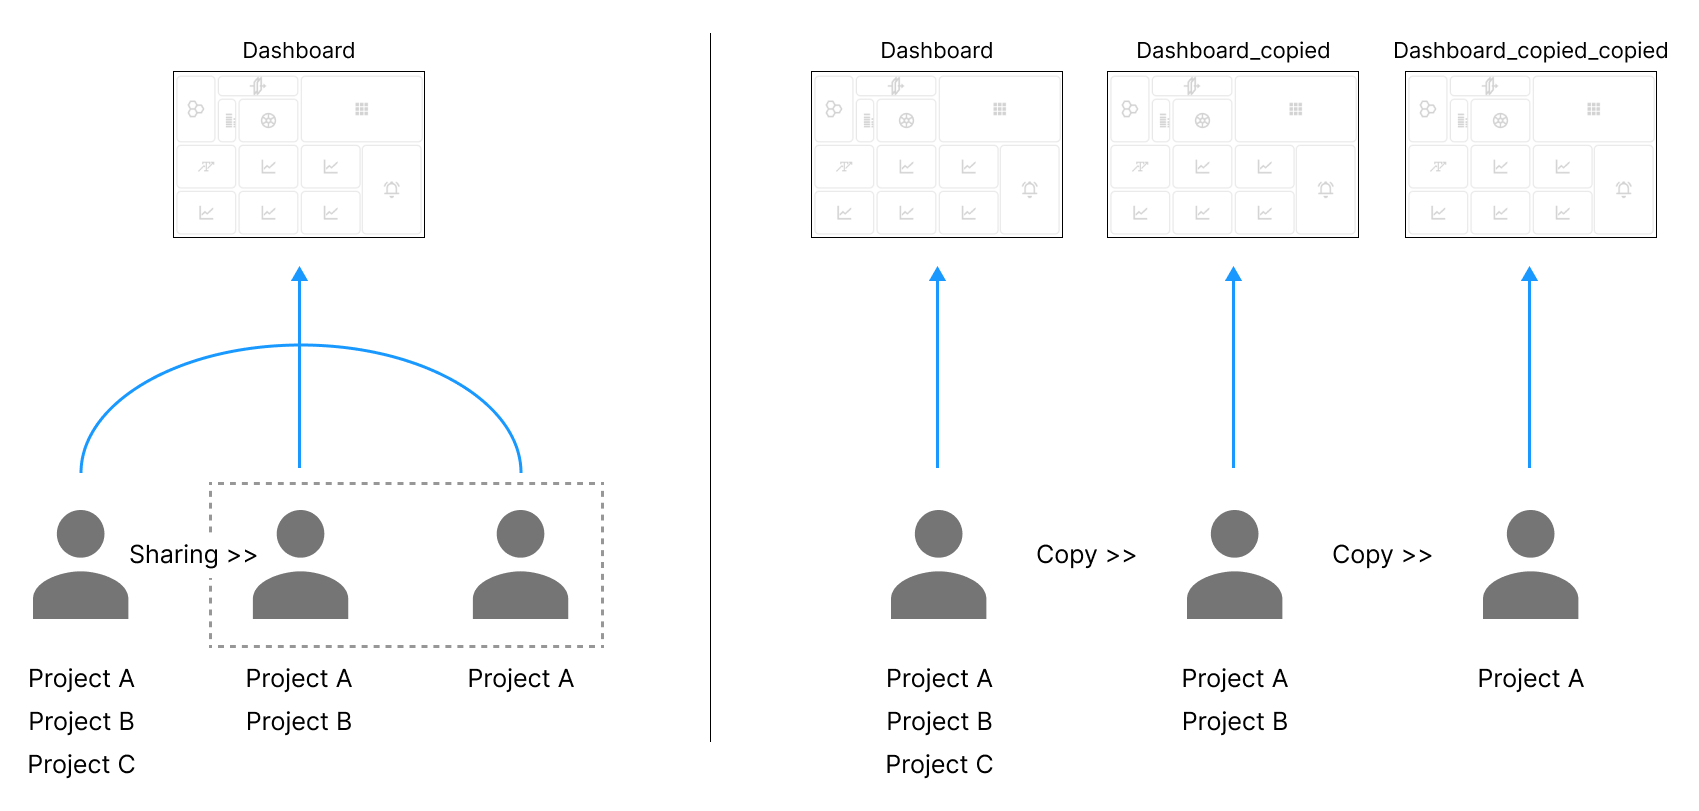
-
Share: all members you share with view the same dashboard.
-
Copy: if you copy a dashboard to another member or to yourself, you view a separate copied dashboard.
-
Dashboards shared or copied as Read only cannot be edited. They can be edited only if shared as Edit mode.
-
Members who receive a dashboard as Read only can also re-share as read only or copy that dashboard.
-
You can share a dashboard only with members who belong to at least one of the projects included in the dashboard. Check whether the member to share or copy to belongs to the relevant project.

You can share a Flex board created in Integrated Flex Board with other members. When the owner edits a shared dashboard, the changes apply to all members it was shared with.
-
In Integrated Flex Board under Dashboard list, click the
 icon for the dashboard to share.
 -
When the Sharing a dashboard window appears, select one or multiple members to share with, or enter accounts directly.
-
If you select Read only, members cannot edit the shared dashboard.
-
Share targets must belong to at least one of the projects included in the dashboard.
-
-
Click the Share button.
-
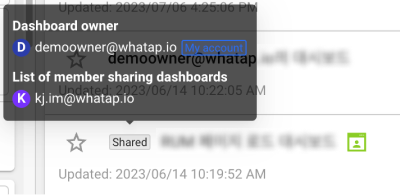
Shared items display the Shared tag. Hover over the Shared tag to view information about the members you shared with.
-
Items shared as read only display the Read only tag.
When you receive a shared dashboard When you share a dashboard (dashboard owner) 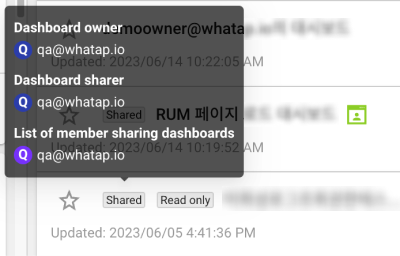
 Tip
TipDashboard sharing conditions
-
The dashboard sharing feature is available only in Home > Integrated Flex Board.
-
Anyone can share their own dashboard, and you can re-share or copy a dashboard you received.
-
Dashboards received as Read only cannot be edited; dashboards received as Edit mode can be edited.
-
If the owner deletes a dashboard, it is deleted for all accounts that received it.
-
If a recipient deletes a dashboard, it is removed only from that user’s Dashboard list and the original remains.
-
For projects in a received dashboard where you do not have View permission, you cannot view data.
-
Copy a Flex board
Users can copy a Flex board and send it to other members.
-
In Integrated Flex Board under Dashboard list, click the
 icon.
icon. -
Choose a copy option.
-
Copy to me: copy to your own account.
a. An item with the
_copiedsuffix is added to Dashboard list. -
Copy to others: copy to another member’s account.
a. Click
 Account.
b. Select the email of the member to copy to and click the Copy dashboard button.
c. An item with the_copiedsuffix is added to that member’s Dashboard list.
-
Share as a JSON file
You can export Flex board settings to a JSON file to share with other members, or import settings from other members.
Export
-
Go to Integrated Flex Board or a project’s Flex board menu.
-
In Dashboard list, click the
 button.
 -
Choose an export option.
-
Include Project Information: include dashboard project information in the JSON file when sharing.
-
Except Project Information: share without including dashboard project information in the JSON file.
-
-
Download the JSON file and send it to the member you want to share with.
Import
-
Go to Integrated Flex Board or a project’s Flex board menu.
-
Click the
 Import button at the top right.
 -
Select the downloaded JSON file.
Only members with Edit permission for the project can use this feature.
Flex board screen modes
Features vary by Flex board screen mode.
Accessible member permissions
Only users with Edit permission in a project’s Flex Board menu can access Edit Mode, Admin, and Filter. For details on member permissions, see the following document.
-
Project Edit permission
-
Project flexboard update permission
-
Site Admin permission
Modes
Available features differ by Flex Board screen mode.
-
Edit Mode: place widgets from the widget template list on the Flex board layout; edit, delete, or reposition widgets.
-
Admin: manage widget properties in JSON format. Click the
 button at the top right of a widget on the layout.
 -
View mode: after finishing layout, sizing, and detailed options, monitor each widget’s data in real time like a dashboard.
Common features
- Data filtering
- Real time data time range settings
- Print mode
- Flex board management
- Data merge options
Data filtering
Use data filtering to narrow monitoring targets and build an efficient Flex board.
-
At the top of the screen, click the
 Filter tab.
 -
In the Filter window on the right, select filter targets. To select all filter targets, choose Select all.
-
Agent option: select agent types or an application list, with Search available
-
Metrics option: select a project or agent type; add + And conditions, or auto select by string with Contain or Exclude
-
-
After selecting filter targets, click the Apply button.
-
Save frequently used conditions with the Save filter button.
a. Enter a filter name and select Save. Saved filters appears at the bottom of the Filter window.
Filtering conditions
Filtering conditions are divided into agent type and metrics type.
Agents provide only basic monitoring targets as selectable options, while metrics provide selectable tags for all metrics data collected in the project. The metrics type is useful when you collect data in a non agent form and want to apply filtering. For details on metrics, see the following document.
| Type | Agent | Metrics |
|---|---|---|
| Selection options | WhaTap project monitoring targets (applications, servers, databases, containers, Kubernetes PODs and NODEs) | All metrics tags including agents |
| Scope | All widgets | All widgets that use metrics data |
| Filtering method | Checkboxes | Equal, Contain, Exclude |
Set the lookup time
Use the time selector at the top right of Flex Board to set data lookup time for widgets.
 : stop real time mode and set a specific lookup time
 : switch back to real time mode
Print
You can save the Flex board screen as a PDF and print it.
-
On the Flex board screen, click the
 icon at the top right to switch to print mode.
 -
Configure options.
- Viewing filter options: toggle filter options on the screen
- Convert to {mode} orientation / Convert to {mode} orientation: change orientation to horizontal or vertical
-
After finishing, select PDFDownload.
-
To exit print mode, click the
 Exit print mode at the top right.
Flex board management
You can change the Flex board layout; move, resize, or rename widgets; and use other management features.
You can also open Flex board management by clicking the icon in Dashboard > Flex Board under Dashboard list.
-
On the Flex board screen, click the
 icon at the top right to open the Flex board management window.
-
Rename: change the Flex board name
-
Layout: move, resize, and delete widgets
-
Don't Allow Other Users to Modify.: restrict modifications
- Members with edit permission can edit, delete, and modify; if you enable the option, it changes to Don't Allow Other Users to Modify.: On
-
Widget.json: edit and manage widgets on the Flex board in JSON
-
Option.json: edit and manage Flex board settings in JSON (project info, Flex board filters, time selection, and other settings)
CautionThe Widget.json and Option.json features are available only to dashboard administrators.
-
-
After completing all settings, click the Save button.
Add a dashboard to favorites
You can add a Flex board you created to favorites for quick access. In Dashboard > Flex Board under Dashboard list, click the  button for the dashboard to add. It changes to
  .
.