Payment account
This is an FAQ document regarding the billing accounts while using the WhaTap monitoring service.
Billing account management
I want to know the method how to manage the billing accounts for the WhaTap service.
See the following overview on how to manage the payment accounts including registering payment information for the WhaTap monitoring service, transferring the billing role, and project subscription.
To continue using the service during the free trial period or when the free usage threshold exceeds, enter the payment information and then subscribe the service for the project.
 Registering the payment information
Before registering the payment information, check the billing role. The billing role is granted to the created project by default.
-
Log in the WhaTap monitoring service (https://service.whatap.io).
-
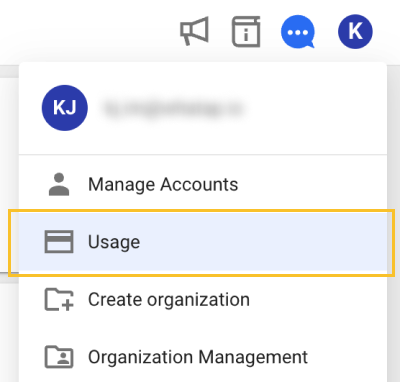
Select the profile icon on the upper right of Home screen.
-
If the dropdown menu appears, select My usage.
-
In Payment information, select Register your payment information.
-
Configure the detailed settings in order. * is required.
-
Select a desired payment method in Payment method.
-
When the Register your payment information window appears, enter the required information and then select Apply.
-
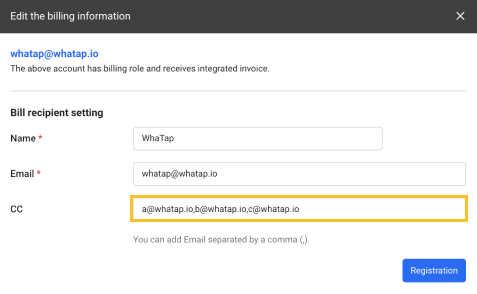
Enter the contact information to receive the invoice, and then select Save.
-
For more information about the payment information registration, see the following.
-
Supported payment currencies are KRW, JPY, and USD. Payment method is changed depending on the changed currency.
-
To receive invoices by multiple email addresses, enter multiple email addresses by using comma (,) as the delimiter in CC. e.g. a@whatap.io,b@whatap.io,c@whatap.io
 Transferring the billing role
Only 1 person can have the billing role. For example, when the billing role is transferred from the account A to the account B, the account A no longer has the billing role. Additionally, to transfer the billing role, only the account with the payment information can transfer the billing role.
Registering the payment information for the account to transfer the billing role to
-
In WhaTap monitoring service, log in with the account to transfer the billing role to.
-
Through the
step, register the payment information for the acctount.
Invite Member
-
In WhaTap monitoring service, log in with the account with the Billing and Edit roles.
-
In Home screen, select a project to transfer the billing role.
-
Go to Project member that is under Management.
-
Select Invite Member on the upper right of the screen.
-
Enter the email address of the account to transfer the billing role to in the email field, and then select Add.
-
Check whether the account has been registered in List of members to invite, and then select Complete.
Modifying the role
-
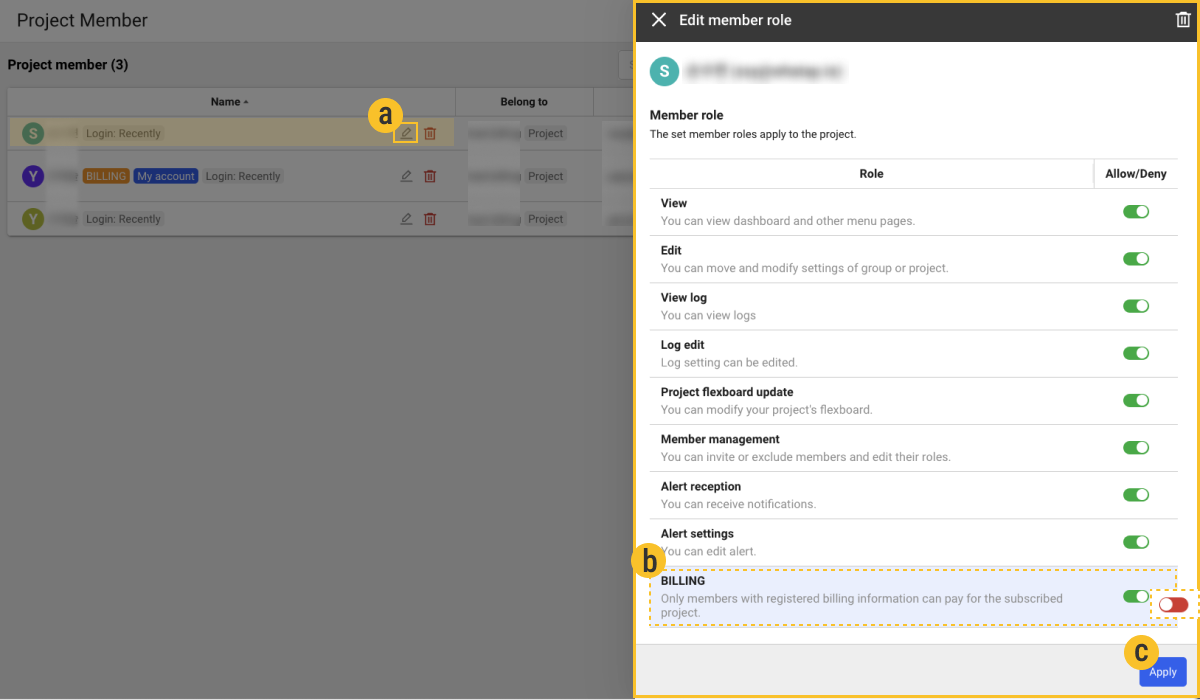
In the Project member list, select

 on the right of the account to transfer the billing role to.
 -
If the Edit member role window appears, among the roles, grant only
 BILLING.
 -
After configuration, select
 Apply.
-
In case of the member with the billing role, on the left of the name in the Project member list, the
Paymenttag appears. -
The Edit member role window appears differently depending on whether the project member role or the organization or group member role is modified. For more information about the member roles, see the following.
 Project subscription
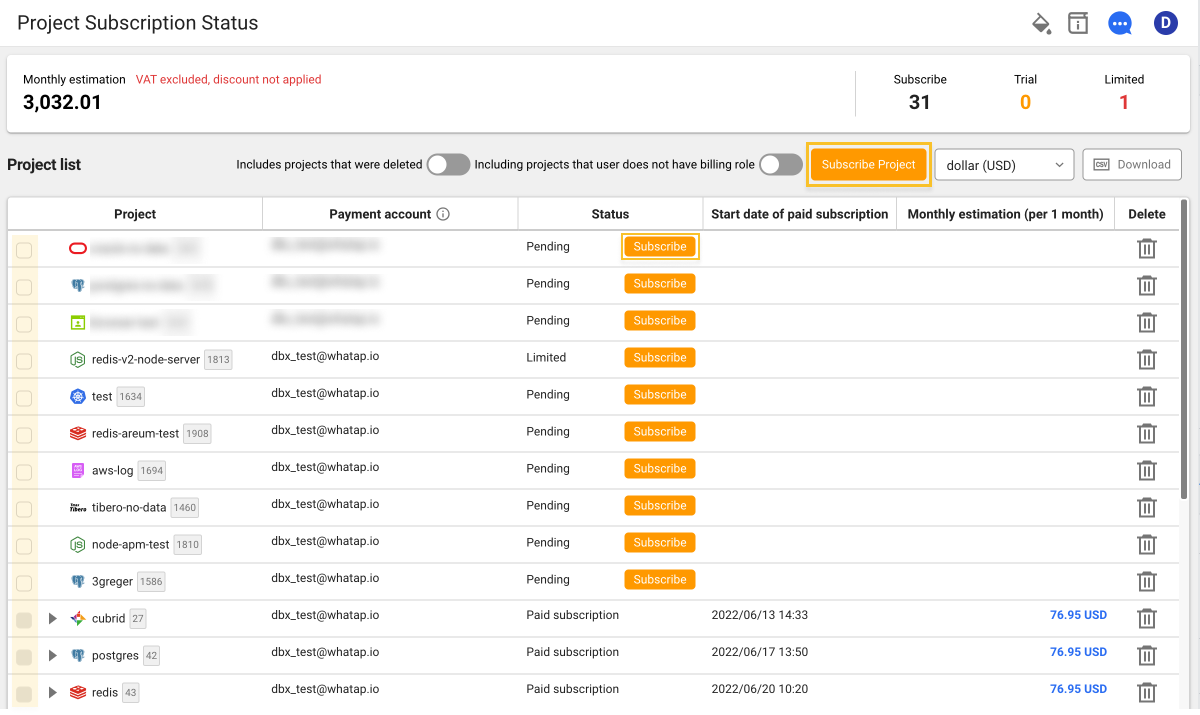
After registration of the payment information, the Project Subscription Status menu appears. You can see the entire Project list owned by the account as follows:
-
When converting all non-paid projects to paid ones at once, select Subscribe Project on the upper right of the screen.
-
When subscribing multiple projects, select each check box in Project list and then select Subscribe Project on the upper right of the screen.
-
In case of subscribing by project, select Subscribe in the Status column of Project list.
-
Select Subscribe for each project in Project list for individual subscription.
For more information about Project Subscription Status, see the following.