Dashboard Common Features
This guide covers features commonly available across dashboards. You can narrow data scope with lookup time and application filters, manipulate charts with widget options, and save and manage widget configurations with presets.
Query Time Setting
The dashboard basically provides the real-time monitoring feature but the past data can be viewed using the time selector at the top of the screen. In the time selector, select  and then set the following time. It updates the data in widgets placed on the dashboard based on the set time.
Agent Check
Checking the agent connection status
On the upper left of the screen, the right area of the time selector provides information that allows you to check the status of agents connected to the project. This allows you to immediately check whether the target application server is running.
-
Total: Number of all agents connected to the project
-
Active: Number of active agents
-
Inactive: Number of inactive agents
-
 : Can display or hide inactive agents.
Agent-based monitoring
To select all agents again while one or more agents is selected, deselect them or click Total.
Searching the agent
If the agents connected to the project are numerous and difficult to find, use the agent search function. If you click  Search on the upper right of the screen, a box appears where you can enter a string.
The agents that match the entered string appear in the list. To filter the data in the dashboard based on the searched agents, click Select on the right of the text entry box.
To reset the selected agent entries, click Close on the right of the input field.
Widget Options
The icons displayed on the widget function as follows:
The provided options may differ depending on the widget.
Widget Edit
The widgets on the dashboard can be adjusted to the desired size and placed in the desired positions. You can also delete unnecessary widgets or add them again.
Resizing a widget
Click and hold the mouse on the  element at the lower right of the widget, and then drag it to the desired size. Grids with a uniform horizontal-to-vertical ratio appear and the size of the widget can be adjusted in each grid.
Moving a widget
When you move the mouse cursor to the top of the widget, the cursor shape changes to  . At this time, you can move the widget by dragging with your left mouse button and move to the desired position.
Deleting a widget
Right-click on a widget to delete. If you select Delete, the widget is deleted from the dashboard.
Adding a widget
Move the mouse cursor to an empty space on the dashboard and then right-click on it. Select a widget to add from the pop-up menu. Place the widget to the desired position and then resize it.
Preset Setting
Creating a new preset
-
Place the widgets in the desired format on the dashboard. You can also resize and place only the widgets to be frequently checked.
-
On the upper right of the screen, select
 .
. -
Enter a new preset name.
To save the selected agent data, select Include agent selection history.
-
Select Save.
You can see the newly saved preset from the preset list.
-
If any changes are made to the newly created preset, save the preset again. Select
and then save the preset with the same name. Any changes are overwritten in the existing preset. -
If you go to another menu without saving changes on the dashboard, the changes are not saved.
-
Presets are saved on a project basis and can be shared with other users.
Deleting presets
If you have unused presets, you can delete them from the preset list. Select  on the right of the item to delete from the preset list.
The Default preset cannot be deleted.
Changing the default preset
You can change the preset displayed when you first enter the Application Dashboard menu.
-
Check the preset selection box on the upper right of the dashboard.
-
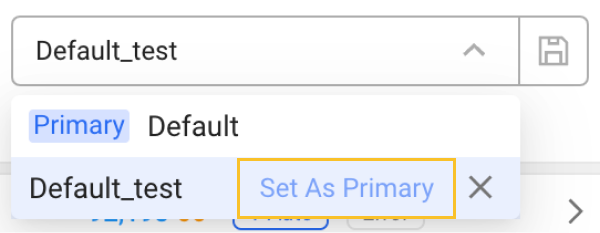
Hover your mouse over a desired preset to set it as default.
-
If the Set as primary button appears, select it.
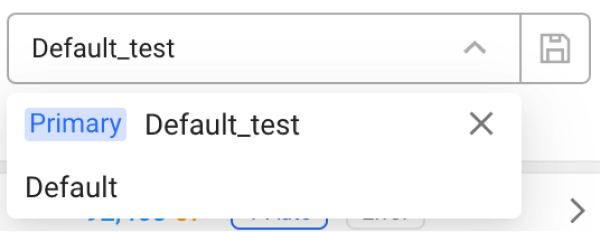
The selected preset is changed to the default preset, and the Primary tag appears in the preset list.
Real-time Alert
If you select  Alert Status on the upper right of the screen, the recent events appear. You can turn on or off the browser notifications by clicking the toggle menu.
For more information about basic elements in the fixed menu area at the top of the screen, see the following.