Guide to Home screen (UI)
It guides you to the elements displayed on the initial screen, after you log in WhaTap Monitoring Service.
-
The default menu of the initial screen is Project list.
-
The panel on the left of the screen is the side menu.
-
At the top of the screen, you can see the name of the current menu and support menus.
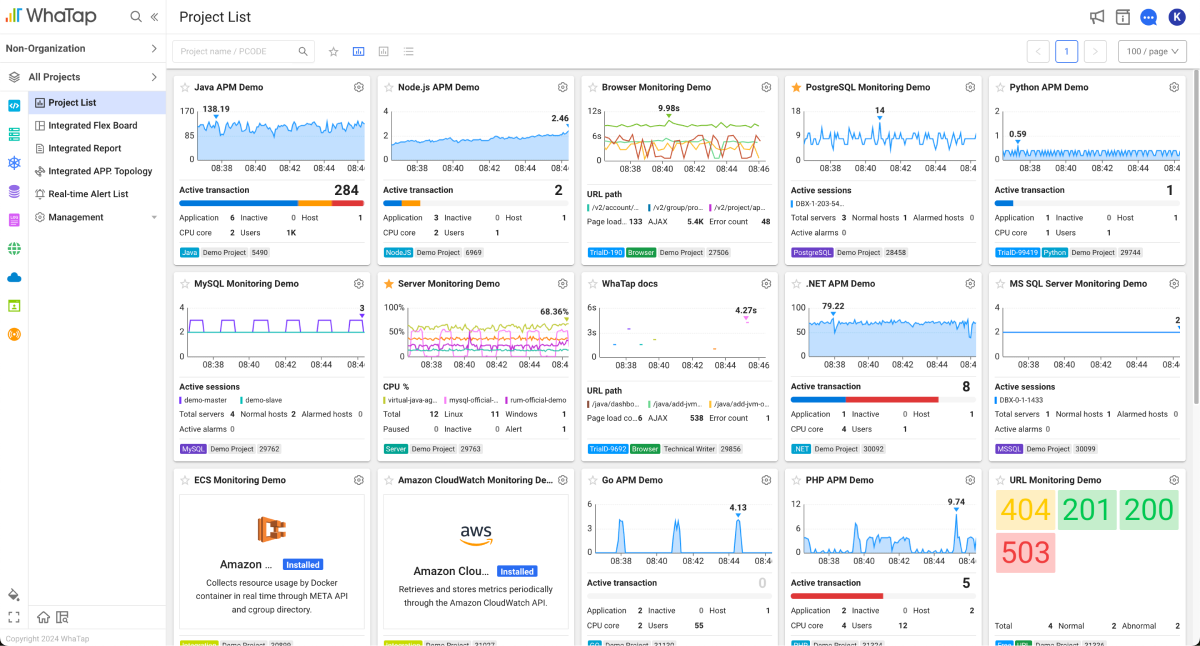
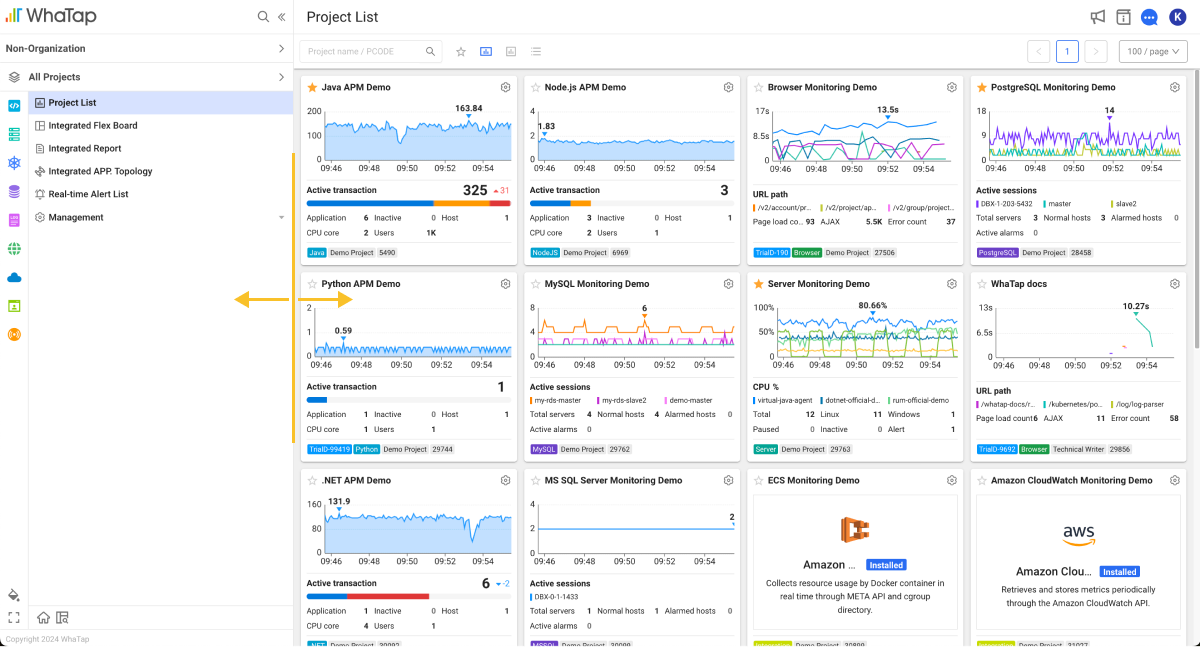
Project list
This menu allows you to check the projects where you are a member or administrator. When you select an individual project in the expanded list, the Dashboard menu for the project appears.
The information and features for each project of Project list are as follows:
-
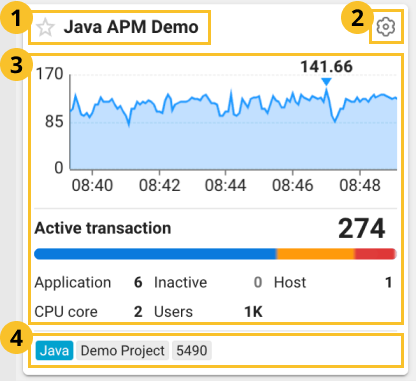
 displays the project name and you can set any favorite. Select
  and then select the Favorite mode. The projects set for favorites (
 ) appear in the list.Note
For more information about the favorite settings, see the following.
-
If you select

 , you can use the following features:
-
Project management: Goes to the project management menu. You can check and modify information such as project name and description, access keys, etc. For more information, see the following.
-
Edit Project Name: You can modify the project name.
-
Delete project: You can delete the project.
-
Add to group / Delete From Group: You can add projects into the group or delete them from the group.
CautionIf a project is deleted, all user list and collected data are deleted and cannot be recovered.
NoteAvailable functions may differ depending on the roles set for the user. For more information about the member role scheme, see the following.
-
-
 You can see the chart for key metrics of the project, agent status, and others. The chart types and data provided may differ depending on the product.
 -
 You can check the product type, group name, and project code of the project in order.Note
The projects that are free to use or experience or are restricted for use display the related information in the tag form.

Project view
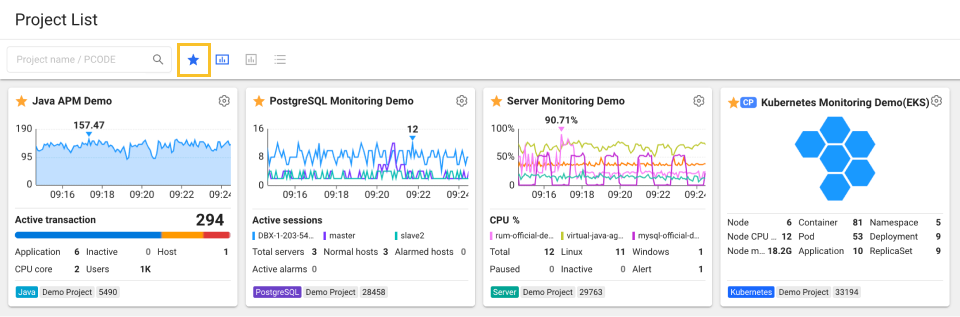
You can see the project list in three view modes as follows: Check the overall project status by selecting the mode for your purpose.

 Wide card view
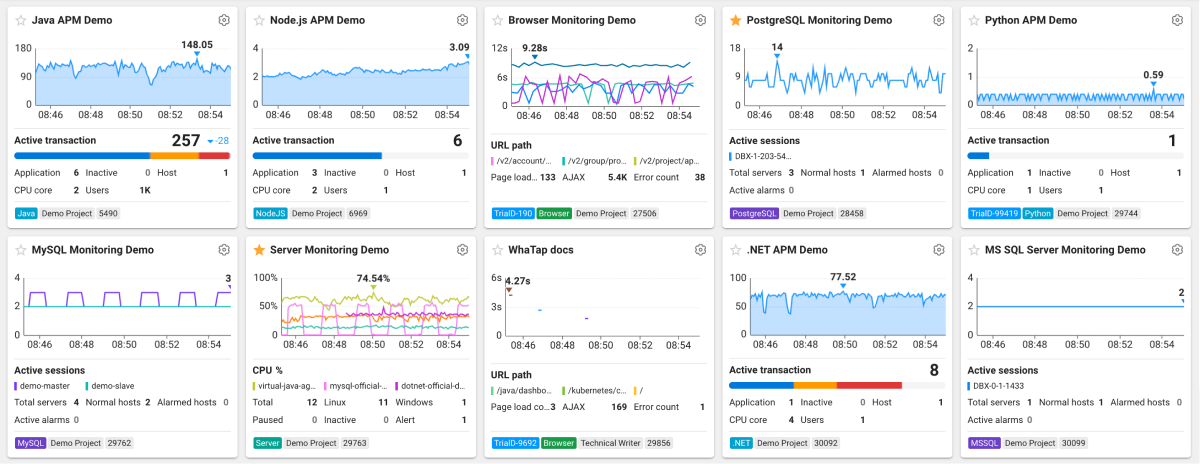
The default view mode. At this time, the unit in which individual projects are displayed is referred to as project card. Key metrics and properties being collected by the project's agents appear on each project card. This allows you to quickly see the performance status of the project.
 Compact card view
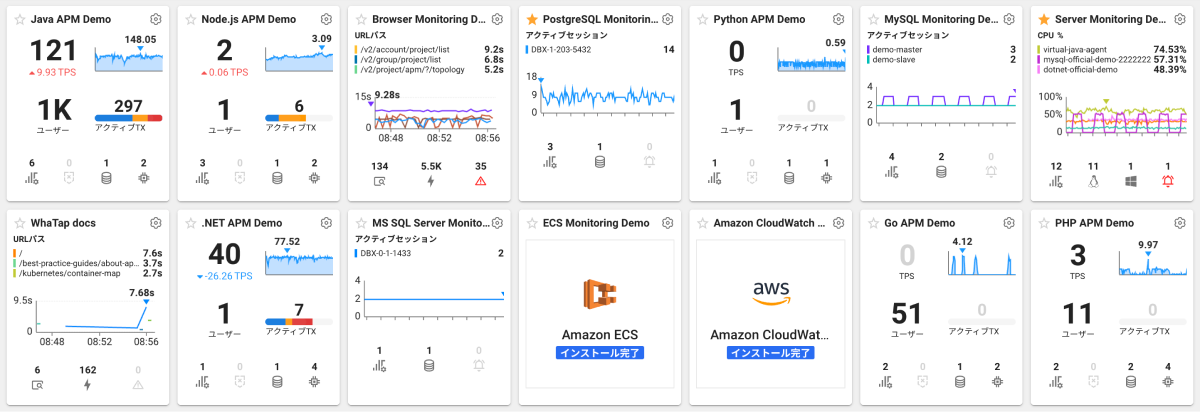
Individual projects provide information less than Wide card view, which provides a larger list of projects.
 List
List
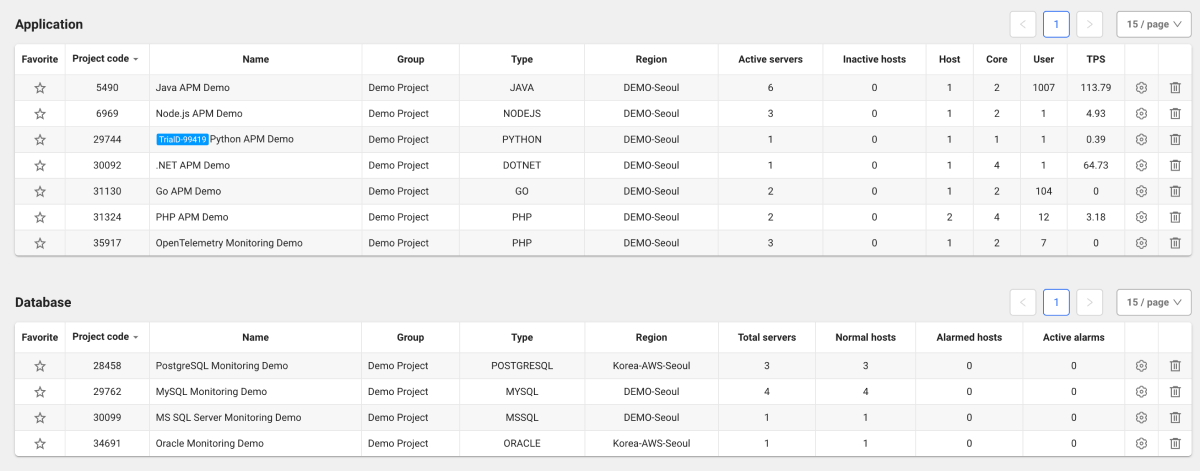
Projects are classified depending on the product type and displayed in the list format. The displayed information may differ depending on the product type. The rightmost part in the list provides the project management (![]() ) and deletion (
) and deletion (![]() ) functions.
) functions.
Viewing the favorite project list
In three view modes, only the projects set as ![]() (Favorite) can appear in the list.
(Favorite) can appear in the list.
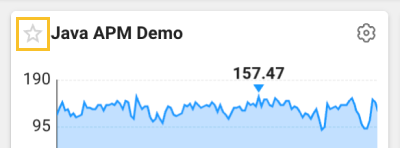
Select ![]() in the project card to set a favorite. You can select multiple projects. On the right of the project search field, select the
in the project card to set a favorite. You can select multiple projects. On the right of the project search field, select the ![]() (Favorite) mode.
(Favorite) mode.
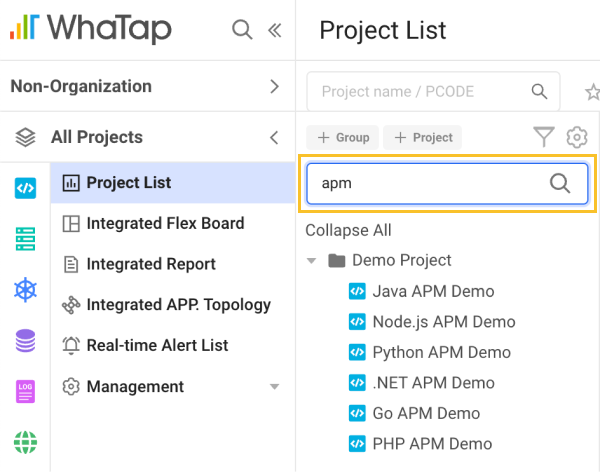
Searching by the project/project code
If you have trouble finding a project because there are many managed or owned projects, use the search function. You can filter the projects to search. Enter the project name or project code in the project search field at the top of the screen.
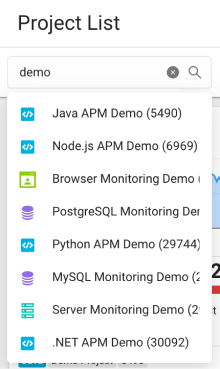
Below the input field, a list of projects that match the specified string appears. Select a desired project. With the string entered, press the Enter key or select ![]() . The projects that match the entered string appear in the list.
. The projects that match the entered string appear in the list.
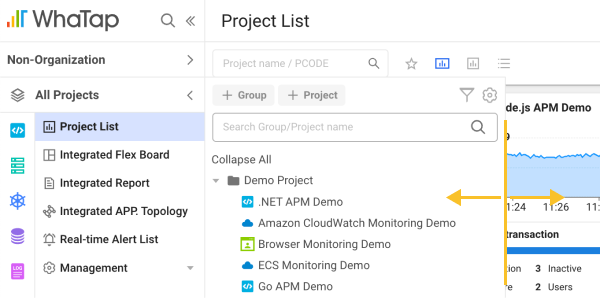
Side menu
On the WhaTap monitoring screen, the panel menu on the left is called side menu. The side menu provides key functions such as moving between projects, creating or moving groups and organizations, and creation of projects.
Creating a project
There are two ways to create a new project.
-
In the side menu, select All Projects. If the project list panel appears, select
 Project.
 -
Select the icons for each product type on the utmost left of the side menu. If the product introduction menu appears, select Getting Started of the desired product. See the following table.
Product icon Description 
Java, Node.js, PHP, Python, .NET, Go A project can be created to monitor the application of the product. 
A project can be created for Server monitoring. 
A project can be created for Kubernetes monitoring. 
MySQL, SQL Server, Oracle, PostgreSQL, Redis, MongoDB, CUBRID, Tibero, Altibase A project can be created to monitor the database of the product. 
A project can be created for URL monitoring. 
Amazon CloudWatch, Amazon ECS, Azure Monitor, Oracle Cloud Monitor, Naver Cloud Monitoring A project can be created for product cloud monitoring. 
The introduction and configuration method to Log monitoring are provided. 
A project can be created for Browser monitoring.
For more information about project creation, see the following.
Switching between Home screen and project
You can see the full list of projects in the group where you belong in tree view format. Below the screen logo, select All Projects. If the project list panel appears, select a desired project. You can go to the selected project.

If there are too many groups or projects so it is difficult to find a desired item, enter a string in the Search Group/Project name field of the project list panel. You can filter groups or projects that match a specified string. To filter projects by product, select ![]() and then select a desired product.
and then select a desired product.
If a project name is selected in the side menu with the project open, you can see the hierarchy of the current project and easily move to another selected project. To go to the Home screen, select the WhaTap logo at the upper left of the screen or select ![]() at the bottom of the screen.
at the bottom of the screen.

Creating, moving or managing group
In the side menu, select All Projects.
-
To create a new group, select
Group in the project list panel. The Add Group menu appears. -
To move to another group, select
 on the right of the
  group in the project list panel. You can see the list of projects that belong to the group.
 -
To go to the group management menu, select
in the project list panel. The Integrated group management menu appears.
-
For more information about group addition, movement, and management, see the following.
-
For more information about the project hierarchical structure, see the following.
Creating, moving or managing organization
In the side menu, select Non-Organization.
-
To create a new organization, select
Organization. The Create organization menu appears. -
To see a list of projects belonging to an organization, select an organization to move from the list.
-
To go to the Organization Management menu for management of all organizations, select
on the right of Organization. -
Hover over an individual organization to go to the Organization Management menu for management of individual organizations. Select
if displayed.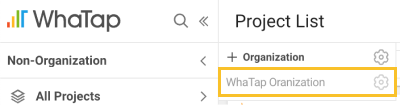
-
For more information about organization addition, movement, and management, see the following.
-
For more information about the project hierarchical structure, see the following.
Searching projects for each group/agent
You can search for projects based on the group they belong to or the name of the agent included in them. Select ![]() next to the logo on the upper left of the screen.
next to the logo on the upper left of the screen.
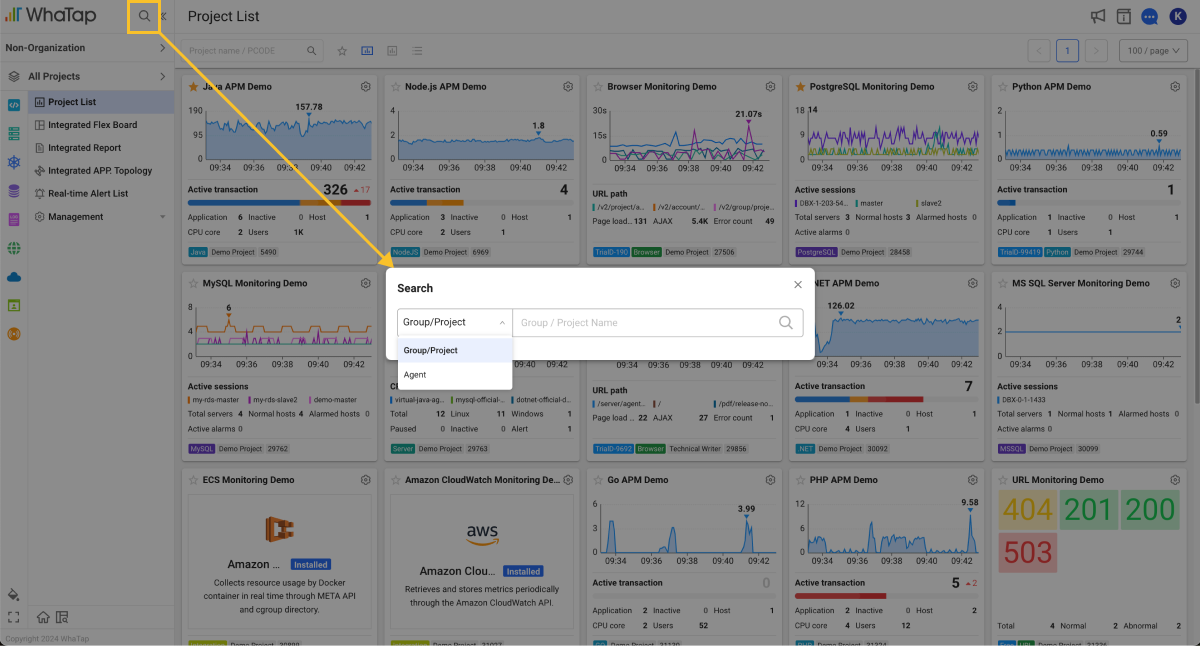
-
Group / Project: You can search for the name of group or project to which the project belongs. In the searched results, you can see groups and projects that match the entered string.
-
Agent / IP: You can search for projects based on the agent name or IP address included in the project. In the searched results, you can see projects and agents that match the entered string.
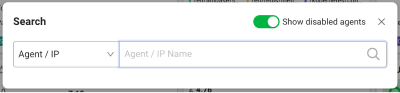 Note
NoteTo exclude inactive agents from search results, turn off the Show inactive agents option.
Using the Home menu
The menus available on the home screen are as follows:
-
Project list: You can see the list of all projects.
-
Flex board: Custom integrated dashboard. You can create a real-time dashboard with metrics collected from projects such as applications, servers, databases, and containers.
Documents by product
-
Integrated report: You can easily create reports for multiple projects. For more information, see the following.
-
Integrated topology: You can collectively select the projects that support the Topology to see in a single topology. For more information, see the following.
-
Real-time alert list: You can see notifications from all projects with permission at a glance in real time. For more information, see the following.
-
Management: You can manage all groups and members. For more information, see the following.
Registering the project menus as favorites
When you select and move a project on the Home screen, the side menu displays the menus available in the project. You can register frequently used menus as favorites.
-
When you place the mouse pointer over a frequently used menu in the side menu, the
button appears.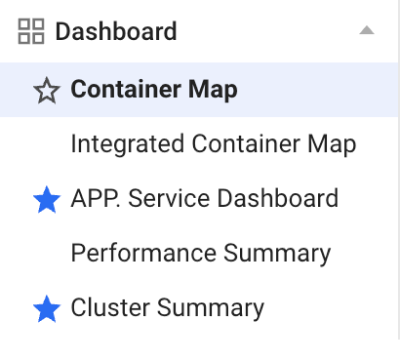
-
If the button is selected, it is changed to
 .
. -
Repeat the above process to add other menus to favorites.
-
Select
below the side menu.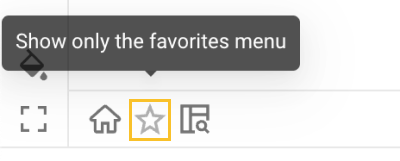
The side menu displays only the menus set as favorites.
The displayed menus may differ depending on the project's product.
Changing the theme
You can set the screen to dark or light. On the lower left of the screen, select ![]() .
.
-
Light: Light theme that is applied by default.
-
Dark: Dark theme whose background is black or dark.
-
Presentation: The optimized color is applied when using a beam projector.
-
Add Custom Theme: You can set detailed elements to a desired color in Light and Dark modes.
Viewing the full screen
To view the WhaTap monitoring service screen in a web browser in full screen, select ![]() at the lower left of the screen. To end the full screen, press the ESC key.
at the lower left of the screen. To end the full screen, press the ESC key.
Using the sitemap
You can see all the menus that can be selected from the entry path. On the lower left of the screen, select ![]() .
.
Available menus may differ depending on the entry menu path or project.
Resizing the side menu
You can use the wide screen by adjusting the size of the side menu in the following two ways.
-
To collapse the side menu tree, select
 on the right of the WhaTap logo. To expand the side menu, select
  .
.
-
To expand the side menu wider than before, hover your mouse over the border of the side menu and then drag it. You can resize it.
Resizing the project list
If a project name in the project list is too long, you can adjust the width of the project list to make it wider than before. Hover and drag your mouse to the utmost right of the project list. You can resize it.
Support menus
Below are the support menus available on the top right of the screen.
Checking the service notice
Select ![]() . Go to Service Notice where you can see the regular release news and emergency maintenances for the WhaTap monitoring service.
. Go to Service Notice where you can see the regular release news and emergency maintenances for the WhaTap monitoring service.
Going to technical documentation
Select ![]() to go to the WhaTap Docs technical documentation page. For more information about Whatap Docs, see the following.
to go to the WhaTap Docs technical documentation page. For more information about Whatap Docs, see the following.
Online chat
If you select ![]() , a chat window appears where you can make online inquiries. You may inquire about the technologies, costs, and payments related to the WhaTap monitoring service.
, a chat window appears where you can make online inquiries. You may inquire about the technologies, costs, and payments related to the WhaTap monitoring service.
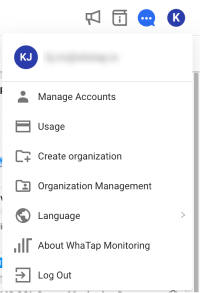
Entering the management menu
Select the profile icon on the top right of the screen. It provides the following functions:
-
Manage Accounts: You can modify the user account or configure the functions such as notification reception and multi-factor authentication.
Note-
For more information about membership registration, password modification, and withdrawal, see the following.
-
For more information about the multi-factor authentication, see the following.
-
-
Usage: You can register the payment information and view the service usage. For more information, see the following.
-
Create organization / Organization Management: You can go to the menu to create or manage organizations. For more information about the organization, see the following.
-
Language: You can change the language on the service screen to your preferred one.
-
About WhaTap Monitoring: You can see the information about the WhaTap monitoring service.
-
Log Out: You can log out from the current service screen.