Package Manager Installation
This guide provides instructions for installing the WhaTap database monitoring agent using a package manager.
Choosing an Installation Method
- Refer to this document for Debian/Ubuntu-based systems that use the
aptpackage manager. - For Docker environments, refer to Docker Installation.
- For other environments, refer to Manual Installation.
Supported Databases
MySQL, PostgreSQL, SQL Server
To use the WhaTap monitoring service, after Sign in, create a project and install the agent to the target server. For more information about registration as a member, see the following.
Creating a project
Create a project before installing the agent.
-
Log in to the WhaTap Monitoring Service.
-
In the left side menu, click All Projects > + Project.
-
On the Select product screen, select the product you want to install.
-
Enter or select the following items:
-
Project name: Enter the project name.
-
Data server region: Select the data server region. A region is a group of data centers that provide cloud services. Your data will be stored in the selected region.
-
Time zone: Set the time zone to be used for alerts and report generation.
-
Notification language setting: Set the language for alert notifications. (Supports Korean and English)
-
Project groups: Group multiple projects for easier management. Select a group if applicable.
-
Project description: Add additional details or a description for your project.
-
-
After completing all settings, click the Creating a project button.
If you add a project while an organization is selected, you must set the Groups of organization field.
For more information about groups, see the related document.
Checking the configuration diagram
The DBX agent can be installed on a separate server or on the DB server. Select a method how to install the agent and check its configuration and firewall.
| Install on a separate server | Install on the DB server |
|---|---|
|
|
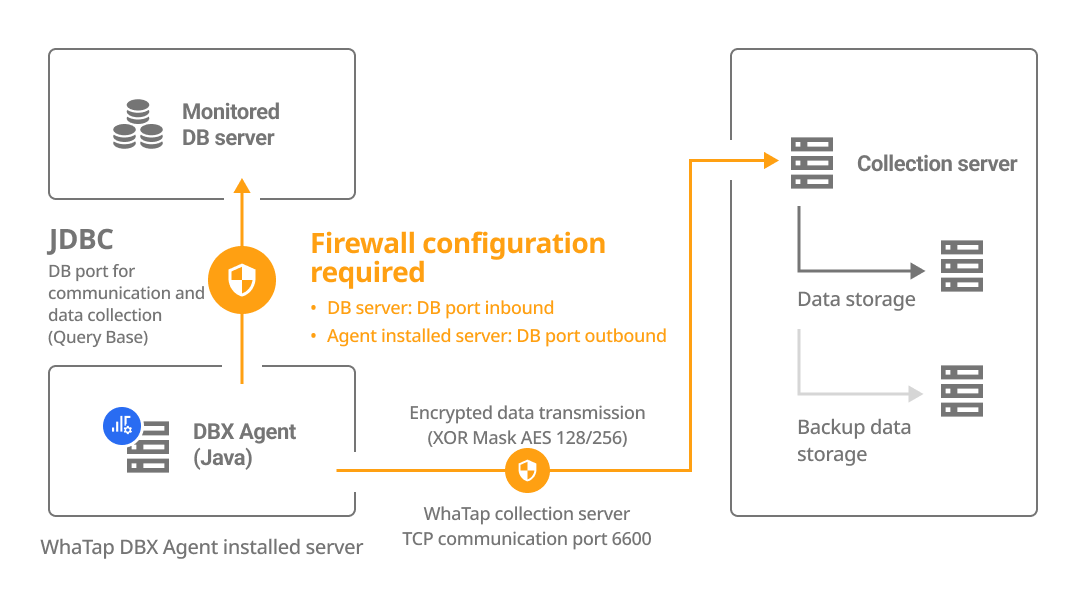
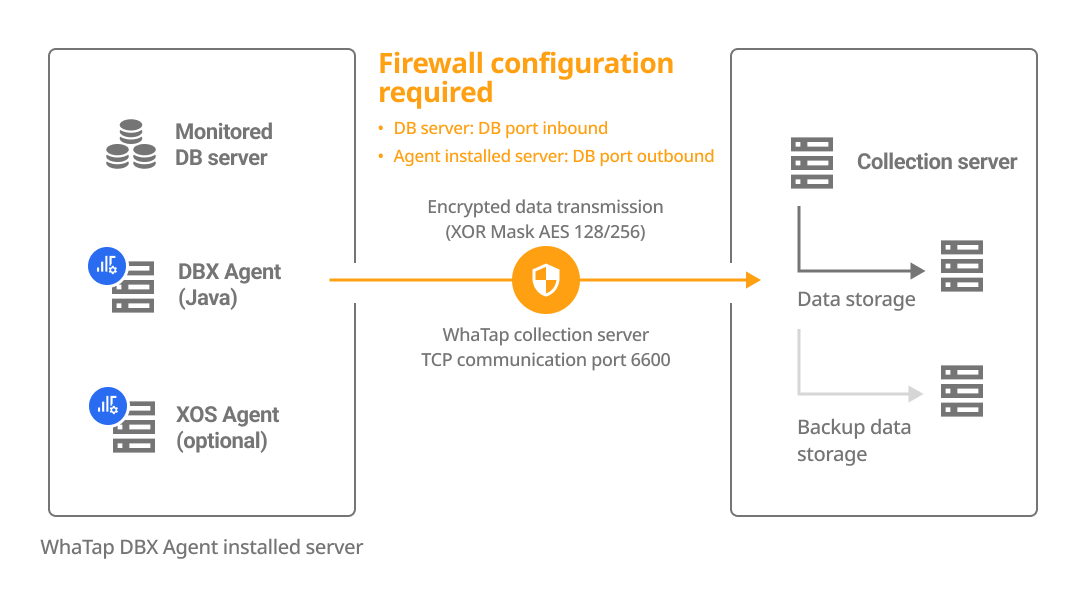
Creating an Account
-
If you already have an account with the required permissions, skip this step and proceed to the next step.
-
In the example code,
DB_Useris the database user account name. Change it to the user account name you are using. -
Enter your user password in
DB_Passwordin the example code. -
Accounts without proper permissions may not be monitored correctly.
-
In a replication structure, account creation and permission grants should only be performed on the Master DB. (Performing this on a Slave DB may break replication.)
- MySQL
- MariaDB
  create user DB_User identified by 'DB_PASSWORD'; # Enter the desired password.
  grant process on *.* to DB_User;
  grant select on performance_schema.* to DB_User;
  grant show databases on *.* to DB_User;

  To monitor lock information in MySQL 8.0 or later, the following privileges are required.

  grant select on `sys`.`sys_config` TO DB_User;
  grant select on `sys`.`innodb_lock_waits` TO DB_User;
  grant execute on function `sys`.`format_statement` TO DB_User;
  grant execute on function `sys`.`quote_identifier` TO DB_User;
  grant execute on function `sys`.`sys_get_config` TO DB_User;
Assign additional roles depending on the features and operation environment.
-
In case of collecting all table data
grant select on *.* to DB_User; -
In case of monitoring tables only in a specific DB
grant select on {DB_NAME}.* to DB_User; -
In case of using replication
grant replication client on *.* to DB_User;
grant replication slave on *.* to DB_User; -
In case of using the kill session
grant super on *.* to DB_User; -
In case of using the kill session in the AWS RDS environment
grant execute on procedure mysql.rds_kill to DB_User;
create user DB_User identified by 'DB_PASSWORD'; # Enter the desired password.
grant process on *.* to DB_User;
grant select on performance_schema.* to DB_User;
grant show databases on *.* to DB_User;
Assign additional roles depending on the features and operation environment.
-
In case of collecting all table data
grant select on *.* to DB_User; -
In case of monitoring tables only in a specific DB
grant select on {DB_NAME}.* to DB_User; -
In case of using replication
below MariaDB 10.5.1grant replication client, replication slave on *.* to DB_User;MariaDB 10.5.2 ~ 10.5.8grant replication master admin, replication slave admin, binlog monitor on *.* to DB_User;MariaDB 10.5.9 or latergrant replication master admin, replica monitor, binlog monitor on *.* to DB_User;NoteIn case of AWS RDS MariaDB, replication information inquiry is supported in less than the version 10.5.
-
In case of using the kill session
grant super on *.* to DB_User; -
In case of using the kill session in the AWS RDS environment
grant execute on procedure mysql.rds_kill to DB_User;
Support features for each role
The roles other than the Default role do not need to be assigned depending on the environment. However, some functions may not work.
| Role | command | Menu and feature | Details |
|---|---|---|---|
| Default role | grant process on *.* to whatap; | Active session collection / Lock Tree / Dead Lock | This role to display thread information belonging to another account performs show engine. |
grant select on performance_schema.* to whatap; | Active session collection / Lock Tree / MYSQL SQL STATISTICS | When granting individual roles, see the following table | |
grant show databases on *.* to whatap; | Instance List, etc. | It displays the database name. | |
| Role details | grant select on *.* to whatap;or grant select on {DB_NAME}.{TABLE_NAME} to whatap; | DB size / Table Size Increase / Object detail / Searching a plan | MySQL does not support DB size, Object detail, and plan query features if it has no SELECT role for the table. |
| replication | grant replication client on *.* to whatap; | Displaying the Instance List's S / Collecting the replication information | SHOW MASTER STATUS, SHOW SLAVE STATUS |
grant replication slave on *.* to whatap; | Displaying the Instance List's M / Collecting the replication information | SHOW SLAVE HOSTS | |
| Session Kill | grant super on *.* to whatap; | Session kill feature in the active session list | It terminates the thread belonging to another account. |
grant execute on procedure mysql.rds_kill to DB_User; | Session kill feature in case of AWS RDS | - |
Instead of performance_schema.*, you can grant the following roles individually.
| Role | command | Remarks |
|---|---|---|
| Active sessions / Lock tree | performance_schema.data_lock_waits | Starting from MySQL 8 |
performance_schema.data_locks | ||
performance_schema.threads | - | |
performance_schema.metadata_locks | Starting from MariaDB 10.5 | |
| Wait event information | performance_schema.events_waits_summary_global_by_event_name | - |
| SQL statistical information | performance_schema.events_statements_summary_by_digest | - |
| Wait metric name | performance_schema.setup_instruments | - |
Checking the access key
The access key is the unique ID to enable the WhaTap service.
In the installation guide section, select Getting the access key. After the access key has been issued automatically, proceed to the next step.
After a project has been created, the Agent installation page appears automatically. If the Agent installation does not appear, select Management > Agent installation on the left of the screen.
Installing the Agent
Adding the WhaTap Repository
Run the following commands to add the official WhaTap repository to your system.
curl -s https://repo.whatap.io/debian/release.gpg | gpg --dearmor | sudo tee /etc/apt/trusted.gpg.d/whatap-release.gpg > /dev/null
echo "deb [signed-by=/etc/apt/trusted.gpg.d/whatap-release.gpg] https://repo.whatap.io/debian unstable/" | sudo tee /etc/apt/sources.list.d/whatap.list
sudo apt-get update
Installing the Package
Install the WhaTap database monitoring agent with the following command.
sudo apt-get install whatap-db
Configuring and Starting the Agent
Create the configuration file and start the agent.
sudo bash -c 'cat > /usr/whatap/db/whatap.conf <<EOF
license=license_key
whatap.server.host=13.124.11.223/13.209.172.35
dbms=mysql
db_ip=127.0.0.1
db_port=3306
EOF'
cd /usr/whatap/db && sudo /usr/whatap/db/uid.sh whatap whatap && cd -
sudo service whatap-db restart
- You can add additional database options to the
whatap.conffile. - Modify the parameter values (database account ID and password) of the
uid.shscript to match your actual environment.
Managing the Agent
Updating the Agent
To update the agent to the latest version, run the following commands.
sudo apt-get update
sudo apt-get install whatap-db
sudo service whatap-db restart
Stopping the Agent and Removing the Package
To remove the WhaTap database monitoring agent, run the following commands.
sudo service whatap-db stop
sudo apt-get remove whatap-db
Checking Agent Logs
To check the agent logs, use the following command.
sudo service whatap-db log