Event Notification Settings
Home > Select Project >
Alert > Notifications
Event Notification Settings per User
Information about other members in Event notification settings per-user can only be viewed by members with the Member Management permission. For all other members, required information is masked.
-
Mobile device management for bulk event notification receipt settings and access control can be managed in Account Information.
-
For detailed information about member permissions, refer to the following document.
Notification Methods
Alerts are available via Email, SMS, WhatsApp, and Mobile.
In the Event notification settings per-user section, select the checkbox for the desired notification method to receive alerts. If you clear the checkbox for a notification method, alerts will not be sent through that channel.
All users except the project super administrator can change only their own notification settings.
Email Alerts
Email alerts are sent to the email address provided during sign-up.
SMS Alerts
You can receive alerts via SMS.
The SMS alert feature is available only for paid projects.
Daily SMS Sending Limit
When SMS usage exceeds the daily limit, SMS alerts are stopped. You can check the current day's usage and whether sending is stopped at the top of the Notifications screen, and click the [ Resume SMS Alerts ] button to receive them again.
-
Click your profile icon at the top right of the screen, then go to Manage Accounts.
-
In Account Information, click the [ General Mobile Phone ] button in the User Phone Number section.
-
Enter the phone number that will receive the verification code.
- Only Korean mobile phone numbers can be registered to receive SMS alerts.
-
Click the [ Save ] button.
Change or delete the registered phone number
- To change the phone number, click the [ Change ] button. SMS verification is required.
- To delete the phone number, click the [ Delete ] button. After deletion, you will no longer receive alerts via SMS.
WhatsApp Alerts
You can receive alerts via WhatsApp.
The WhatsApp alert feature is available only for paid projects.
-
Click your profile icon at the top right of the screen and go to Manage Accounts.
-
In Account Information, click the [ WhatsApp ] button in the User Phone Number section.
-
Enter the phone number that will receive the verification code.
-
Click the [ Send Verification Code ] button.
-
Enter the 6-digit verification code sent to your WhatsApp application.
- If you do not receive the verification code within 10 minutes, click the [ Resend Verification Code ] button.
-
Click the [ Verify ] button.
Mobile Alerts
Users who need to receive mobile alerts must install the WhaTap application on their mobile device and log in.
Repeated Alerts (Escalation) Settings
If the alert condition is not resolved after an alert is triggered, you can configure repeated alert intervals based on the time of the initial alert. This setting applies only to Critical level alerts.
For example, to repeat alerts immediately (0 minutes), 1 hour later, and 1 day later after the initial alert, enter 0,1H,1D in the Repeated Alerts (Escalation) column.
-
Go to Alert > Notifications and navigate to the Event notification settings per-user section.
-
Configure the settings in the Repeated Alerts (Escalation) field.
-
M: minutes, H: hours, D: days. If the unit is omitted, the value is interpreted as minutes.
-
Enter a number or a number with a unit (M, H, D). If the input format is invalid, an error message is displayed.
-
-
Click the [ Save ] button. The settings will not be applied unless they are saved.
Event Reception Tags
When configuring events, you can select event reception tags to send alerts to project members and 3rd-party plugins associated with those tags. If no event reception tag is set, alert notifications are sent to all project members.
Add / Edit / Delete Event Reception Tags
Event reception tags that are currently applied to an event cannot be deleted.
-
Go to Alert > Notifications.
-
In the user list under the Event notification settings per-user section, click + Add Tag or +.
-
In the Event reception tag window, click + Create New Tag.
-
In the Create Tag dialog, enter a tag name, select a color, and click the [ Create Tag ] button.
-
To edit or delete a created tag, click the
 icon in the tag list.
 -
Select the desired tag from the Tag List in the Event reception tag window to apply it.
Remove Event Reception Tags
-
Go to Alert > Notifications and open the Event notification settings per-user section.
-
Click + in the Event reception tag field for the user whose event reception tag you want to remove.
-
In the Event reception tag window, click the X on the tag you want to remove. The tag will be removed.
Receive Alerts Without Reception Tags
When configuring events, you can select event reception tags to send alerts to project members and 3rd-party plugins associated with those tags.
-
To receive alerts without event reception tags, enable the Receive alerts without reception tags option.
-
If you want to receive only alerts that have event reception tags, disable this option.
To stop receiving all alerts, disable this option and make sure that no Event reception tag is selected.
Selecting the event reception mode
In the Event notification settings per-user section, you can select the event alert reception scope per member or third-party channel from the following three modes. The reception mode is selected in the Event reception tags column of each member or channel row.
| Mode | Description |
|---|---|
| Receive all alerts | Receive all alerts regardless of the event reception tags |
| Receive alerts for selected tags only | Receive only alerts that have the selected event reception tags. Select at least one tag |
| Receive no alerts | Receive no event alerts. The selected tags are preserved without being deleted |
-
In the Receive alerts for selected tags only mode, select at least one tag to receive alerts in the tag selection area.
-
To also receive alerts that have no event reception tag specified, select the Unclassified virtual tag in the tag selection area. The Unclassified tag can be selected or deselected like a normal tag, but the tag itself cannot be edited or deleted.
In the Receive no alerts mode, the corresponding member or channel receives no event alerts at all. The selected tags are preserved without being deleted, so if you switch back to the Receive alerts for selected tags only mode, you can use the previously selected tag settings as is.
Select Notification Language
You can choose the language in which you receive alert notifications.
-
Go to Alert > Notifications.
-
In the user list under the Event notification settings per-user section, click the ▶️ button at the far left of the user whose language you want to configure.
-
Select the Notification Language.
Day and Time-based Notification Settings
You can configure whether a user receives notifications by day of the week and time of day.
-
Go to Alert > Notifications.
-
In the user list under the Event notification settings per-user section, click the ▶️ button at the far left of the user whose day and time settings you want to configure.
-
Select the days and/or enter the time ranges during which you want to receive alerts.
- Settings can be configured separately for each notification method.
3rd-party Plugins
You can receive alert notifications through external applications.
- Supported applications: Slack, Telegram, Teams, Teams Workflows, Jandi, AlertNow, Webhook, Webhook JSON, Opsgenie, PagerDuty, LINE, ilert
Internal messengers that are not included in WhaTap Labs’ supported scope can be integrated via standard Webhook or Webhook JSON.
| Item | Description |
|---|---|
| Plugin Name | Name of the plugin |
| Auth Key | Authentication key |
| Auth Value | Authentication value |
| Receive Level | Notification level: Warning, All, or Critical |
| Repeated Alerts (Escalation) | Re-notification interval from the initial alert time if the issue is not resolved - Applies only to Critical alerts |
| Smart Message (AI) | AI-powered notifications available when adding the Telegram plugin - Supported languages: Korean, English, Japanese |
| Event Reception Tag | Whether to receive alerts for specific members or teams in the project |
| Delete | Delete the 3rd-party plugin |
Add a 3rd-party Plugin
-
Go to Alert > Notifications.
-
In the 3rd-party Plugins section, click Add.
-
In the Add 3rd-party Plugin window, select the desired service tab.
-
Follow the instructions for the selected service (see How to add 3rd-party plugin notifications).
-
Click Test Receive to verify the configuration.
-
When finished, click Add or Register.
How to Add 3rd-party Plugin Notifications
Slack
In the Add 3rd-party Plugin window, click the [ Add To Slack ] button on the Slack tab to register WhaTapNotiBot to your Slack team and channel.
Telegram
-
In Telegram, search for @WhaTapApmNotiBot.

-
Select the bot and click the [ Start ] button.
-
In the chat window, enter the
/licensecommand followed by the access key of the project for which you want to receive alerts.
Available commands
-
/help: View the list of commands -
/license: Enter the access key of the project to receive alerts -
/remove: Enter the project code for which you want to stop receiving alerts -
/list: View the list of project codes currently receiving alerts
Teams
-
Go to the connector of the channel where you want to receive alerts.
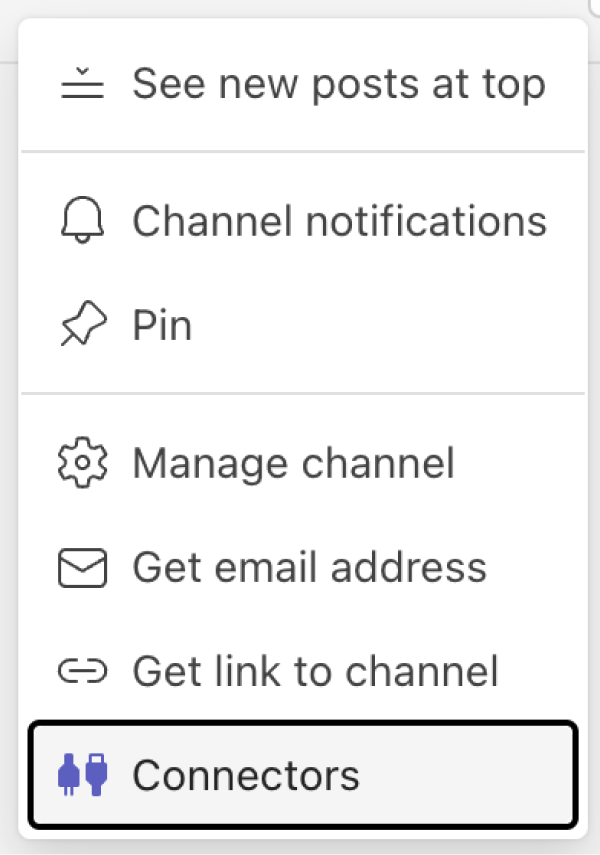
-
Add a Webhook and click the [ Configure ] button.

-
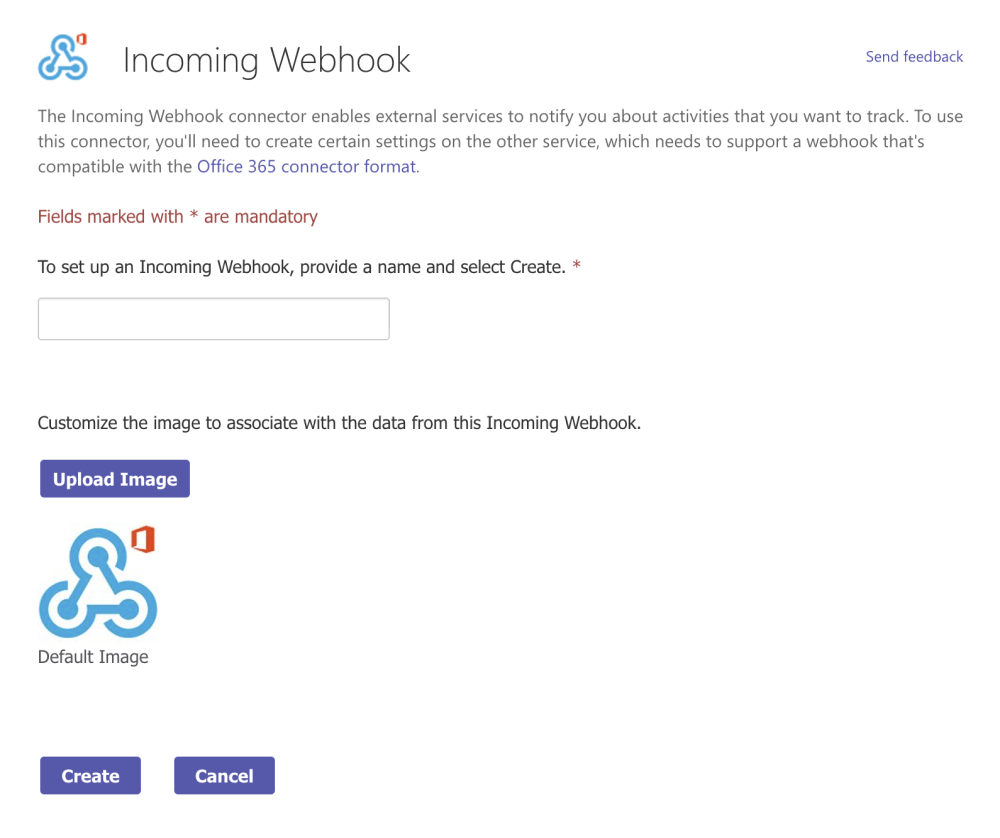
Enter a webhook name and click the [ Create ] button.
-
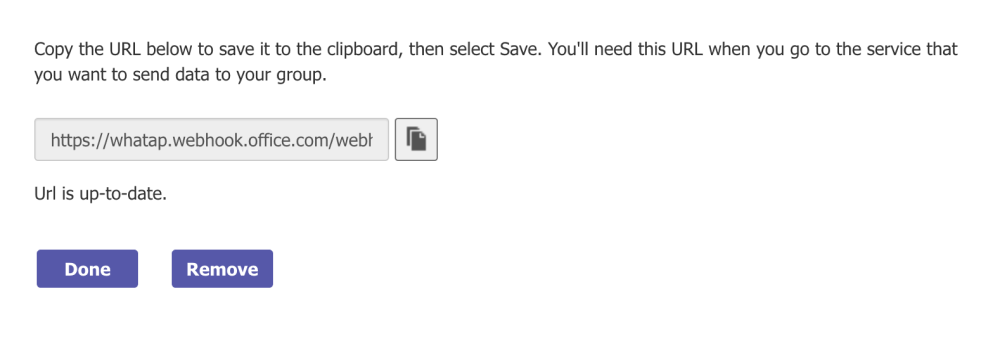
Copy the generated Webhook URL.
-
Return to the Add a third-party plug-in window in the WhaTap Monitoring service, and enter values for Channel Name and Webhook URL at the bottom of the Teams tab.
-
Click the [ Registration ] button.
Teams Workflows
To use workflows, you need an account that can access Microsoft Teams and a Business plan subscription.
-
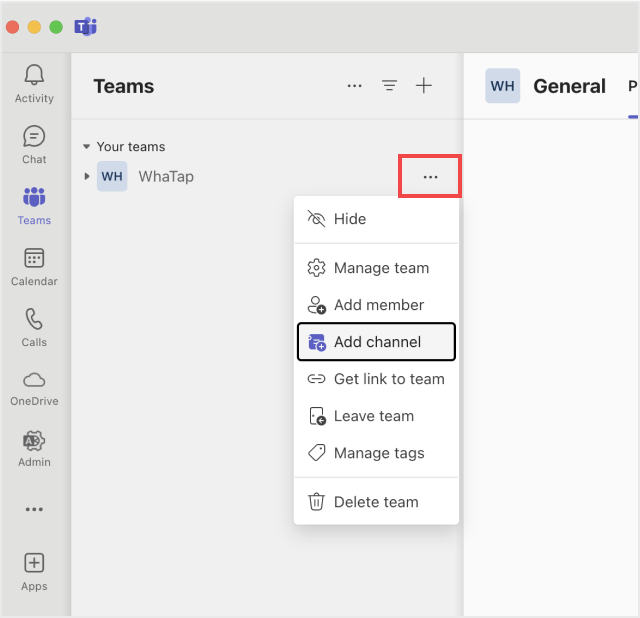
In the Teams menu, click More actions (...) > Add channel.
-
In the Create a channel window, enter the Channel name and Description. For Channel type, select Standard, then click the [ Create ] button.
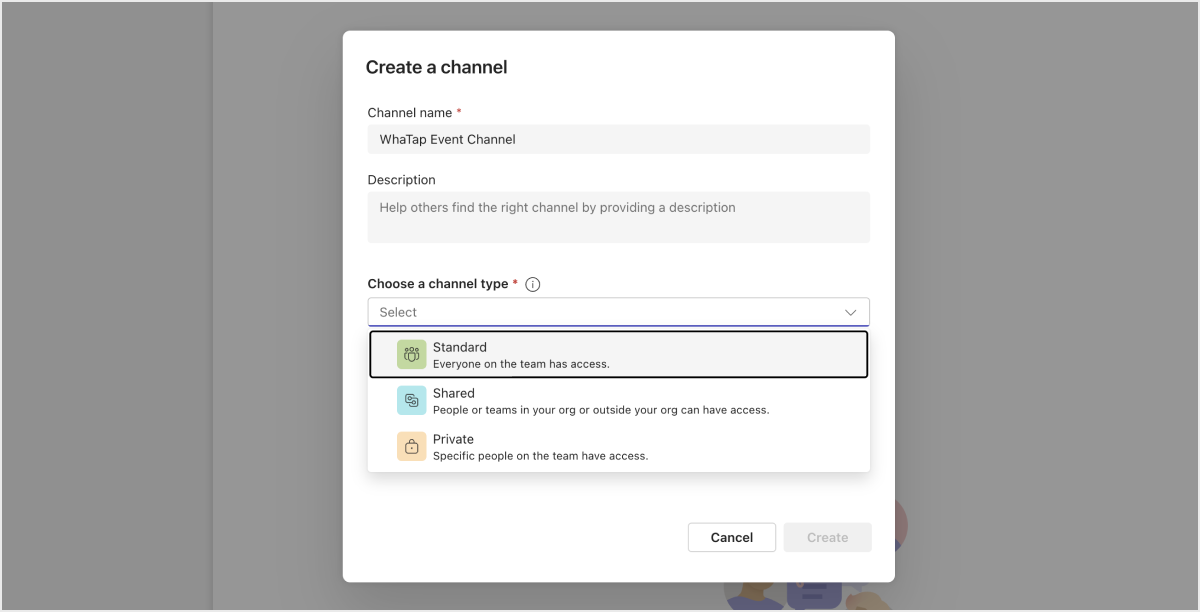 Caution
If you select Shared as the channel type, workflows cannot be used. If you select Private, workflows can be added but notifications cannot be received.
-
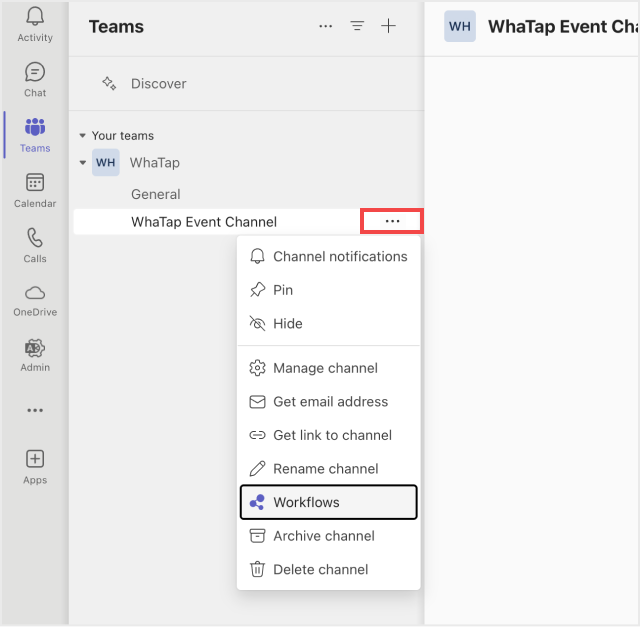
Click More actions (...) of the created channel, then select Workflows.
-
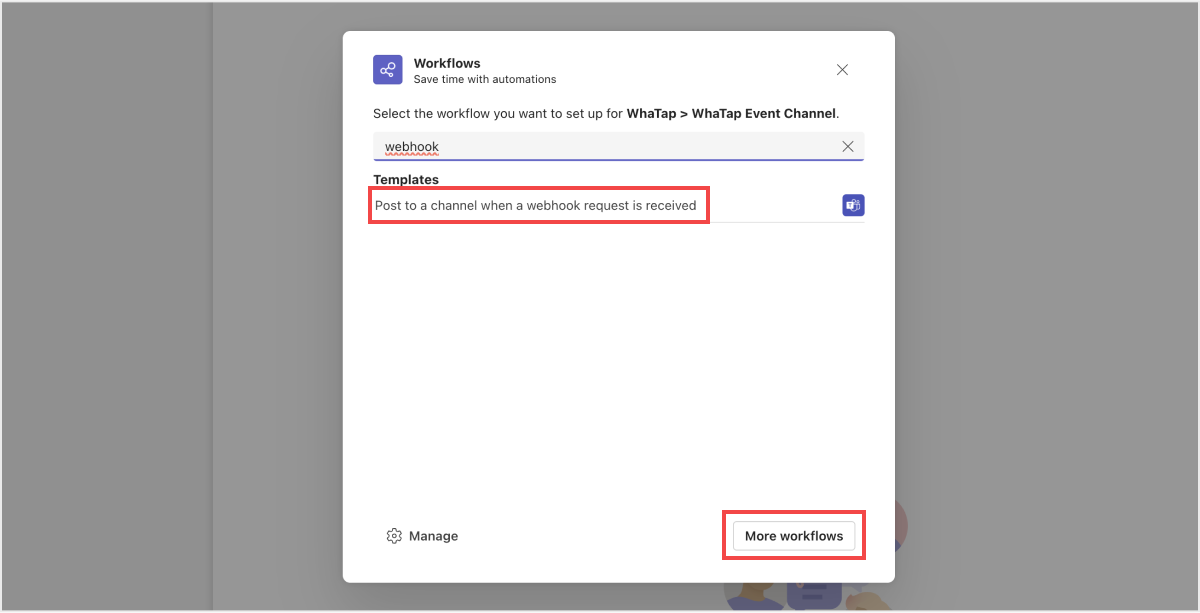
In the Workflows dialog, select Post to a channel when a webhook request is received from the workflow list, then click the [ Add workflow ] button.
-
Check the Name and Connection status, then click the [ Next ] button.
-
Review the Details, then click the [ Add workflow ] button.
-
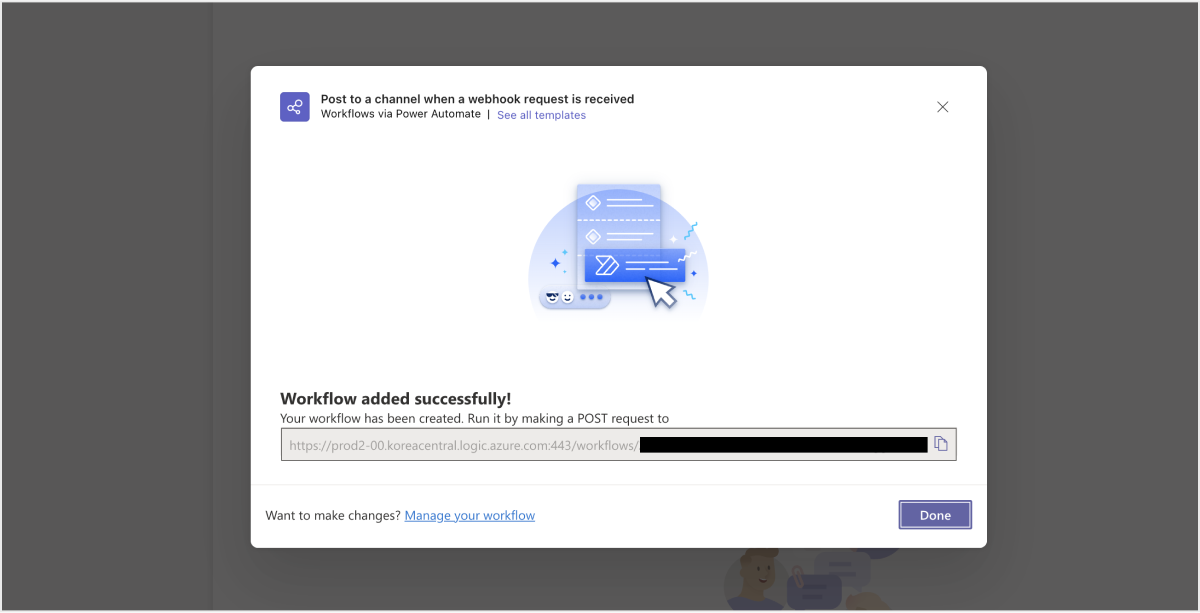
The workflow has been added. Copy the generated URL.
-
Return to the Add a third-party plug-in window in the WhaTap Monitoring service, and enter values for Channel Name and Webhook URL at the bottom of the Teams Workflows tab.
-
Click the [ Registration ] button.
Jandi
-
Go to Jandi Connect settings in the topic or chat where you want to receive notifications.
-
In the Connect list, find Webhook Receiver (Incoming Webhook) and click the [ Connect ] button.
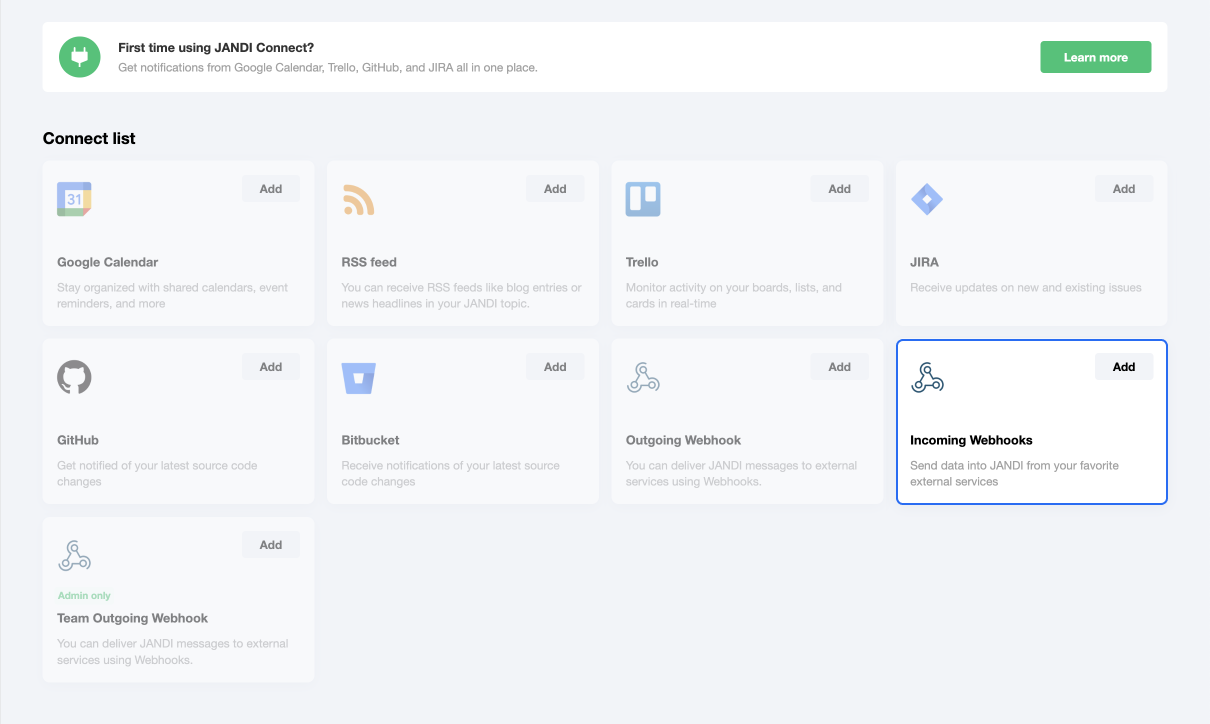
-
Click the [ Add Webhook Receiver ] button.
-
Copy the Webhook URL from the Register Webhook URL section.
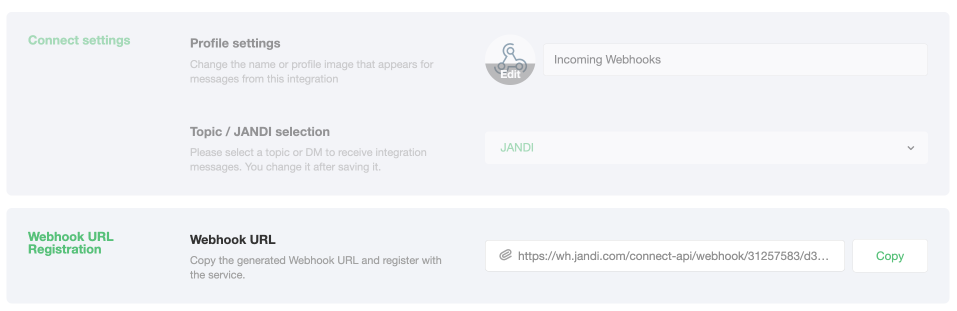
-
Return to the Add a third-party plug-in window in the WhaTap Monitoring service, and enter values for Channel Name and Webhook URL at the bottom of the Jandi tab.
-
Click the [ Registration ] button.
AlertNow
-
Access the AlertNow service, then go to Settings > Integration.
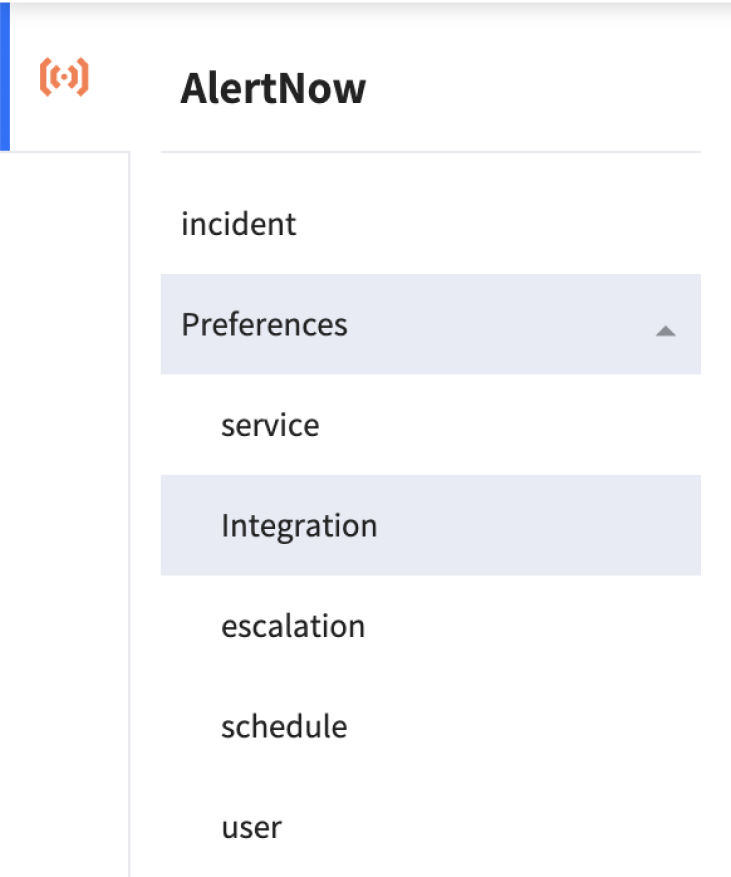
-
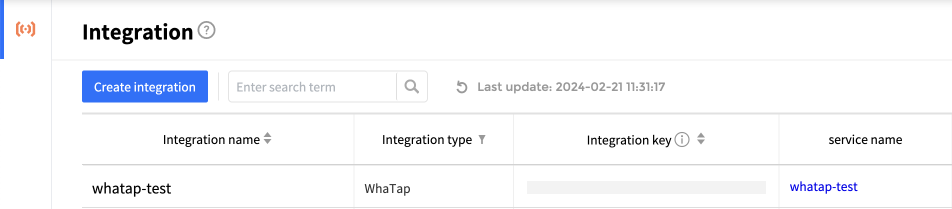
On the Integration screen, click the [ Create Integration ] button.
-
From the list of integration types, select WhaTap.
-
On the Create Integration screen, configure the Name and Naming Rules.
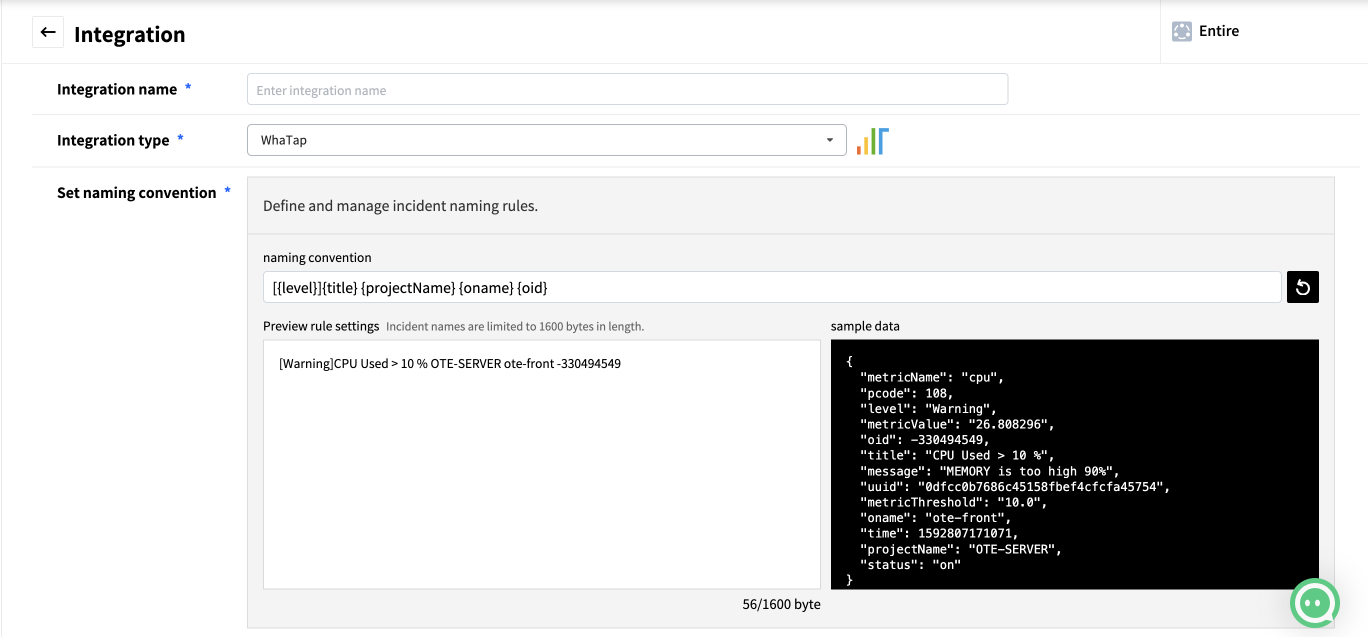
-
Click the [ Confirm ] button to create the integration.
-
Check the list of created integrations and select the newly created integration.
-
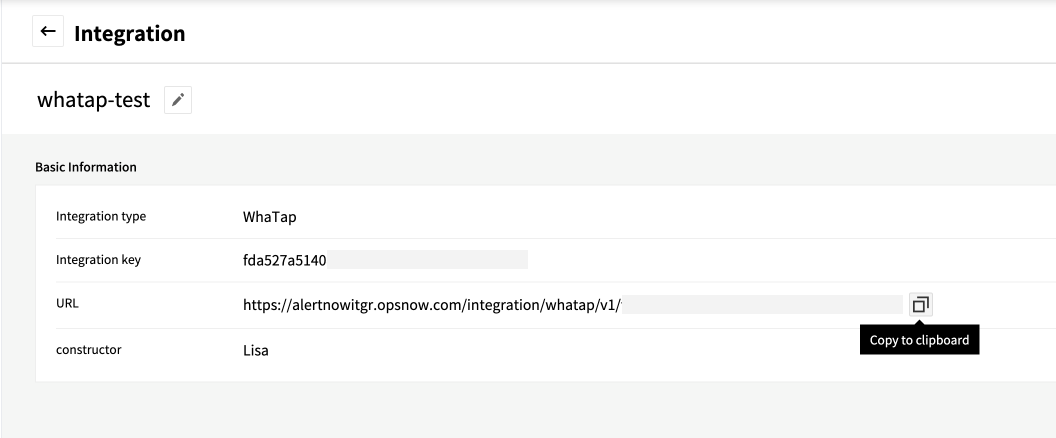
On the details screen, click the copy icon on the right side of the URL to copy it.
-
Return to the Add a third-party plug-in window in the WhaTap Monitoring service, and enter values for Channel Name and Webhook URL at the bottom of the AlertNow tab.
-
Click the [ Registration ] button.
Webhook
-
Register the Webhook that will receive notifications. The alert
titleandtextare sent to the registered URL via the POST method.{
"title":"Alert Title",
"text": "Sample warning message"
} -
Enter values for Webhook Name and Webhook URL.
-
Click the [ Registration ] button.
Webhook JSON
-
Register the Webhook that will receive notifications. Alert data is sent to the registered URL in JSON format via the POST method. For substitution variables that can be included in the JSON payload, see Available Variables.
-
${something}represents a substitution value provided by WhaTap.
Refer to Available Variables for the full list and descriptions. -
The event status (
status) is categorized as event triggered (on) or event recovered (off). -
The
levelis categorized asNone,Info,Warning, orCritical.
{
    "pcode": "${pcode}",
    "projectName": "${projectName}",
    "time": "${time}",
    "oid": "${oid}",
    "oname": "${oname}",
    "title": "${title}",
    "message": "${message}",
    "level": "${level}",
    "status": "${status}",
    "metricName": "${metricName}",
    "metricValue": "${metricValue}",
    "metricThreshold": "${metricThreshold}",
    "uuid": "${uuid}",
    "okind": "${okind}",
    "onode": "${onode}"
} -
-
Enter values for the Webhook Name and Webhook URL fields.
-
To add a header value, click + Add in Add user header value, then enter the key and value.
-
Click the [ Registration ] button.
Opsgenie
-
In the Teams menu, select the team that will receive notifications.
-
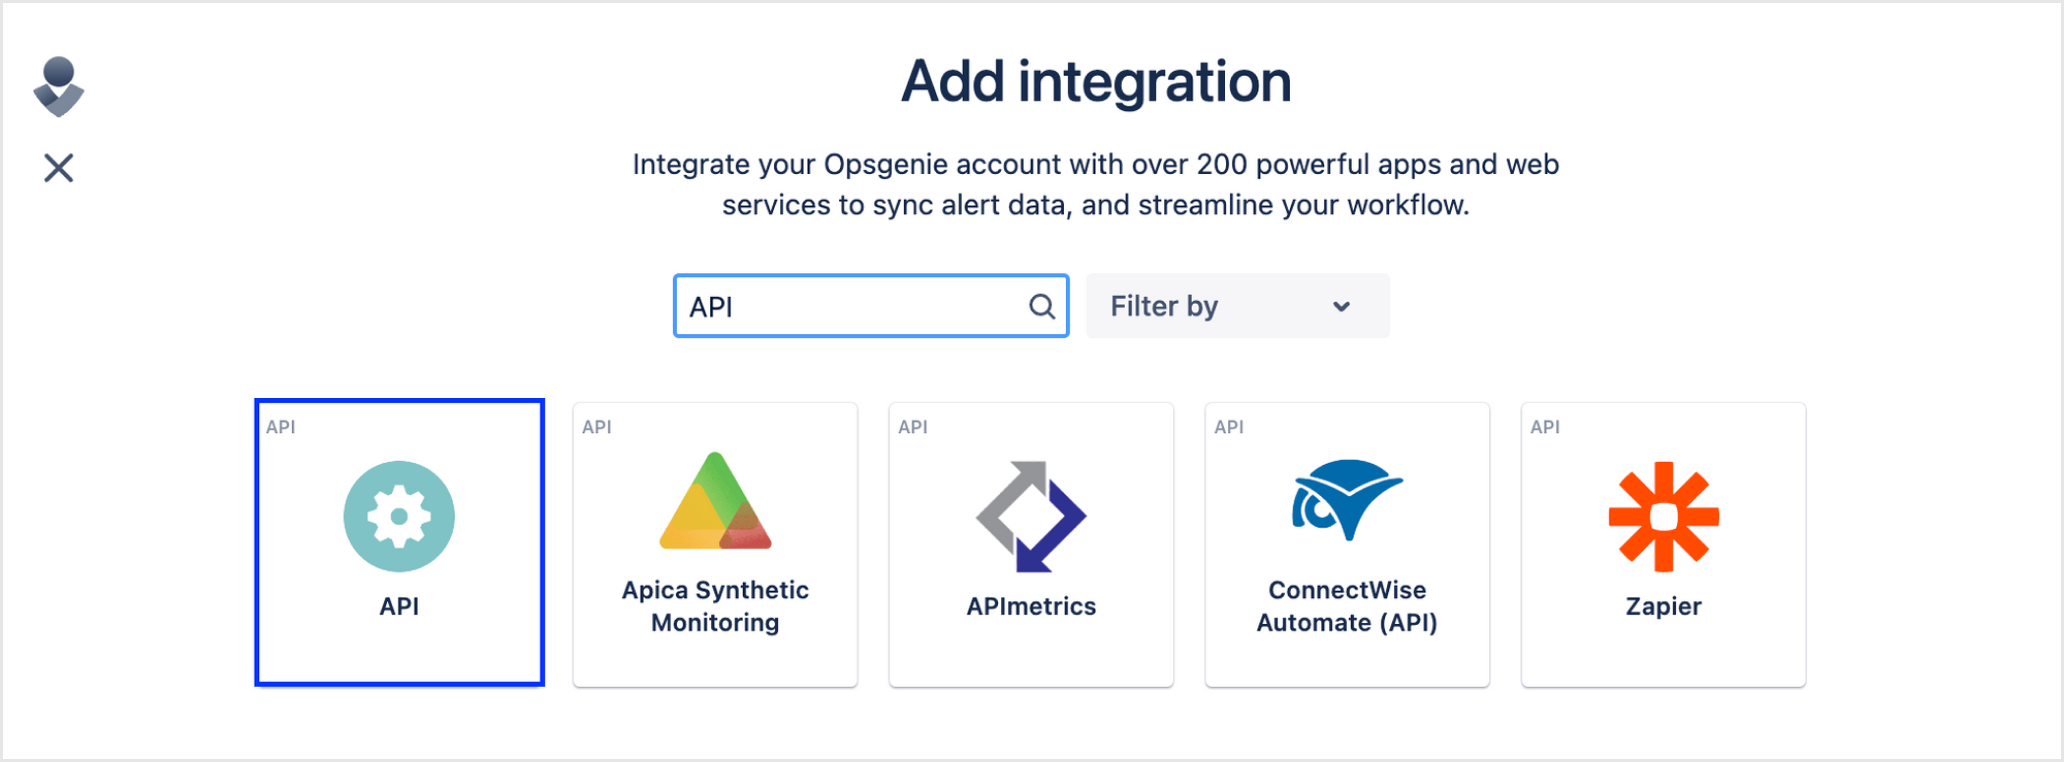
Go to the Integration menu and click the [ Add Integration ] button.

-
In the integration list, search for and select API.
-
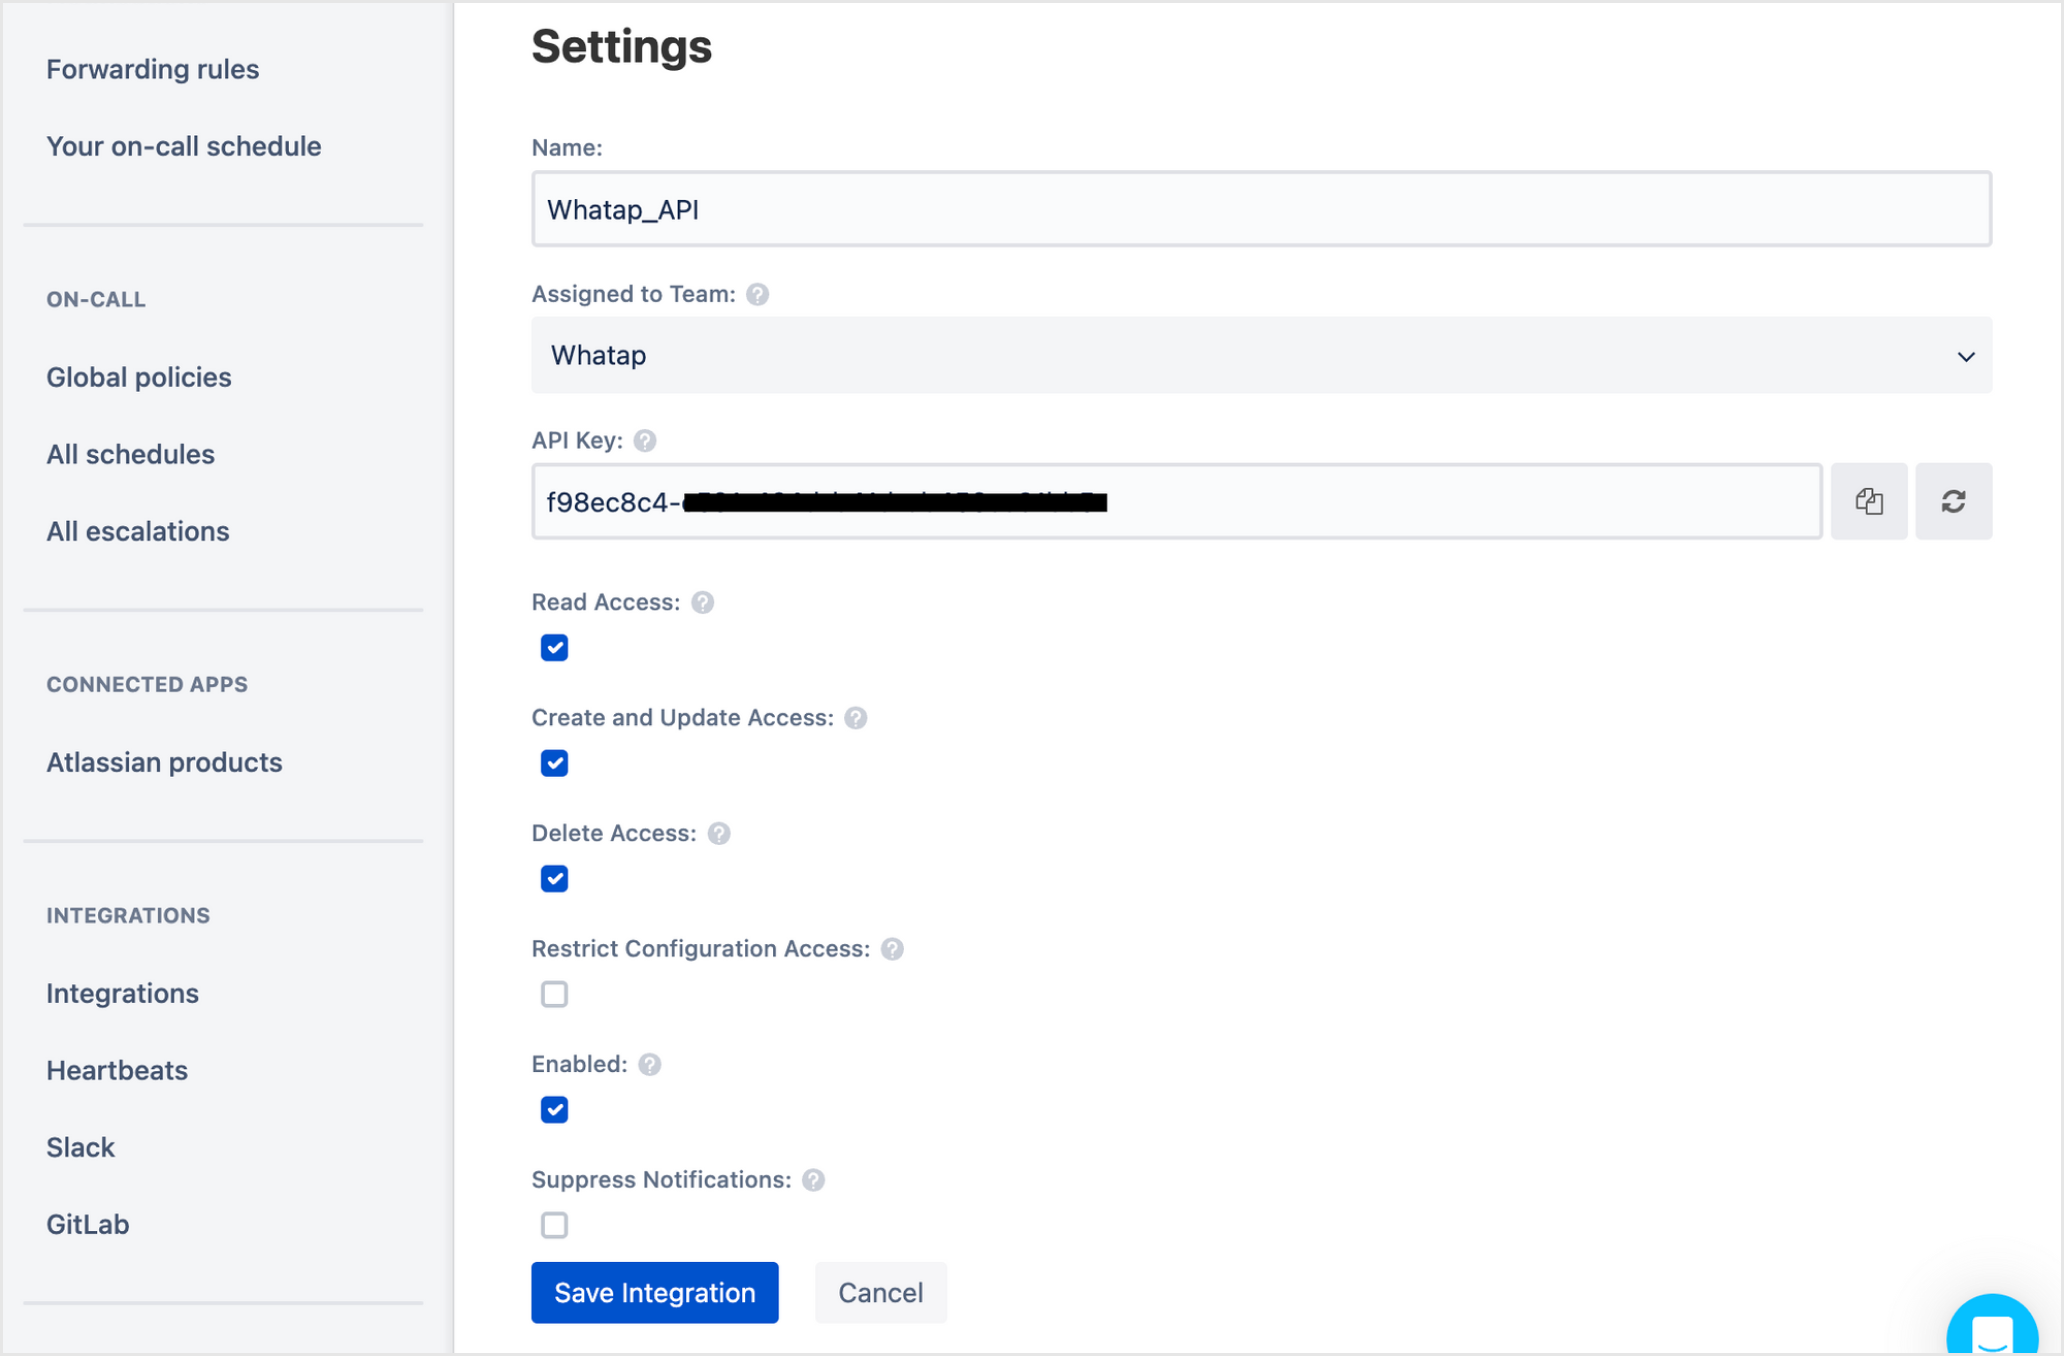
Set the API name, assign a team, configure the required permissions, and then click the [ Save Integration ] button.
-
Return to the Add a third-party plug-in window in the WhaTap monitoring service, and enter values for Name and API Key at the bottom of the Opsgenie tab.
-
Click the [ Registration ] button.
PagerDuty
-
Sign up for a PagerDuty account and log in.
-
In PagerDuty, go to Services > Service Directory, then click the [ + New Service ] button.

-
Enter the service information (Name) and click the [ Next ] button.

-
Configure the Escalation Policy, then click the [ Next ] button.

-
Configure Alert Grouping and Transient Alerts, then click the [ Next ] button.

-
In Integrations, select Event API V2, then click the [ Create Service ] button.

-
On the created service page, copy the Integration Name and Integration Key values.

-
Return to the Add a third-party plug-in screen in the WhaTap monitoring service and enter the Integration Name and Integration Key values.
-
Click the [ Register ] button.
If you do not receive messages or the plugin is not registered, check whether the Integration Name or Integration Key values are correct.
LINE
-
Install the LINE app.
-
Scan the QR code below to add the official WhaTapLabs channel as a friend.

-
Use the following commands to link your project with LINE and configure notifications.
Commands
/help # Show available commands
/list # View the list of linked projects
/license [ACCESS_KEY] # Add a new project linkage
/remove [PROJECT_CODE] # Remove a linked project
/language [ko|ja|en] # Set notification language (Korean/Japanese/English)- You can find the project access key under Management > Project Management.
- Using the
/languagecommand in LINE applies only to the current LINE chat room. It does not change the notification language for other 3rd-party plugins or projects.
Examples
/license XXXXXXXXXX # Link a project
/language ko # Set language to Korean
/list # Check linked projects
-
Project access key: Available under Management > Project Management in the WhaTap project.
-
Language settings: The
/languagecommand applies only within the LINE chat room and does not affect other notification channels.
ilert
-
In the ilert console, click [+ Create alert source] at the top right of the Alert sources page.
-
In the Integration type step, enter
WhaTapin the Filter integrations search field at the bottom to search. -
From the search results, select the WhaTap tile and click the [ Next ] button.
-
Enter the alert source name and assign a team, then click the [ Next ] button.
- You can create a new escalation policy or select an existing one.
-
Select the alert grouping method and click the [ Continue setup ] button.
- The initially selected Do not group alerts option can be changed later.
-
On the next screen, you can configure additional settings such as alert templates and priorities. For now, click the [ Finish setup ] button to complete the setup.
-
When the setup is complete, an API key or Webhook URL will be generated on the completion screen.
-
Copy the generated Webhook URL from the Webhook JSON tab and paste it into the Webhook URL input field below.
-
Click the [ Register ] button.
Preventing Alert Storms
If a large number of alerts occur within a short period, alert notifications are temporarily paused for a specified duration. For example, if 20 events occur within 5 minutes, alert notifications will be suspended for the next 5 minutes. Once the configured Pause Duration has elapsed, the alert-storm prevention feature is automatically released.
-
Go to Alert > Notifications > the Avoids a large number of alerts section.
-
Click the toggle button to Enable or Disable the feature.
-
 Enabled: Temporarily pause alerts when an alert storm is detected
 -
 Disabled: Resume alert notifications
-
-
Configure the Detection Time, Detection Count, and Pause Duration.
- If the number of events exceeds the Detection Count within the Detection Time, alert notifications are paused for the configured Pause Duration.
When alerts are blocked due to an alert storm, a notification banner is displayed. To immediately release the alert-storm block, click the Stop Alert Storm Prevention button in the banner.