Event Setting
Home > Select Project > ![]() Sitemap > Alert > Event Configuration
Sitemap > Alert > Event Configuration New
The new Event Configuration menu can enhance the user experience by focusing on the field (Field) rather than the category (Category). This event function allows you to quickly apply warning level notifications to users who do not need powerful features such as metric event settings or to repeatedly use simple notification conditions. By providing basic event templates for the products of the created project, you can quickly and easily configure the desired warning notification events.
By selecting fields first rather than categories, we can resolve the discrepancy between metrics perceived by the user and event settings. By combining the visual intuition of the simulation, you can complete event settings quickly and accurately.
-
New projects can use this feature without extra settings. However, for the created projects, select Create event template. The event lists optimized for new features are automatically generated.
-
The provided event templates may differ depending on the product.
-
This function can be used by only the members with the Alert settings role. For more information about the member roles, see the following.
Basic event templates
Basic event templates are provided based on the product of the created project. You can activate a desired event by selecting Activation on the utmost left of the event list.
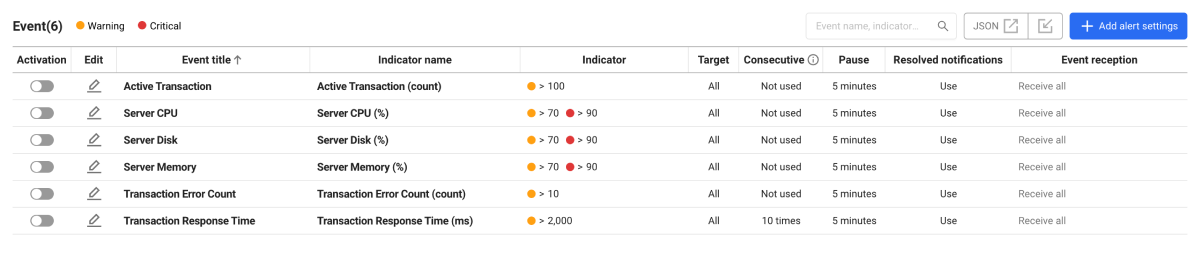
The provided event templates are as follows. The default value set in Indicator can be changed to a desired one.
-
Active Transaction
Category:
app_counterIf the number of active transactions (
active_tx_count) exceeds 100, a warning (Warning) level notification is sent. -
Agent Alive Check
Category:
agent_status_summaryIt sends a warning (Warning) level notification when data collection from the agent fails (
isActive==false).NoteThis template event can occur even if the network is disconnected.
-
Apdex 100 by kind
Category:
app_counterIf the application performance metric percentage (
apdex100) by agent type is less than 95%, a warning (Warning) level notification is sent, and if it is less than 90%, a critical (Critical) level notification is sent. -
Apdex 100 by project
Category:
app_counterIf the application performance metric percentage (
apdex100) for all agents in the project is less than 95%, a warning (Warning) level notification is sent, and if it is less than 90%, a critical (Critical) level notification is sent. -
Server CPU
Category:
app_host_resourceIf the host's CPU utilization (
cpu) exceeds 70%, a warning (Warning) level notification is sent. If it exceeds 90%, a critical (Critical) level notification is sent. -
Server Disk
Category:
app_host_resourceIf the host's disk utilization (
disk) exceeds 70%, a warning (Warning) level notification is sent. If it exceeds 90%, a critical (Critical) level notification is sent. -
Server Memory
Category:
app_host_resourceIf the host's memory utilization (
mem) exceeds 70%, a warning (Warning) level notification is sent. If it exceeds 90%, a critical (Critical) level notification is sent. -
Transaction Error Count
Category:
app_counterIf the number of transaction errors (
tx_error) exceeds 10, a warning (Warning) level notification is sent. -
Transaction Response Time
Category:
app_counterIf the average response time (
resp_time) for transactions continues to exceed 2,000 ms (2 seconds) for 10 consecutive times, a warning (Warning) level notification is sent.
For more information about the fields applied to the basic event templates, see the following.
Modifying event
You can modify the metric values applied in basic event templates for changing the warning notification occurrence criteria. In addition, you can change the notification occurrence criteria through various option settings. Select ![]() on the event to modify. The event editing screen appears. Modify the following items and then select Save.
on the event to modify. The event editing screen appears. Modify the following items and then select Save.
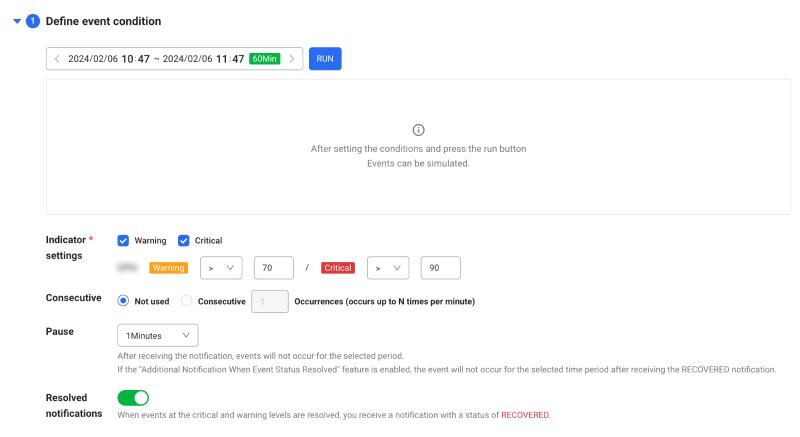
Define event condition
You can set the criteria for event occurrence conditions.
-
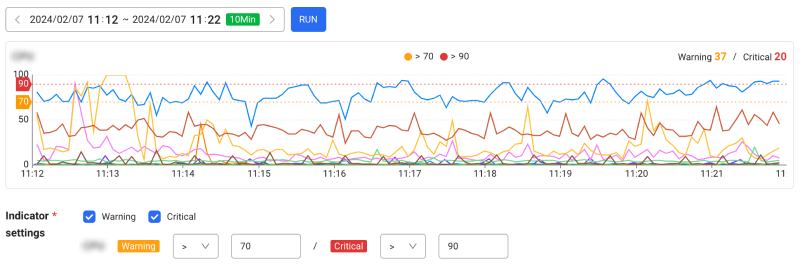
RUN: After setting the event conditions, you can simulate the set event by selecting the button.
-
Indicatorsettings: You can set the thresholds for the Warning or Critical notifications. Set an operator and then enter thresholds.
-
Operators:
>(greater than),>=(greater than or equal to),<(less than),<=(less than or equal to),==(equal to) -
You can enter a positive number, negative number, or 0 as the threshold, but whether to enter a negative number may differ depending on the selected event template.
Note-
Depending on the provided event template, the notification levels that can be set may differ.
-
You can select one of Warning and Critical. However, you cannot disable both two items.
-
-
Consecutive: You can send notifications based on the count that meets the specified event conditions.
-
Not used: Notifications are sent each time any event occurs.
-
Consecutive: Notifications are sent each time any event occurs as many as you specified.
-
-
Pause: No notification is sent for the selected time after receiving the notification.
NoteIf the Resolved notification feature is active, notifications are not sent for the set period after sending a notification in RECOVERED state.
-
Resolved notification: When the event is resolved, notify the status of RECOVERED.
The criteria for sending notifications differ depending on the following conditions:
| Consecutive | Resolved notification | Action |
|---|---|---|
| Not used | On | Notifications are sent when the specified event conditions are met or resolved. |
| Off | The notifications are sent whenever the specified conditions are met. | |
| Consecutive N Occurrences | On | Notifications are sent when a condition is met at least N times or an event is resolved at least N times. |
| Off | A notification is sent if the event conditions you set are met more than N times. After sending a notification, the count is reset and it is recounted. |
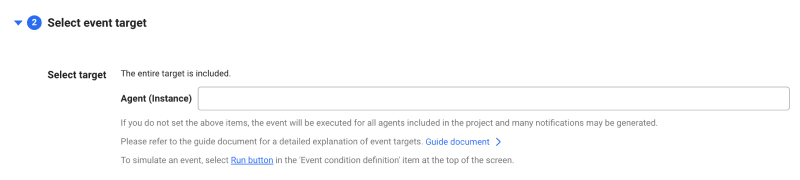
Select event target
You can set to send events that occur only on specific agents as notifications. Click the Agent (Instance) item and then select a desired agent.
-
Depending on the provided template, selectable targets may differ.
-
To check the event occurrence status for the selected targets, select RUN in Define event condition.
- If you do not select a target, notifications are sent to all agents included in the project. When an event occurs across all agents, it can generate numerous notifications.
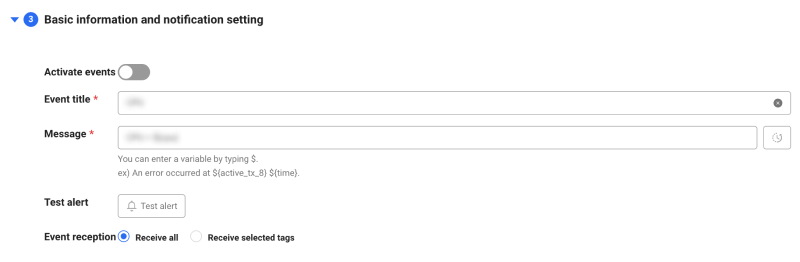
Basic information and notification setting
You can write a title and message for the event received as a notification, and then select the recipients.
-
Activate events: You can enable the current events.
-
Event title: The event name of the basic template has been specified. You can edit the event name as you want.
-
Message: The message of the basic template has been specified. You can edit the message as you want. If the
 button is clicked, you can see the history of previously entered messages.Tip
You can write a message by entering the
${Tag}or${Field}variable in the message field.In Analysis > Metrics Search, select Category and then check the
${Tag}or${Field}variable that can be entered. For the Category name of the current event template, see the Category in the following -
Test alert: When receiving notifications as events, you can pre-check the specified event name and message. Testing is possible only when the required items (Indicatorsettings, Event title, and Message) are all entered.
NoteDuring testing, substitution for actual metric values or variables does not work, and the notifications cannot be sent only to users with recipient tags.
-
Event reception: You can select members to receive notifications from current events.
-
Receive all: You can send notifications to all the members in the project.
-
Receive selected tags: It sends notifications to project members and 3rd-party plugins with the selected tags. Click Add tag or
 to select a tag from the tag list.
NoteIn Alert > Notifications, you can set the tags in project members and 3rd-party plug-ins. For more information, see the following.
-
Adding an event
You can edit a basic event template to add your own notification.
-
On the upper right of the screen, select Add alert settings.
-
Select an event to add from the template list.
-
Set the options in the Select event target, Select event target, and Basic information and notification setting sections in turn.
-
After all settings are made, select Save on the upper right of the screen.
You can see newly added events in the event list.
-
To use it differently from basic event templates, edit the Event title item and then save it.
-
For more information about the basic event templates, see the following.
-
For more information about the event condition setting, see the following.
Deleting an event
You can delete the embedded or added events.
-
Select
 in the event to delete from the event list.
 -
In the event modification screen, select Delete on the upper right of the screen.
-
If the deletion confirmation window appears, select Delete again.
The deleted event cannot be restored.
Modifying to JSON format
You can modify event settings in JSON format.
-
On the upper right of the screen, select JSON
 .
. -
When the editing window appears, modify the content in JSON format.
-
After all changes are made, select Save on the upper right of the screen.
If the modified content does not match the JSON format, an error message appears at the bottom of the screen and the changes cannot be saved. The displayed error message may differ depending on the format.

The JSON data structure is as follows:
{
    "metaId": "infra001",
    "displayName": "CPU",
    "stateful": true,
    "selectCondition": {},
    "warningEnabled": true,
    "criticalEnabled": true,
    "receiver": [],
    "warningThreshold": "cpu > 70",
    "criticalThreshold": "cpu > 90",
    "repeatCount": 1,
    "silentPeriod": 60000,
    "enabled": false,
    "message": "CPU = ${cpu}"
},
The fields in JSON data are associated with the following options in event settings.
| JSON field | Option |
|---|---|
metaId | Unique identifier for the selected template |
displayName | Event title |
stateful | Resolved notification |
selectCondition | Select target |
warningEnabled | Whether the Warning event is active or not |
criticalEnabled | Whether the Critical event is active or not |
receiver | List of key values in the Event reception > Receive selected tags option |
warningThreshold | Threshold setting of the Warning event |
criticalThreshold | Threshold setting of the Critical event |
repeatCount | Consecutive N Occurrences |
silentPeriod | Pause |
enabled | Activate events |
message | Message |
Default Sharing events
You can save the Default event settings as a JSON file to share them with other users or import them from other users.
Export
-
On the upper right of the screen, select JSON
. -
If the JSON edition window appears, select
Export. -
Once the JSON file has been downloaded, forward it to others for sharing.
The format of the JSON file name is event-rules-YYYY-MM-DD.json.
Import
-
On the upper right of the screen, select
 .
. -
Using the Export function, select a JSON file to download.
-
If the JSON edition window appears, select Add to list or Overwrite.
It is recommended to use this function for the products of the same type. You can import event settings from the projects for other products, but it does not work.
Sharing all event settings
You can download the settings of the default event and all other events as a JSON format file, allowing you to share the settings between products of the same type. This simplifies repetitive event configurations.
Export
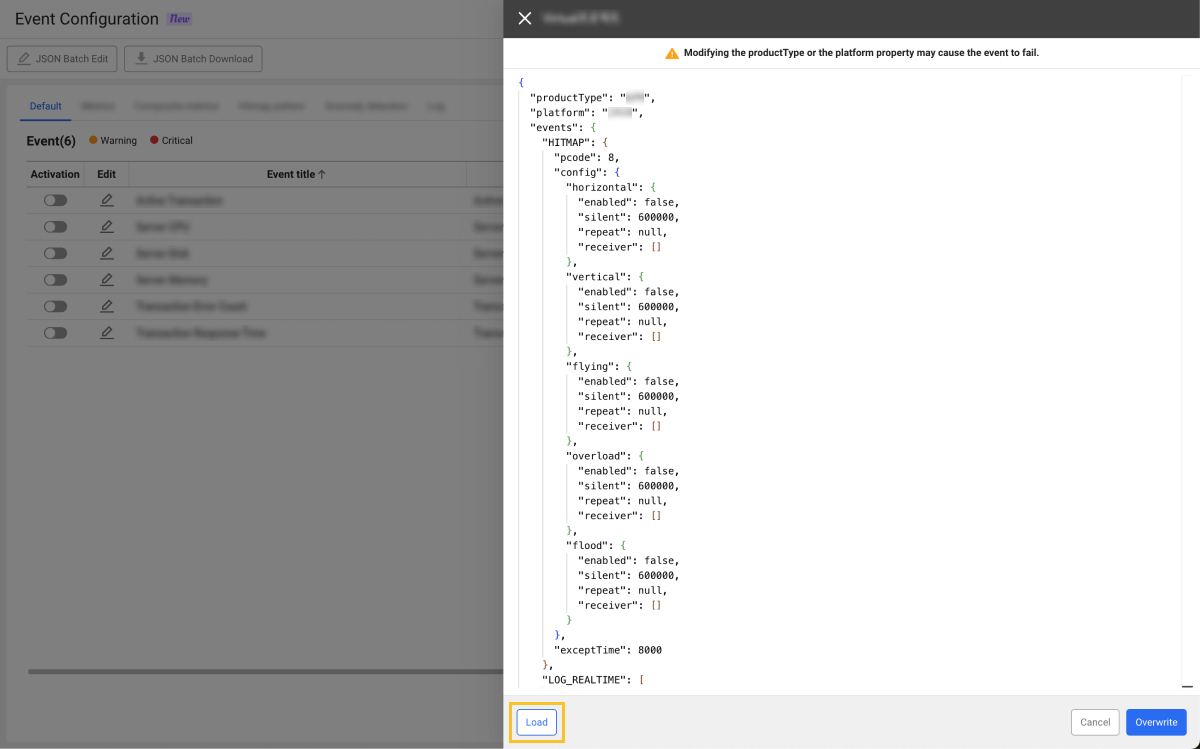
On the screen, select JSON Batch Download. A JSON file containing all event settings are downloaded. The format of the JSON file name is integrated-event-YYYY-MM-DD.json.
The JSON data structure is as follows:
{
"productType": "{productType}",
"platform": "{platform}",
"events": {
"HITMAP": {
...
},
"LOG_REALTIME": [
{...}
],
"METRICS": [
{...}
],
"COMPOSITE_LOG": [
{...}
],
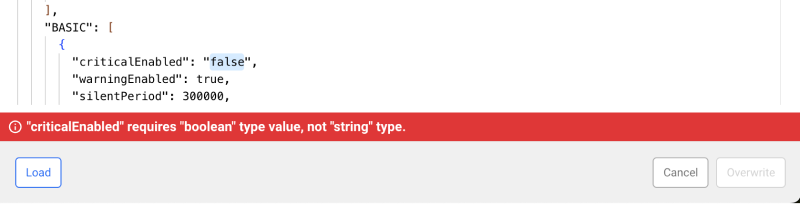
"BASIC": [
{...}
],
"COMPOSITE_METRICS": [
{...}
],
"ANOMALY": [
{...}
]
}
}
The sub properties of the events property correspond to the following event settings.

BASIC: Default
METRICS: Metrics
COMPOSITE_METRICS: Composite metrics
HITMAP: Hitmap pattern
-
ANOMALY: Anomaly detection -
LOG_REALTIME: Real-time log event -
COMPOSITE_LOG: Composite log event
The structure of the JSON data and sub properties of the events property may differ depending on the product (platform) or product type (productType).
If you arbitrarily modify the value of the productType or platform property among the JSON data properties, the events may not work in other projects.
Load
-
On the screen, select JSON Batch Edit.
-
If the JSON editing window appears, select Load at the bottom of the screen.
-
Using the JSON Batch Download function, select a JSON file to download.
-
Select Overwrite.
-
When the confirmation message appears, select Overwrite.
-
If overwritten, the previous event settings cannot be restored.
-
If you arbitrarily modify the value of the
productTypeorplatformproperty, the events may not work in other projects. -
The JSON editing window has a built-in JSON validation function. If the format or value is incorrect, an error message appears below the editing window, and the Overwrite button is disabled.
Searching event
You can search the event by event name or metric in the event list. Enter a string in the search field and then select ![]() .
.