Agent Installation
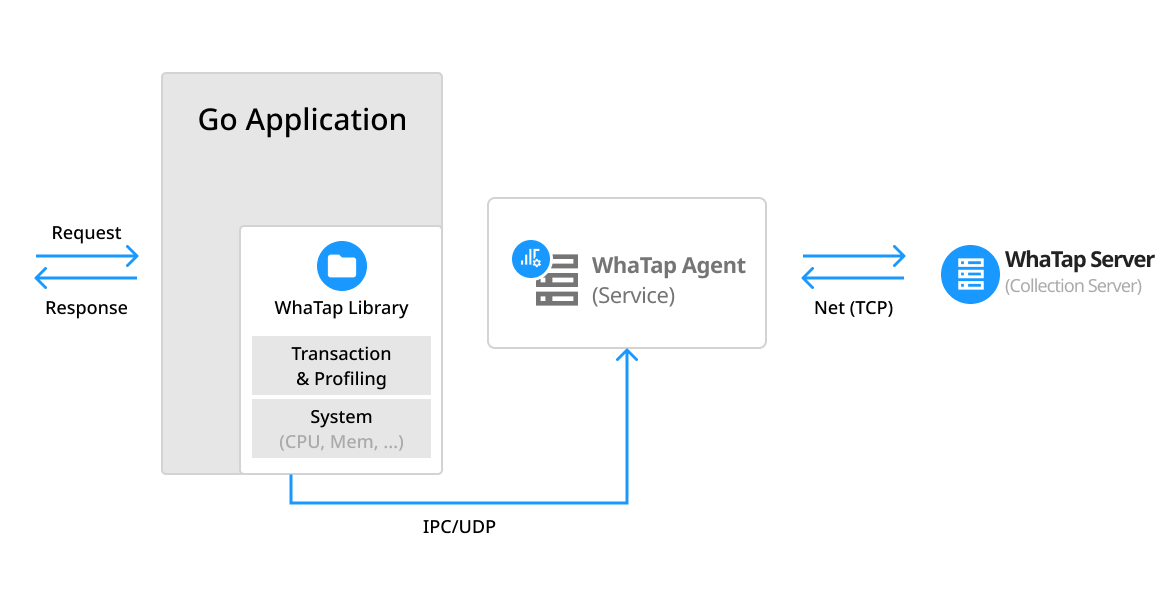
An agent must be installed on the same server to forward data from the monitored application server through TCP communication and to transfer the data to the WhaTap collection server. The agent can be installed using the package.
The agent works as the default 127.0.0.1:6600 TCP server. It receives data from the Go application and forwards the data to the WhaTap collection server via the outbound 6600 port.
-
Install the WhaTap repository.
-
Install the whatap-agent Linux package (yum, apt-get).
-
Run the whatap-agent service.
To use the WhaTap monitoring service, after Sign up, create a project and then install the agent to the target server.
Creating a project
Create a project before installing the agent.
-
Log in WhaTap monitoring service.
-
To create a project, on the left of the screen, select All Projects > + Project.
-
Select a product in Select product for installation.
-
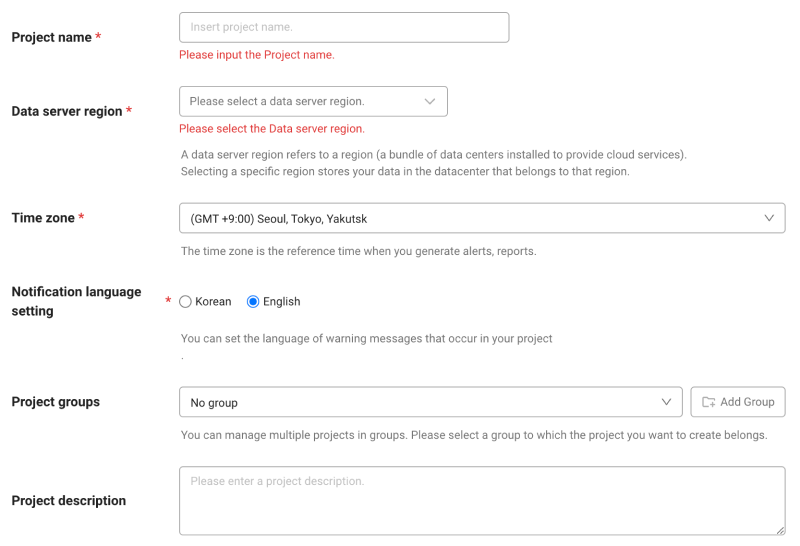
Configure the settings for Project name, Data server region, and Time zone.
-
In Notification language setting, select the language for alert messages.
-
After all settings are finished, select Creating a project.
-
A Data server region refers to a region (a bundle of data centers installed to provide cloud services). Selecting a specific region stores your data in the datacenter that belongs to that region.
-
Time zone is the reference time for generating alerts and reports.
-
To group multiple projects for management, select a group from Project groups or add a group. For more information about grouping, see the following.
-
To add a project with an organization selected, Groups of organization must be set.
Checking the access key
The access key is the unique ID to enable the WhaTap service.
In the installation guide section, select Getting the access key. After the access key has been issued automatically, proceed to the next step.
After a project has been created, the Agent installation page appears automatically. If the Agent installation does not appear, select Management > Agent installation on the left of the screen.
Download agent
Once you have received the access key, download the agent with the following command.
- Red Hat/CentOS
- Debian/Ubuntu
- Amazon Linux
- Alpine Linux
- Alpine Linux Docker
## Register the package repository
$ sudo rpm -Uvh https://repo.whatap.io/centos/5/noarch/whatap-repo-1.0-1.noarch.rpm

## Install the package
$ sudo yum install whatap-agent
## Register the package repository
$ wget https://repo.whatap.io/debian/release.gpg -O -|sudo apt-key add -
$ wget https://repo.whatap.io/debian/whatap-repo_1.0_all.deb
$ sudo dpkg -i whatap-repo_1.0_all.deb
$ sudo apt-get update

## Install the package
$ sudo apt-get install whatap-agent
## Register the package repository
$ sudo rpm --import https://repo.whatap.io/centos/release.gpg
$ echo "[whatap]" | sudo tee /etc/yum.repos.d/whatap.repo > /dev/null
$ echo "name=whatap packages for enterprise linux" | sudo tee -a /etc/yum.repos.d/whatap.repo > /dev/null
$ echo "baseurl=https://repo.whatap.io/centos/latest/\$basearch" | sudo tee -a /etc/yum.repos.d/whatap.repo > /dev/null
$ echo "enabled=1" | sudo tee -a /etc/yum.repos.d/whatap.repo > /dev/null
$ echo "gpgcheck=0" | sudo tee -a /etc/yum.repos.d/whatap.repo > /dev/null

## Install the package
$ sudo yum install whatap-agent
[whatap-agent.tar.gz]After downloading the file (https://s3.ap-northeast-2.amazonaws.com/repo.whatap.io/alpine/x86_64/whatap-agent.tar.gz), unzip the file based on the "/" directory. Create the monitoring file in the /usr/whatap/agent path.
$ wget https://s3.ap-northeast-2.amazonaws.com/repo.whatap.io/alpine/x86_64/whatap-agent.tar.gz
$ tar -xvzf whatap-agent.tar.gz -C /
[whatap-agent.tar.gz]After downloading the file (https://s3.ap-northeast-2.amazonaws.com/repo.whatap.io/alpine/x86_64/whatap-agent.tar.gz), unzip the file in the /usr/whatap/agent path.
FROM alpine

RUN apk update && apk upgrade

# Install WhaTap Go monitoring agent
RUN wget https://s3.ap-northeast-2.amazonaws.com/repo.whatap.io/alpine/x86_64/whatap-agent.tar.gz
RUN tar -xvzf whatap-agent.tar.gz -C /
Agent configuration file
It consists of a tracer to collect the monitoring data, an agent to transmit the collected data to the server, and an installation script file to dynamically apply the tracer and agent to the server.
-
whatap-agent: This program transmits the data passed from the agent and tracer to UDP, to the collection server.
-
/etc/init.d/whatap-agent: Service script file.
-
whatap_agent: Service execution file.
-
whatap.conf: Enter the configuration data, collection server IP, and access key in this file.
-
whatap-boot-
yyyymmdd.log: Agent log file. (path: /usr/whata/agent/log)
Agent setting
Default settings
Execute the following commands in order to set the access key and collection server IP in whatap.conf.
-
Create the whatap.conf file in the path of the application startup script.
-
If the
WHATAP_HOMEenvironment variable has not been set, the path of the application startup script is recognized as the one of the whatap.conf file.
# Creation of whatap.conf in the script running path
$ echo "license={Access Key}" >> ./whatap.conf
$ echo "whatap.server.host={Collection Server IP}" >> ./whatap.conf
$ echo "app_name={Application Name}" >> ./whatap.conf

# 애플리케이션 실행
./app
-
license: Enter the access key. -
whatap.server.host: Enter the collection server IP address. -
app_name: Enter the application name. Set the user as a string.Noteapp_nameis a component to determine the agent name. For more information, see the following.
Setting the WHATAP_HOME variable
You can set the whatap.conf path as the WHATAP_HOME variable. Create the WHATAP_HOME path first.
# Set the whatap.conf path after setting the WHATAP_HOME path.
mkdir ./whatap_home
echo "license={Access Key}" >> ./whatap_home/whatap.conf
echo "whatap.server.host={Collection Server IP}" >> ./whatap_home/whatap.conf
echo "app_name={Application Name}" >> ./whatap_home/whatap.conf

# Run the application.
WHATAP_HOME=./whatap_home ./app
Setting the agent names for each process
If one whatap.conf file is shared by the applications running in multiple processes, any changes may not be reflected. It is recommended to set a whatap.conf for each process.
To avoid duplicate agent names, you can add a string to each agent name for identification. The value set with the app_name option is added to the beginning of the agent name.
You can avoid duplicate names of agents run with the same command and the same instance.
# Set the whatap.conf path after setting the WHATAP_HOME path.
mkdir ./whatap_home
echo "license={Access Key}" >> ./whatap_home/whatap.conf
echo "whatap.server.host={Collection Server IP}" >> ./whatap_home/whatap.conf
echo "app_name={Application Name-1}" >> ./whatap_home/whatap.conf

# Run the application.
WHATAP_HOME=./whatap_home ./app

# Set the whatap.conf path after setting the WHATAP_HOME path.
mkdir ./whatap_home1
echo "license={Access Key}" >> ./whatap_home1/whatap.conf
echo "whatap.server.host={Collection Server IP}" >> ./whatap_home1/whatap.conf
echo "app_name={Application Name-2}" >> ./whatap_home1/whatap.conf

# Run the application
WHATAP_HOME=./whatap_home1 ./app
Configuring the Go library
Add the github.com/whatap/go-api package to the Go application source code.
go get github.com/whatap/go-api
Configure for initialization and shutdown with the trace.Init() and trace.Shutdown() functions. Set the startup and end for transactions with the trace.Start() and trace.End() functions.
import "github.com/whatap/go-api/trace"

func main(){
    trace.Init(nil)
    //It must be executed before closing the app.
    defer trace.Shutdown()

    ctx, _ := trace.Start(context.Bacground(), "Start Tx")

    ...

    trace.End(ctx, err)
}
For more information about the library configuration, see the following.
Starting the monitoring
- Red Hat/CentOS
- Debian/Ubuntu
- Amazon Linux
Once the application server has been restarted, the agent starts collecting data.
Once the application server has been restarted, the agent starts collecting data.
-
Execute the following command to install the WhaTap agent daemon.
/usr/whatap/php/whatap-agent start -
Execute the following command to check whether the WhaTap service has been run normally.
ps -elf | grep whatap_agent_static
Once the application server has been restarted, the agent starts collecting data.