고급 기능
확장팩 설정
정상적으로 설치 후 확장팩 기능을 사용하려면 다음과 같이 설정 파일을 생성하고 에이전트를 다시 시작하세요.
MySQL 서버 목록
MySQL/MariaDB 모니터링 에이전트를 이용할 수 있습니다.
웹 URL 성능 체크
와탭 인프라 에이전트가 주어진 웹 주소로 접속하여 접속 여부 및 응답 시간을 수집합니다. 수집된 웹 URL 성능은 카테고리 server_webcheck에서 확인할 수 있습니다. 다음 명령으로 체크할 웹 주소를 추가하세요. URL 모니터링 서비스에 대한 자세한 내용은 다음 문서를 참조하세요.
- Linux Shell
- Windows Powershell
echo "체크할 웹 주소" | sudo tee -a /usr/whatap/infra/conf/webcheck.conf
echo "webcheck.enabled=true" | sudo tee -a /usr/whatap/infra/conf/whatap.conf
sudo service whatap-infra restart
Add-Content -Path "C:\Program Files\WhatapInfra\webcheck.conf" -Value "체크할 웹 주소"
Add-Content -Path "C:\Program Files\WhatapInfra\whatap.conf" -Value "webcheck.enabled=true"
Restart-Service "Whatap Infra"
Redis 서버 목록
와탭 인프라 에이전트가 주어진 Redis 주소로 접속하여 연결 개수를 포함한 여러 개의 성능 지수를 수집합니다. 수집된 성능 정보는 카테고리 server_redis에서 확인할 수 있습니다. 다음 명령으로 체크할 Redis 서버의 접속 정보를 추가할 수 있습니다.
- Linux Shell
- Windows Powershell
sudo echo "addr=Redis 주소:포트" | sudo tee /usr/whatap/infra/conf/redis.conf
sudo echo "password=Redis 패스워드" | sudo tee -a /usr/whatap/infra/conf/redis.conf
sudo service whatap-infra restart
Add-Content -Path "C:\Program Files\WhatapInfra\redis.conf" -Value "addr=Redis 주소:포트"
Add-Content -Path "C:\Program Files\WhatapInfra\redis.conf" -Value "password=Redis 패스워드"
Restart-Service "Whatap Infra"
Memcached 서버 목록
와탭 인프라 에이전트가 주어진 Memcached 주소로 접속하여 연결 개수를 포함한 여러 개의 성능 지수를 수집합니다. 수집된 정보는 카테고리 server_memcached에서 확인할 수 있습니다. 다음 명령으로 체크할 Memcached 서버의 접속 정보를 추가할 수 있습니다.
- Linux Shell
- Windows Powershell
sudo echo "addr=Memcached 주소:포트" | sudo tee /usr/whatap/infra/conf/memcached.conf
sudo echo "password=Memcached 패스워드" | sudo tee -a /usr/whatap/infra/conf/memcached.conf
sudo service whatap-infra restart
Add-Content -Path "C:\Program Files\WhatapInfra\memcached.conf" -Value "addr=Memcached 주소"
Add-Content -Path "C:\Program Files\WhatapInfra\memcached.conf" -Value "password=Memcached 패스워드"
Restart-Service "Whatap Infra"
TCP 포트 감시
네트워크 데몬의 수신 포트 비활성화 시 알림을 받을 수 있습니다.
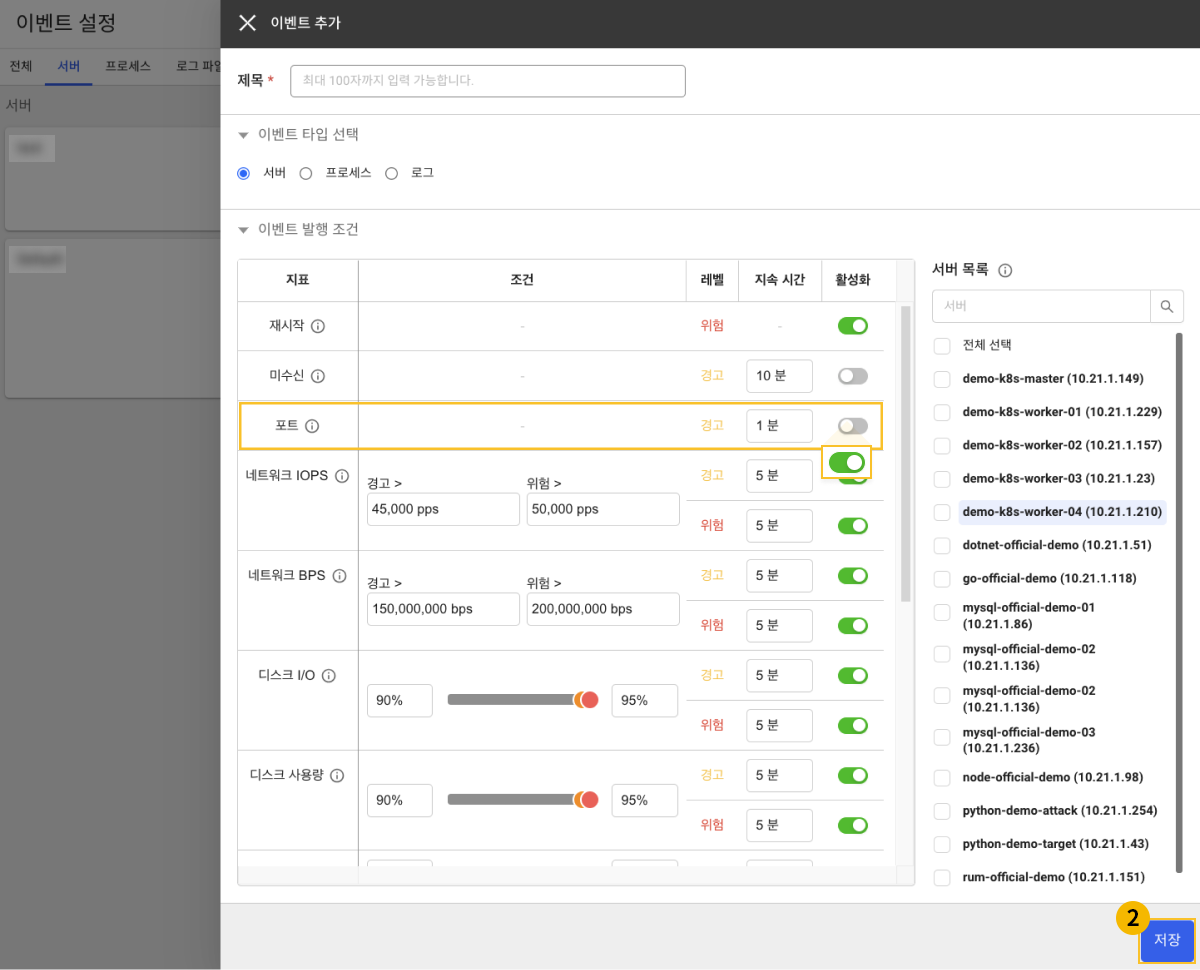
홈 화면 > 프로젝트 선택 > 경고 알림 > 이벤트 설정 > 서버 탭을 선택하고 + 이벤트 추가 버튼을 선택하세요.

-
포트 지표 토글 버튼을 클릭하여 사용 상태로 변경하세요.
-
저장 버튼을 선택하여 저장하세요.
-
대상 서버에서 다음 명령을 추가하세요.
- Linux Shell
- Windows Powershell
#아래 변수에 모니터링 대상 아이피를 지정합니다.
export TARGET_IP=127.0.0.1
#아래 변수에 모니터링 대상 포트를 지정합니다.
export TARGET_PORT=80
echo "tcp.check.$TARGET_PORT=tcp://$TARGET_IP:$TARGET_PORT" |sudo tee -a /usr/whatap/infra/conf/whatap.conf
#아래 변수에 모니터링 대상 아이피를 지정합니다.
$TARGET_IP="127.0.0.1"
#아래 변수에 모니터링 대상 포트를 지정합니다.
$TARGET_PORT="80"
Add-Content -Path "C:\Program Files\WhatapInfra\whatap.conf" -Value "tcp.check.${TARGET_PORT}=tcp://${TARGET_IP}:${TARGET_PORT}"
다중 포트 감시
여러 개의 포트를 감시하기 위해서는 whatap.conf 파일 내 추가 설정이 필요합니다. 다음 예시를 참고하세요.
# port 8080, port 80
tcp.check.8080=tcp://127.0.0.1:8080
tcp.check.80=tcp://127.0.0.1:80
프로세스 네트워크 성능 측정
프로세스 네트워크 성능은 서버 목록 > 서버 상세 화면의 프로세스 위젯에서 확인할 수 있습니다.
- Linux Shell
- Windows Powershell
echo "process.fdcheck=true" |sudo tee -a /usr/whatap/infra/conf/whatap.conf
# 관리자 권한이 필요합니다.
Add-Content -Path "C:\Program Files\WhatapInfra\whatap.conf" -Value "process.fdcheck=true"
서버 스펙 수집
CPU, MEMORY, DISK, NIC의 스펙과 설치된 패키지 및 가상 머신의 메타 정보를 수집합니다. 각 카테고리에서 다음 내용을 확인하실 수 있습니다.
server_package: 설치된 패키지입니다.server_inventory: CPU, MEMORY, DISK, NIC의 스펙입니다.server_pending_security_update: 리눅스의 보안 패치 대기 목록입니다.
- Linux Shell
- Windows Powershell
echo "inventory.product.enabled=true" |sudo tee -a /usr/whatap/infra/conf/whatap.conf
# 관리자 권한이 필요합니다.
Add-Content -Path "C:\Program Files\WhatapInfra\whatap.conf" -Value "inventory.product.enabled=true"
리눅스 컨테이너 성능 수집
리눅스 컨테이너의 CPU, MEMORY, DISK, NIC 성능을 수집합니다. 수집된 성능 정보는 카테고리 server_container에서 확인할 수 있습니다.
echo "container.enabled=true" |sudo tee -a /usr/whatap/infra/conf/whatap.conf
윈도우 서버 서비스 운영 상태 수집
윈도우 서버 서비스 운영 상태를 수집합니다. 수집된 서비스 운영 상태는 카테고리 server_windows_service에서 확인할 수 있습니다.
# 관리자 권한이 필요합니다.
Add-Content -Path "C:\Program Files\WhatapInfra\whatap.conf" -Value "winservice.enabled=true"
파일 감시
파일 시스템상에 존재하거나 존재할 가능성이 있는 파일 및 디렉터리를 감시할 수 있습니다.
- Linux Shell
- Windows Powershell
echo "filecheck.enabled=true" |sudo tee -a /usr/whatap/infra/conf/whatap.conf
echo "감시를 원하는 파일 혹은 디렉터리 전체 경로" |sudo tee -a /usr/whatap/infra/conf/filesystem.conf
Add-Content -Path "C:\Program Files\WhatapInfra\whatap.conf" -Value "filecheck.enabled=true"
Add-Content -Path "C:\Program Files\WhatapInfra\filesystem.conf" -Value "감시를 원하는 파일 혹은 디렉터리 전체 경로"
Nvidia GPU 모니터링
nvidia-smi 명령이 탑재된 경우 GPU 성능을 5초 간격으로 수집해 와탭으로 업로드합니다. 수집된 정보는 메트릭스 카테고리 server_nvidiasmi로 수집됩니다.
- Linux Shell
- Windows Powershell
echo "nvidiasmi.enabled=true" |sudo tee -a /usr/whatap/infra/conf/whatap.conf
Add-Content -Path "C:\Program Files\WhatapInfra\whatap.conf" -Value "nvidiasmi.enabled=true"
-
category server_nvidiasmi
메트릭스 비고 DecoderUtil gauge, Decoder utilization (in %) EncoderUtil gauge, Encoder utilization (in %) FreeFbMemoryUsageGpu gauge, Framebuffer memory free (in MiB). UsedFbMemoryUsageGpu gauge, Framebuffer memory used (in MiB). GpuTemp gauge, GPU temperature (in C). GpuUtil gauge, GPU utilization (in %). MemClock gauge, Memory clock frequency (in MHz). MemoryUtil gauge, Memory utilization (in %). SmClock gauge, SM clock frequency (in MHz).
와탭 에이전트 로그 위치 변경
와탭 에이전트 로그(whatap_infrad.log, whatap_infra.log, whatap_infrad.fork.stdout.log)의 경로를 변경합니다. 지정 경로가 없는 경우 와탭 에이전트가 생성을 시도합니다. 에이전트 버전 2.0.6 이상 지원됩니다.
- Linux Shell
- Windows Powershell
echo "agent.log.prefix=변경을 원하는 디렉터리" |sudo tee -a /usr/whatap/infra/conf/whatap.conf
Add-Content -Path "C:\Program Files\WhatapInfra\whatap.conf" -Value "agent.log.prefix=변경을 원하는 디렉터리"
윈도우의 경우 경로 구분자를 \\로 입력할 수 있습니다.
Netstat 모니터링
netstat 명령이 탑재된 경우 1분 간격으로 수집하여 카테고리 server_netstat (netstat connection 통계), server_netstat_s (netstat -s 명령 실행 결과)로 업로드됩니다.
- Linux Shell
- Windows Powershell
echo "netstats.enabled=true" |sudo tee -a /usr/whatap/infra/conf/whatap.conf
Add-Content -Path "C:\Program Files\WhatapInfra\whatap.conf" -Value "netstats.enabled=true"
사용자 스크립트 모니터링
- Linux Shell
- Windows Powershell
리눅스 서버에서 실행 가능한 사용자 스크립트를 주기적으로 실행하여 결과를 업로드합니다. 다음 예시를 참조하여 사용자 스크립트를 작성하세요.
-
스크립트를 다음과 같이 작성 후 실행하세요.
Linux Shell#!/bin/bash
urls=("https://www.whatap.io" "https://blog.whatap.io" "https://service.whatap.io")
for url in ${urls[*]}; do
echo "M $url url $url"
curl -w @- -o /dev/null -s "$url" <<'EOF'
M %{url_effective} url %{url_effective}\n
H %{url_effective} time_namelookup %{time_namelookup}\n
H %{url_effective} time_connect %{time_connect}\n
H %{url_effective} time_appconnect %{time_appconnect}\n
H %{url_effective} time_pretransfer %{time_pretransfer}\n
H %{url_effective} time_redirect %{time_redirect}\n
H %{url_effective} time_starttransfer %{time_starttransfer}\n
H %{url_effective} time_total %{time_total}\n
EOF
done -
다음과 같이 출력되는지 확인하세요.
Linux Shell$ ./curl.sh
M https://www.whatap.io/ url https://www.whatap.io/
H https://www.whatap.io/ time_namelookup 0.007289
H https://www.whatap.io/ time_connect 0.010702
H https://www.whatap.io/ time_appconnect 0.033637
H https://www.whatap.io/ time_pretransfer 0.033831
H https://www.whatap.io/ time_redirect 0.000000
H https://www.whatap.io/ time_starttransfer 0.043230
H https://www.whatap.io/ time_total 0.043312
M https://blog.whatap.io/ url https://blog.whatap.io/
H https://blog.whatap.io/ time_namelookup 0.000000
H https://blog.whatap.io/ time_connect 0.000000
H https://blog.whatap.io/ time_appconnect 0.000000
H https://blog.whatap.io/ time_pretransfer 0.000000
H https://blog.whatap.io/ time_redirect 0.000000
H https://blog.whatap.io/ time_starttransfer 0.000000
H https://blog.whatap.io/ time_total 0.005654
M https://service.whatap.io/ url https://service.whatap.io/
H https://service.whatap.io/ time_namelookup 0.004296
H https://service.whatap.io/ time_connect 0.007282
H https://service.whatap.io/ time_appconnect 0.038404
H https://service.whatap.io/ time_pretransfer 0.038607
H https://service.whatap.io/ time_redirect 0.000000
H https://service.whatap.io/ time_starttransfer 0.055226
H https://service.whatap.io/ time_total 0.055307 -
스크립트 정상 수집을 확인하고 다음과 같이 와탭 서버 모니터링 에이전트에 스크립트를 등록하세요.
Linux Shellexport USER_SCRIPT=실행할 사용자 스크립트 절대 경로
sudo chmod +x $USER_SCRIPT
sudo mkdir /usr/whatap/infra/ext/
sudo cp -r $USER_SCRIPT /usr/whatap/infra/ext/
export RUNAS_USER=사용자 스크립트를 실행할 계정. root 계정제외
sudo WHATAP_HOME=/usr/whatap/infra/conf /usr/whatap/infra/whatap_infrad --user=$RUNAS_USER init-script
sudo service whatap-infra restart
수집된 데이터는 분석 > 메트릭스 차트에서 카테고리 server_ext_폴더_실행스크립트에서 찾을 수 있습니다.
윈도우 서버에서 실행 가능한 사용자 스크립트를 주기적으로 실행하여 결과를 업로드합니다. 다음 예시를 참조하여 사용자 스크립트를 작성하세요.
- BAT
- PowerShell
BAT 스크립트 실행
-
스크립트를 다음과 같이 작성 후 실행하세요.
BAT@echo off
setlocal enabledelayedexpansion
set urls=https://www.whatap.io https://blog.whatap.io https://service.whatap.io
for %%u in (%urls%) do (
echo M %%u url %%u
rem Use curl to fetch the URL and get the total time taken for the request
for /f "tokens=*" %%i in ('curl -o nul -s -w "M %%{url_effective} url %%{url_effective}" %%u') do (
echo %%i
)
rem Measure the start time
set startTime=!time!
rem Perform the curl request and measure the end time
curl -o nul -s %%u
set endTime=!time!
rem Parse the start time
for /F "tokens=1-4 delims=:.," %%a in ("!startTime!") do (
set /A "startH=%%a, startM=%%b, startS=%%c, startMS=%%d"
)
rem Parse the end time
for /F "tokens=1-4 delims=:.," %%a in ("!endTime!") do (
set /A "endH=%%a, endM=%%b, endS=%%c, endMS=%%d"
)
rem Calculate the elapsed time in milliseconds
set /A "elapsedMS=(endH*3600000 + endM*60000 + endS*1000 + endMS) - (startH*3600000 + startM*60000 + startS*1000 + startMS)"
rem Convert milliseconds to seconds and milliseconds part
set /A "elapsedSec=elapsedMS/1000"
set /A "elapsedMSPart=elapsedMS %% 1000"
echo H %%u time_total !elapsedSec!.!elapsedMSPart!
)
endlocal -
다음과 같이 출력되는지 확인하세요.
BAT>webcheck.bat
M https://www.whatap.io url https://www.whatap.io
M https://www.whatap.io/ url https://www.whatap.io/
H https://www.whatap.io time_total 0.38
M https://blog.whatap.io url https://blog.whatap.io
M https://blog.whatap.io/ url https://blog.whatap.io/
H https://blog.whatap.io time_total 0.1
M https://service.whatap.io url https://service.whatap.io
M https://service.whatap.io/ url https://service.whatap.io/
H https://service.whatap.io time_total 0.922 -
스크립트 정상 수집을 확인하고 다음과 같이 와탭 서버 모니터링 에이전트에 스크립트를 등록하세요.
BATcd "\Program Files\WhatapInfra"
whtap_infra.exe init-script
sc stop "Whatap Infra"
sc start "Whatap Infra"
PowerShell 스크립트 실행
-
스크립트를 다음과 같이 작성 후 실행하세요.
PowerShell$urls = @("https://www.whatap.io", "https://blog.whatap.io", "https://service.whatap.io")
# Hide progress bar
$ProgressPreference = 'SilentlyContinue'
foreach ($url in $urls) {
Write-Output "M $url url $url"
$startTime = Get-Date
try {
$response = Invoke-WebRequest -Uri $url -UseBasicParsing
$endTime = Get-Date
$timeTotal = ($endTime - $startTime).TotalSeconds
Write-Output "M $($response.BaseResponse.ResponseUri) url $($response.BaseResponse.ResponseUri)"
Write-Output ("H {0} time_total {1}" -f $url, $timeTotal)
} catch {
Write-Output "Failed to access $url"
}
} -
다음과 같이 출력되는지 확인하세요.
PowerShell> .\webcheck.ps1
M https://www.whatap.io url https://www.whatap.io
M url
H https://www.whatap.io time_total 0.376979
M https://blog.whatap.io url https://blog.whatap.io
Failed to access https://blog.whatap.io
M https://service.whatap.io url https://service.whatap.io
Failed to access https://service.whatap.io -
스크립트 정상 수집을 확인하고 다음과 같이 와탭 서버 모니터링 에이전트에 스크립트를 등록하세요.
PowerShellcd "\Program Files\WhatapInfra"
.\whatap_infra.exe init-script
Restart-Service "Whatap Infra"
서버 시간 동기화 모니터링
사전 확인
-
운영체제: 리눅스
-
와탭 서버 모니터링 에이전트 버전: 2.5.4 이상
다음 옵션을 통해 서버 시간 동기화(NTP) 모니터링 기능을 활성화 할 수 있습니다.
echo "ntpq.enabled=true" |sudo tee -a /usr/whatap/infra/conf/whatap.conf
추가 지표 안내
서버 시간 동기화 모니터링 기능 활성화 시 추가되는 메트릭은 다음과 같습니다.
server_ntpq
Tags
| 태그명 | 설명 | 비고 |
|---|---|---|
refid | 해당 리모트(remote)의 시간 동기화 소스를 의미합니다. | - |
remote | 호스트가 시간 동기화를 수행할 대상 서버를 의미합니다. | - |
Fields
| 필드명 | 단위 | 설명 | 비고 |
|---|---|---|---|
delay | ms | 서버가 보낸 쿼리에 대한 응답으로 회신 패킷을 반환하는데 걸린 시간을 의미합니다. | - |
jitter | - | 두 샘플 간의 오프셋 측정 차이로 추정한 오차 경계치를 의미합니다. | - |
offset | ms | 서버 설정 시간과 클라이언트 설정 시간 간의 차이를 의미합니다. | - |
poll | second | ntp.conf 파일에서 minpoll 값으로 정의된 원격 호스트로의 폴링 간격을 의미합니다. | - |
reach | - | 서버에 도달하는 시도가 얼마나 성공적인지 확인할 수 있습니다. 2^0 위치에 가장 최근 질의 성공 여부를 기록하고 8 비트 쉬프트 레지스터로 작동합니다. | - |
st | - | 원격 호스트의 스트래텀 레벨을 의미합니다. | - |
sync_client | - | 1: 동기화 서버가 존재합니다. | - |
| 0: 동기화 서버가 존재하지 않습니다. | |||
t | - | 사용 가능한 유형은 다음과 같습니다. | - |
| l : 로컬(예 GPS시계) | |||
| u: 유니캐스트(일반적인 유형) | |||
| m: 멀티캐스트 | |||
| b: 브로드캐스트 | |||
when | second | 원격 호스트 응답 이후 지난 초 수를 의미합니다. | - |
리눅스 시스템 로그 모니터링
리눅스 시스템 로그를 실시간 업로드하여 장애 시 해당 시간에 발생한 로그를 확인할 수 있습니다. 수집 대상 로그 파일은 다음과 같습니다.
- /var/log/syslog
- /var/log/messages
설정 방법은 다음과 같습니다.
echo "systemlog.enabled=true" |sudo tee -a /usr/whatap/infra/conf/whatap.conf
로그 모니터링 플러그인
임의의 로그를 수집할 수 있습니다. 다음 설정은 에이전트 재시작이 필요합니다.
Linux Shell
-
기본 설치
Linux Shellexport LOGFILES=/some/path/file1,/some/other/file2
echo "logsink.files=$LOGFILES" | sudo tee -a /usr/whatap/infra/conf/whatap.conf -
카테고리와 함께 설치
Linux Shellcd /usr/whatap/infra
sudo mkdir extension
cat <<EOL | sudo tee extension/logsink.conf > /dev/null
[[inputs.logsink]]
category = "serverlog"
## 로그 발생량 통계 별도 데이터로 전송 여부
stats_enabled = true
## 로그 발생량 통계 카테고리
stats_category = "logsink_stats"
## 로그 파일 경로(path)에 별표(*)가 포함되어 제외할 로그 비대상 파일명 설정
excludeNames = [ ".gz",".zip" ]
[[inputs.logsink.file]]
## 로그 파일 지정 시, 날짜 패턴(strftime.org) 지정 가능
path = "/some/path/%Y-%m-%d/.log"
disabled = false
encoding = "euc-kr"
[[inputs.logsink.file]]
path = "/some/other/log"
disabled = false
encoding = "utf-8"
[[inputs.logsink.file]]
## 줄 단위 로그에서 해당 키워드 검색 시, 이전 로그에 병합
nowrap_keywords = ["Caused by:", "Test"]
[[inputs.logsink.file]]
## 프로젝트 코드 및 프로젝트 라이선스 입력 시, 로그를 같은 리전의 원하는 프로젝트로 전송 가능
# pcode = 프로젝트 코드
# license = "프로젝트 라이선스"
[[inputs.logsink.file]]
# whatap_host_ip = "수집 서버 아이피1/수집 서버 아이피2"
# whatap_host_port = 6600
EOL
sudo service whatap-infra restart
Windows Powershell
-
기본 설치
Windows Powershell$LOGFILES="c:\\whatap\\logs\\%Y-%m-%d\\*.log,c:\\whatap\\logs\\*.log"
Add-Content "c:\Program Files\WhatapInfra\whatap.conf" -Value "logsink.files=$LOGFILES" -
카테고리와 함께 설치
Windows Powershell# 관리자 권한 필요
New-Item -type "Directory" -Path "C:\Program Files\WhatapInfra\extension"
$contentToAdd = @"
[[inputs.logsink]]
category = "serverlog"
## 로그 발생량 통계 별도 데이터로 전송 여부
stats_enabled = true
## 로그 발생량 통계 카테고리
stats_category = "logsink_stats"
## 로그 파일 경로(path)에 별표(*)가 포함되어 제외할 로그 비대상 파일명 설정
excludeNames = [ ".gz",".zip" ]
[[inputs.logsink.file]]
## 로그 파일 지정 시, 날짜 패턴(strftime.org) 지정 가능
path = "c:\\whatap\\logs%Y-%m-%d_.log"
disabled = false
encoding = "euc-kr"
[[inputs.logsink.file]]
## 줄 단위 로그에서 해당 키워드 검색 시, 이전 로그에 병합
nowrap_keywords = ["Caused by:", "Test"]
[[inputs.logsink.file]]
## 프로젝트 코드 및 프로젝트 라이선스 입력 시, 로그를 같은 리전의 원하는 프로젝트로 전송 가능
# pcode = 프로젝트 코드
# license = "프로젝트 라이선스"
[[inputs.logsink.file]]
# whatap_host_ip = "수집 서버 아이피1/수집 서버 아이피2"
# whatap_host_port = 6600
"@
New-Item -path "C:\Program Files\WhatapInfra\extension" -name "logsink.conf" -type "file" -value $contentToAdd -Force
Restart-Service "Whatap Infra"
옵션 설정
-
stats_enabled: 수집 현황 데이터의 수집 여부를 설정합니다. 기본값은false입니다. 값을true로 설정해야 합니다.true로 설정하면 다음stats_category에서 설정한 카테고리(logsink_stats)로 통계 데이터가 발생합니다. -
stats_category: 수집 현황 데이터를 저장할 메트릭스 카테고리를 설정합니다. 값을logsink_stats로 설정해야 합니다. 통계 데이터 필드는 다음과 같습니다.filecheckIntervalencodingfileposcheckedLocalTimelastupdatedLocalTimefileSizeerrorfirstChecktransferBytes
-
excludeNames: 로그 파일 경로(path)에 별표(*)를 포함한 경우 로그 비대상 파일을 제외하도록 파일명을 설정할 수 있습니다. 쉼표(,)를 구분자로 이용해 복수 설정할 수 있습니다.ExampleexcludeNames = [ ".gz",".zip" ] -
nowrap_keywords: 줄 단위 로그 검색 시 해당 옵션값으로 지정한 키워드가 검색될 경우 이전 로그에 병합합니다. -
pcode: 로그를 전송할 같은 리전의 프로젝트 코드를 입력합니다. -
license: 로그를 전송할 같은 리전의 프로젝트의 라이선스 코드를 입력합니다.
pcode, license 옵션의 경우 서버 에이전트 2.7.4 버전 이상부터 지원합니다.
윈도우 이벤트 로그 옵션 설정
윈도우 이벤트 로그 수집 시 다음과 같이 옵션을 설정할 수 있습니다.
# 관리자 권한 필요
New-Item -type "Directory" -Path "C:\Program Files\WhatapInfra\extension"

$contentToAdd = @"
[[inputs.win_eventlog]]
    category = "win_event_log"
    stats_category = "win_event_log_stats"
    stats_enabled = true
    enabled = true
    [[inputs.win_eventlog.file]]
        #true | false
        enabled = true
        # Application, Security, Setup, System, Forwarded
        file = "Application"
        #1: Information, 2: Warning 3: Error 4: Audit Success 5 Audit Fail
        #event_type =
        #event id
        #event_id =
        #event source name
        #source_name = ""
        #프로젝트 코드 및 프로젝트 라이선스 입력 시, 로그를 같은 리전의 원하는 프로젝트로 전송 가능
        #pcode = 프로젝트 코드
        #license = "프로젝트 라이선스"
        #whatap_host_ip = "수집 서버 아이피1/수집 서버 아이피2"
        #whatap_host_port = 6600

"@

New-Item -path "C:\Program Files\WhatapInfra\extension" -name "win_eventlog.conf" -type "file" -value $contentToAdd -Force

Restart-Service "Whatap Infra"
-
카테고리 지정(
category) 필수예,
win_event_log -
통계 카테고리 지정(
stats_category) 필수예,
win_event_log_stats -
통계 카테고리 On/Off(
stats_enabled) 필수예,
true혹은false -
수집 기능 On/Off(
enabled) 필수예,
true혹은false -
파일별 수집 기능 On/Off(
enabled) 필수예,
true혹은false -
파일(
file) 필수예,
Application,Security,Setup,System,Forwarded -
이벤트 타입(
event_type) 비필수예,
1,2,3,4,5노트이벤트 타입
-
Information
-
Warning
-
Error
-
Audit Success
-
Audit Fail
-
-
이벤트 아이디(
event_id) 비필수 -
이벤트 소스 이름(
source_name) 비필수 -
프로젝트 코드(
pcode) 비필수 -
프로젝트 라이선스 (
license) 비필수
-
윈도우 이벤트 로그 수집의 경우 서버 에이전트 2.5.2 버전 이상부터 지원합니다.
-
윈도우 이벤트 로그 옵션 중
pcode,license옵션의 경우 서버 에이전트 2.7.4 버전 이상부터 지원합니다.
로그 다중 파일 지정 및 분리
다중 파일 지정
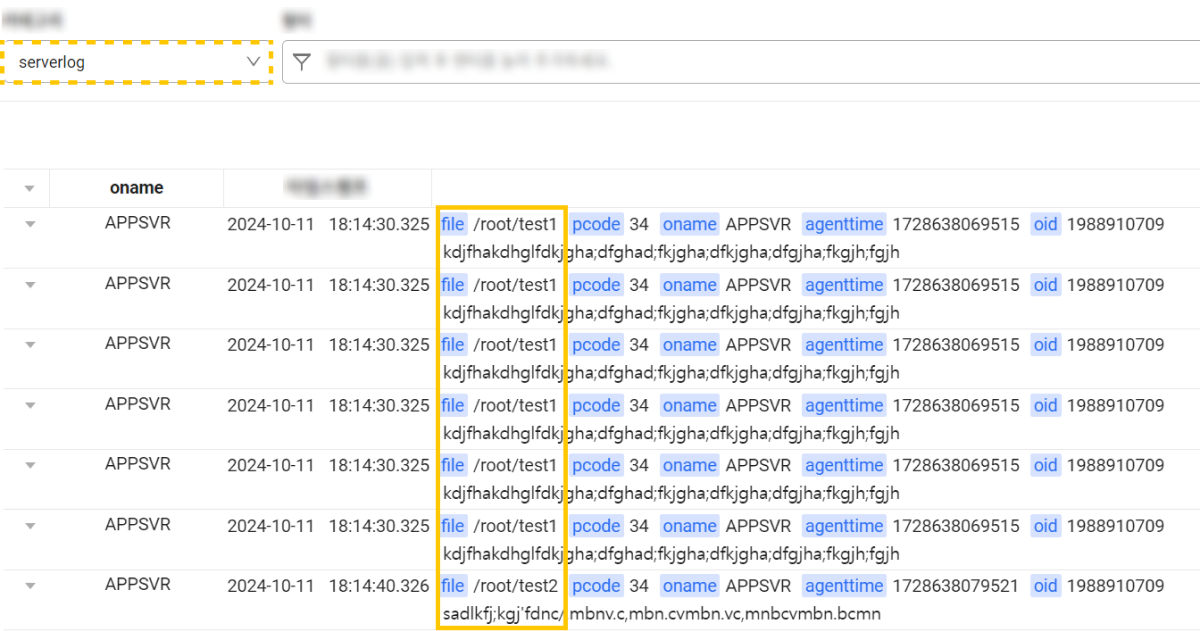
여러 로그 파일을 동일한 카테고리로 설정하려면, 각 로그 파일 경로를 [[inputs.logsink.file]] 항목에 추가하고, path 설정을 통해 파일 경로를 지정합니다. 또한, category, stats_enabled, stats_category 등의 옵션을 사용하여 로그 발생량 통계 설정과 같은 부가적인 설정을 할 수 있습니다. 예시는 /root/test1 및 /root/test2 파일을 동일한 카테고리(serverlog)로 지정한 경우입니다.
[[inputs.logsink]]
  category = "serverlog"
  stats_enabled = true
  stats_category = "logsink_stats"
  excludeNames = [ ".gz",".zip" ]

[[inputs.logsink.file]]
  path = "/root/test1"
  disabled = false
  encoding = "utf-8"

[[inputs.logsink.file]]
  path = "/root/test2"
  disabled = false
  encoding = "utf-8"
category, stats_enabled, stats_category, nowrap_keywords 등의 옵션에 대한 내용은 상단 안내를 참조하세요.
해당 예시의 경우 라이브 테일 메뉴에서는 다음과 같이 확인할 수 있습니다.

파일 분리
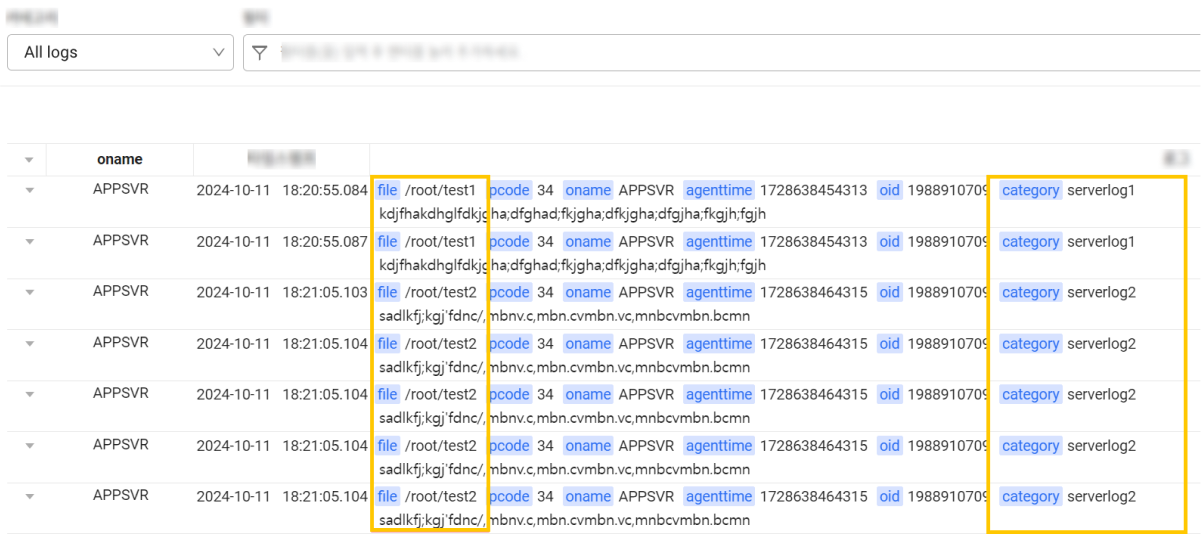
서로 다른 카테고리로 로그 파일을 지정하려면, logsink{숫자}.conf 파일을 각각 생성한 후, 각 파일 내에서 다른 category 값을 설정하세요. 다음 예시는 logsink.conf와 logsink1.conf를 통해 각각 다른 로그 카테고리를 설정한 경우입니다.
# cat logsink.conf
[[inputs.logsink]]
  category = "serverlog1"
  stats_enabled = true
  stats_category = "logsink_stats"
  excludeNames = [ ".gz",".zip" ]

[[inputs.logsink.file]]
  path = "/root/test1"
  disabled = false
  encoding = "utf-8"
#cat logsink1.conf
[[inputs.logsink]]
  category = "serverlog2"
  stats_enabled = true
  stats_category = "logsink_stats"
  excludeNames = [ ".gz",".zip" ]

[[inputs.logsink.file]]
  path = "/root/test2"
  disabled = false
  encoding = "utf-8"
category, stats_enabled, stats_category, nowrap_keywords 등의 옵션에 대한 내용은 상단 안내를 참조하세요.
해당 예시의 경우 라이브 테일 메뉴에서는 다음과 같이 확인할 수 있습니다.
