에이전트 설치
와탭 데이터베이스 모니터링 서비스 이용을 위한 기본 설치 방법을 안내합니다.
와탭 모니터링 서비스를 사용하기 위해서는 회원 가입 후 프로젝트를 생성하고 대상 서버에 에이전트를 설치해야 합니다. 회원 가입에 관한 자세한 내용은 다음 문서를 참조하세요.
프로젝트 생성하기
에이전트를 설치하기 전에 먼저 프로젝트를 생성하세요.
-
와탭 모니터링 서비스로 이동한 다음 로그인하세요.
-
프로젝트를 생성하려면 화면 왼쪽 사이드 메뉴에서 전체 프로젝트 > + 프로젝트 버튼을 선택하세요.
-
상품 선택 화면에서 프로젝트에 설치할 상품을 선택하세요.
-
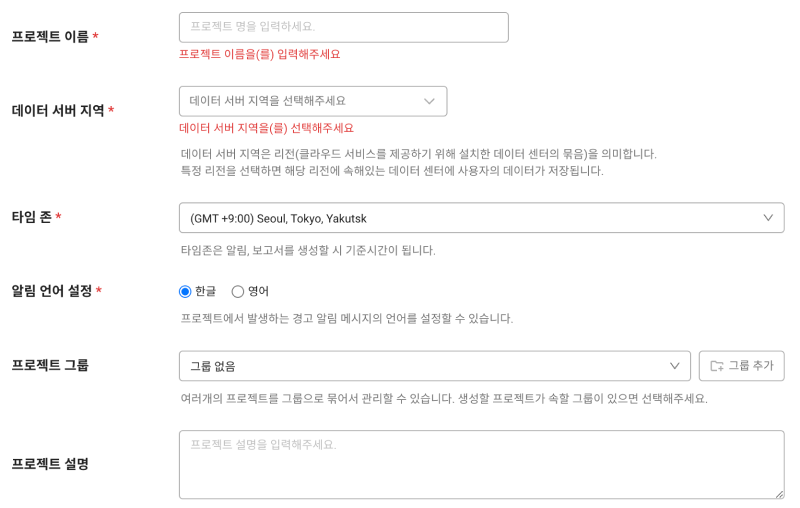
프로젝트 이름, 데이터 서버 지역, 타임 존 항목을 차례로 설정하세요.

-
알림 언어 설정에서 경고 알림 메시지의 언어를 선택하세요.
-
모든 설정을 완료한 다음에는 프로젝트 생성하기 버튼을 선택하세요.
-
데이터 서버 지역은 리전(클라우드 서비스를 제공하기 위해 설치한 데이터 센터의 묶음)을 의미합니다. 특정 리전을 선택하면 해당 리전에 속한 데이터 센터에 사용자의 데이터를 저장합니다.
-
타임 존은 알림, 보고서를 생성하는 기준 시간입니다.
-
여러 개의 프로젝트를 그룹으로 묶어 관리하려면 프로젝트 그룹에서 그룹을 선택하거나 그룹을 추가하세요. 그룹에 대한 자세한 설명은 다음 문서를 참조하세요.
-
조직을 선택한 상태에서 프로젝트를 추가할 경우 조직 하위 그룹을 필수로 설정해야 합니다.
구성도 확인
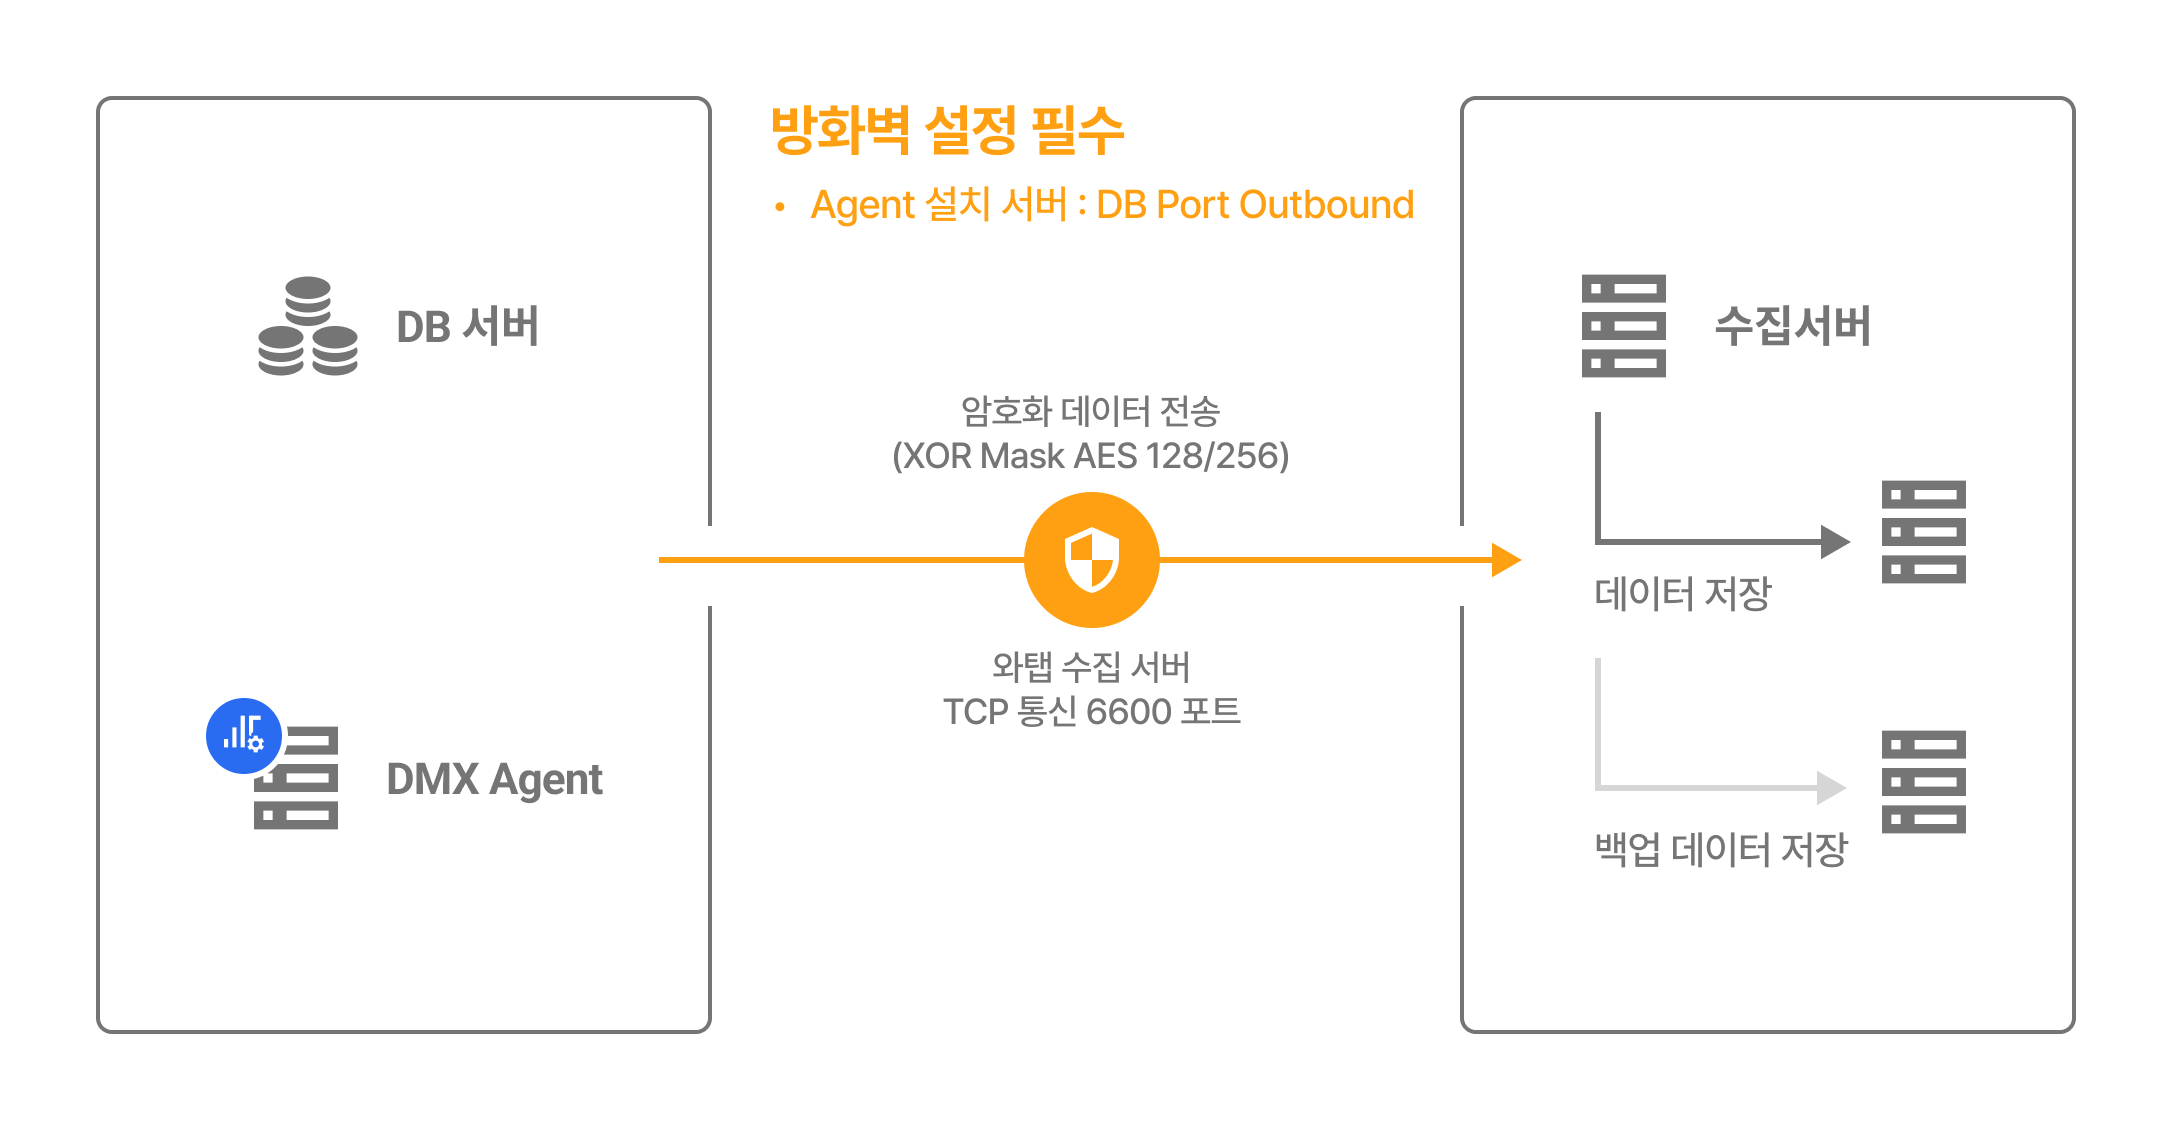
Oracle Pro 모니터링을 위해 데이터베이스 서버에 에이전트를 설치하는 구성입니다.

방화벽 설정은 필수이며, 모든 데이터는 암호화되어 전송됩니다. 와탭 수집 서버와의 통신을 위해 6600 포트를 사용합니다. 데이터베이스 모니터링을 하기 위해 필요한 권한을 가진 계정을 생성하세요. root(admin) 계정으로 로그인해 계정을 생성하세요. 이미 있는 계정을 사용하고 싶다면 DB 유저 파일 생성으로 넘어가세요. 권한이 없을 경우 모니터링을 시작할 수 없습니다. 예시 코드에서 계정 생성
whatap은 DB 사용자 계정 이름입니다. 사용자가 이용하는 사용자 계정 이름으로 변경하세요.
DB_Password에는 사용자 비밀번호를 입력하세요.
-
일반적인 경우
SQLcreate user whatap identified by DB_Password;
grant create session to whatap;
grant select any dictionary to whatap; -
12c 이상에서 멀티테넌트의 경우: 접두어
c##추가SQLcreate user c##whatap identified by DB_Password;
grant reate session to c##whatap;
grant select any dictionary to c##whatap;
alter user c##whatap set container_data = ALL container = CURRENT; -
Kill session 기능을 사용할 경우
SQLgrant alter system to whatap;
권한에 따른 지원 기능 살펴보기
기본 권한 외의 권한은 사용자의 환경에 따라 부여하지 않아도 됩니다. 단, 일부 기능이 동작하지 않을 수 있습니다.
| 권한 | command (Single DB) | command (Multitenant DB) | 메뉴 및 기능 | 상세 내역 |
|---|---|---|---|---|
| 기본 권한 | grant create session to whatap; | grant create session to c##whatap; | 접속 | - |
grant select any dictionary to whatap; | grant select any dictionary to c##whatap; | 인스턴스 모니터링 / 멀티 인스턴스 모니터링 / SQL 통계 | 개별 권한 부여 시 다음 표 내용 참조 | |
| - | alter user c##whatap set container_data = ALL container = CURRENT; | 멀티태넌트 DB를 사용하는 경우(12C 이상) pdb 조회를 위한 필수 권한임 | ||
| 세션 킬 | grant alter system to whatap; | grant alter system to c##whatap; | 액티브 세션 > 세션 킬 | - |
| 히든 파라미터 조회 | create view sys.whatap_vw_ksppi as select * from sys.x$ksppi;grant select on sys.whatap_vw_ksppi to DB_User;create synonym DB_User.whatap_vw_ksppi for sys.whatap_vw_ksppi; | 파라미터 조회 메뉴에 히든 파라미터 내용 포함 | 히든 파라미터를 조회하려면 별도의 뷰/시노님 생성 및 권한 부여 필요 | |
create view sys.whatap_vw_ksppcv as select * from sys.x$ksppcv;grant select on sys.whatap_vw_ksppcv to DB_User;create synonym DB_User.whatap_vw_ksppcv for sys.whatap_vw_ksppcv; | ||||
select any dictionary 대신 다음 권한을 개별로 부여해도 됩니다.
| 권한 | command (Single DB) | command (Multitenant DB) |
|---|---|---|
| 액티브 세션 / 락 트리 / 지표 정보 | grant select on v_$sqlarea to whatap; | grant select on v_$sqlarea to c##whatap; |
grant select on v_$transaction to whatap; | grant select on v_$transaction to c##whatap; | |
grant select on v_$instance to whatap; | grant select on v_$instance to c##whatap; | |
grant select on v_$sysstat to whatap; | grant select on v_$sysstat to c##whatap; | |
grant select on v_$lock to whatap; | grant select on v_$lock to c##whatap; | |
grant select on v_$sesstat to whatap; | grant select on v_$sesstat to c##whatap; | |
grant select on v_$event_name to whatap; | grant select on v_$event_name to c##whatap; | |
grant select on v_$session to whatap; | grant select on v_$session to c##whatap; | |
grant select on v_$sql to whatap; | grant select on v_$sql to c##whatap; | |
grant select on v_$process to whatap; | grant select on v_$process to c##whatap; | |
grant select on v_$statname to whatap; | grant select on v_$statname to c##whatap; | |
grant select on v_$system_event to whatap; | grant select on v_$system_event to c##whatap; | |
grant select on v_$osstat to whatap; | grant select on v_$osstat to c##whatap; | |
grant select on v_$px_session to whatap; | grant select on v_$px_session to c##whatap; | |
grant select on v_$sga to whatap; | grant select on v_$sga to c##whatap; | |
| - | grant select on v_$con_sysstat to c##whatap; | |
| 파라미터 정보 | grant select on v_$parameter to whatap; | grant select on v_$parameter to c##whatap; |
| Wait 정보 / Event 정보 | grant select on v_$event_name to whatap; | grant select on v_$event_name to c##whatap; |
grant select on v_$system_event to whatap | grant select on v_$con_system_event to c##whatap; | |
grant select on v_$system_wait_class to whatap; | grant select on v_$system_wait_class to c##whatap; | |
| - | grant select on v_$con_system_wait_class to c##whatap; | |
| Tablespace 정보 | grant select on dba_data_files to whatap; | grant select on cdb_data_files to c##whatap; |
grant select on dba_free_space to whatap; | grant select on cdb_free_space to c##whatap; | |
grant select on dba_temp_files to whatap; | grant select on v_$sort_segment to c##whatap; | |
grant select on v_$temp_extent_pool to whatap; | grant select on v_$tempfile to c##whatap; | |
grant select on v_$containers to whatap; (12c 이상) | grant select on v_$containers to c##whatap; |
액세스 키 확인
액세스 키는 와탭 서비스 활성화를 위한 고유 ID입니다.
설치 안내 섹션에서 프로젝트 액세스 키 발급받기 버튼을 선택하세요. 액세스 키를 자동으로 발급받은 후 다음 단계를 진행합니다.
프로젝트를 생성한 다음에는 자동으로 에이전트 설치 페이지로 이동합니다. 에이전트 설치 페이지로 이동하지 않는다면 화면 왼쪽 메뉴에서 관리 > 에이전트 설치를 선택하세요.
에이전트 다운로드
에이전트 설치 화면에서 사용자의 환경과 일치하는 오라클 버전을 선택한 다음 다운로드 버튼을 선택하세요.
보안 설정으로 인해 tar 형식의 파일을 다운로드할 수 없는 사용자를 위해 ZIP 형식의 파일도 함께 제공합니다. 설치 화면에서 .zip 다운로드 버튼을 선택하세요.
에이전트 설정
에이전트는 Oracle 계정으로 설치를 권장하며 Oracle 접속 환경 변수가 미리 설정되어 있어야 합니다. 다음 순서대로 에이전트 설정을 진행하세요.
Oracle 계정이 아닌 다른 사용자 계정에서 설치할 경우
-
Oracle이 생성한 공유 메모리(shared memory)를 읽을 수 있는 권한(
read)이 필요합니다. -
ipcs -m명령어를 실행한 결과에서perms값이 640이면, 같은 그룹에 속한 다른 계정으로 에이전트를 설치할 수 있습니다. -
ipcs -m명령어를 실행한 결과에서perms값이 600이면서, Oracle 12c R2 이상이라면, 다음과 같이 파라미터를 설정해 perms 값을 640으로 변경할 수 있습니다. 변경 사항을 적용하려면 DB를 재기동해야 합니다.alter system set allow_group_access_to_sga=true scope=spfile;
whatap.conf 설정
압축을 해제한 폴더로 이동해 whatap.conf 파일을 확인하세요. whatap.conf 파일에 프로젝트 액세스 키 정보 및 와탭 서버 정보, ipckey를 입력하세요.
license={AccessKey}
whatap.server.host=13.124.11.223/13.209.172.35 # WhaTap server information
ipckey={ipckey}
-
ipckey옵션값은ipcs -m명령어를 통해 얻을 수 있습니다. 모니터링할 오라클의 Key 값(16진수)입니다. -
한 서버에 여러 개의 데이터베이스를 설치했다면 다음 문서를 참조해
ipckey를 입력하세요.
초기 설정 파일 생성
초기 설정 파일을 생성하려면 데이터베이스에 SYS 계정(또는 같은 등급의 계정)으로 접속해 정보를 받아 처리합니다. 계정과 암호는 저장되지 않습니다.
./dmxinit.sh {sys_user} {sys_password}
명령어를 실행한 다음 다음 5개의 파일이 생성됩니다.
dmx.init, class.init, dbname.init, stat.init, event.init
-
sys_user와sys_password없이 접속할 수 있다면(sqlplus '/as sysdba'접속처럼),sys_user와sys_password를 인수로 추가하지 않아도 됩니다.BASH./dmxinit.sh -
sys_user와sys_password문자열에 특수 문자가 포함되어 있다면 각 특수 문자 앞에 이스케이프 문자(Escape Character,\)를 추가하세요.BASH./dmxinit.sh whatap whatap\!\@pwd
DB 유저 파일 생성
데이터베이스 접속을 위해 암호화된 UID를 생성합니다. username과 password를 입력하고 쉘 스크립트(또는 배치 파일)를 실행하세요.
./uid.sh {DB_USER} {DB_PASSWORD}
-
최초 한번만 설정하면 그 이후부터는 암호화된 UID를 통해 모니터링 대상 데이터베이스 서버로부터 데이터 수집을 진행합니다.
-
DB 유저 파일을 생성하기 위해서는 프로젝트 액세스 키가 whatap.conf 파일에 입력되어 있어야 합니다. 액세스 키 확인
-
Azure Database 환경의 경우
DB_USER를 DB_USER@DB_name과 같은 형식으로 입력해야 합니다. -
DB_USER또는DB_PASSWORD에 특수문자가 포함될 경우 특수문자 앞에 Escape Character(\)를 같이 입력하세요.Example./uid.sh whatap whatap\!pwd
# 특수문자가 2개 이상일 경우 각각 이스케이프 문자 추가
./uid.sh whatap whatap\!\@pwd
모니터링 시작하기
에이전트를 설치한 경로에서 쉘 스크립트(또는 배치 파일)를 실행하세요.
./start.sh
데몬처럼 사용하고 싶은 경우에는 다음 명령어를 실행하세요. 단 nohup을 설치한 환경에서만 동작합니다.
./startd.sh
다음 단계
-
설치 점검하기
프로젝트 생성 및 에이전트 설치, 기본 에이전트 옵션까지 모두 적용했다면 다음 문서에서 점검 사항을 확인하세요.
-
설치 문제 해결
에이전트 설치 시 발생할 수 있는 다양한 문제들과 이를 해결하기 위한 구체적인 지침을 제공합니다. 자세한 내용은 다음 문서를 참조하세요.
-
에이전트 설정
에이전트 설정(whatap.conf) 파일에 옵션을 적용해 모니터링을 위한 다양한 기능을 제공합니다. 자세한 내용은 다음 문서를 참조하세요.
-
모니터링 시작하기
모든 설정을 완료한 다음 데이터베이스 서버의 지표를 에이전트가 정보를 수집하기 시작합니다. 먼저 인스턴스 목록 메뉴에서 모니터링 데이터가 수집되는지 확인하세요. 인스턴스 목록에 대한 자세한 내용은 다음 문서를 참조하세요.