拡張機能
拡張パックの設定
通常のインストール後に拡張パックの機能を使用するには、構成ファイルを作成し、次のようにエージェントを再起動します。
MySQLサーバーリスト
MySQL/MariaDB モニタリングエージェントが利用可能です。
Web URLの性能チェック
WhaTapインフラエージェントは、与えられたWebアドレスに接続し、接続有無および応答時間を収集します。収集されたWeb URLの性能はカテゴリserver_webcheckで確認できます。次のコマンドでチェックするWebアドレスを追加します。URLモニタリングサービスの詳細については、次の文書を参照してください。
- Linux Shell
- Windows Powershell
echo "チェックするウェブアドレス" | sudo tee -a /usr/whatap/infra/conf/webcheck.conf
echo "webcheck.enabled=true" | sudo tee -a /usr/whatap/infra/conf/whatap.conf
sudo service whatap-infra restart
Add-Content -Path "C:\Program Files\WhatapInfra\webcheck.conf" -Value "チェックするウェブアドレス"
Add-Content -Path "C:\Program Files\WhatapInfra\whatap.conf" -Value "webcheck.enabled=true"
Restart-Service "Whatap Infra"
Redisインスタンス
WhaTapインフラエージェントは、特定のRedisアドレスに接続し、接続数を含む複数の性能指数を収集します。収集された性能情報は、カテゴリserver_redisで確認できます。次のコマンドでチェックするRedisサーバーの接続情報を追加できます。
- Linux Shell
- Windows Powershell
sudo echo "addr=Redisアドレス:ポート番号" | sudo tee /usr/whatap/infra/conf/redis.conf
sudo echo "password=Redis 패스워드" | sudo tee -a /usr/whatap/infra/conf/redis.conf
sudo service whatap-infra restart
Add-Content -Path "C:\Program Files\WhatapInfra\redis.conf" -Value "addr=Redisアドレス:ポート番号"
Add-Content -Path "C:\Program Files\WhatapInfra\redis.conf" -Value "password=Redisパスワード"
Restart-Service "Whatap Infra"
Memcachedインスタンス
WhaTapインフラエージェントは、特定のMemcachedアドレスに接続し、接続数を含む複数の性能指数を収集します。収集された情報は、カテゴリserver_memcachedで確認できます。次のコマンドでチェックするMemcachedサーバーの接続情報を追加できます。
- Linux Shell
- Windows Powershell
sudo echo "addr=Memcachedアドレス:ポート番号" | sudo tee /usr/whatap/infra/conf/memcached.conf
sudo echo "password=Memcachedパスワード" | sudo tee -a /usr/whatap/infra/conf/memcached.conf
sudo service whatap-infra restart
Add-Content -Path "C:\Program Files\WhatapInfra\memcached.conf" -Value "addr=Memcachedアドレス"
Add-Content -Path "C:\Program Files\WhatapInfra\memcached.conf" -Value "password=Memcachedパスワード"
Restart-Service "Whatap Infra"
TCPポートモニタリング
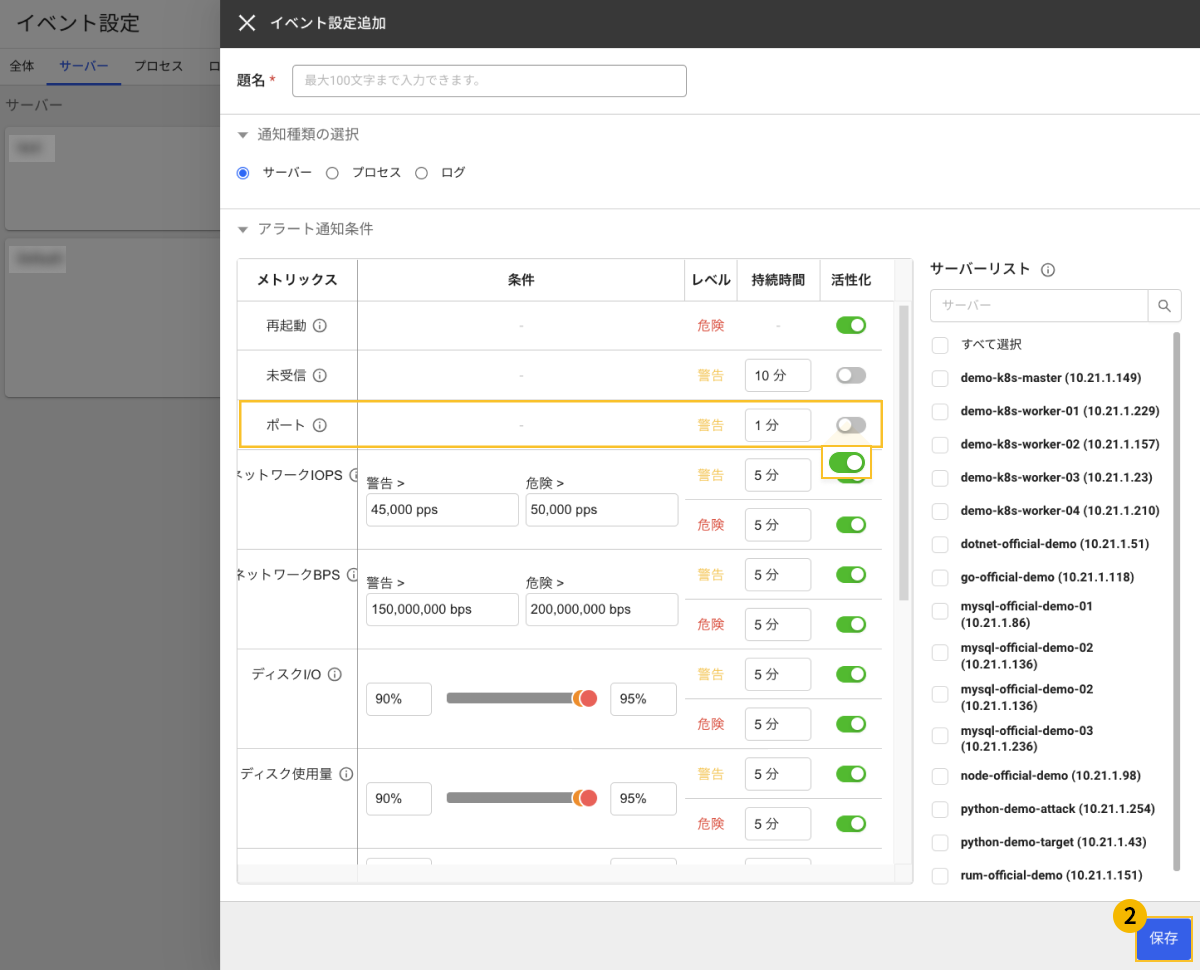
ネットワークデーモンの受信ポートが無効になった場合に通知を受け取ることができます。
ホーム画面 > プロジェクトの選択 > アラート通知 > イベント設定 > サーバータブを選択して、+ イベント設定追加ボタンを選択します。

-
ポート指標のトグルボタンをクリックして、使用状態に変更します。
-
保存ボタンを選択して保存します。
-
対象サーバーに、次のコマンドを追加してください。
- Linux Shell
- Windows Powershell
#以下の変数にモニタリング対象IPを指定します。
export TARGET_IP=127.0.0.1
#以下の変数にモニタリング対象ポート番号を指定します。
export TARGET_PORT=80
echo "tcp.check.$TARGET_PORT=tcp://$TARGET_IP:$TARGET_PORT" |sudo tee -a /usr/whatap/infra/conf/whatap.conf
#以下の変数にモニタリング対象IPを指定します。
$TARGET_IP="127.0.0.1"
#以下の変数にモニタリング対象ポート番号を指定します。
$TARGET_PORT="80"
Add-Content -Path "C:\Program Files\WhatapInfra\whatap.conf" -Value "tcp.check.${TARGET_PORT}=tcp://${TARGET_IP}:${TARGET_PORT}"
マルチポートモニタリング
複数のポートをモニタリングするためにはwhatap.confファイル内の追加設定が必要です。 次の例を参考にしてください。
# port 8080, port 80
tcp.check.8080=tcp://127.0.0.1:8080
tcp.check.80=tcp://127.0.0.1:80
プロセスネットワークの性能測定
プロセスネットワークの性能は、サーバーリスト > サーバー 詳細画面のプロセスウィジェットで確認できます。
- Linux Shell
- Windows Powershell
echo "process.fdcheck=true" |sudo tee -a /usr/whatap/infra/conf/whatap.conf
# 管理者権限が必要です。
Add-Content -Path "C:\Program Files\WhatapInfra\whatap.conf" -Value "process.fdcheck=true"
サーバースペック収集
CPU、MEMORY、DISK、NICの仕様とインストールされたパッケージおよび仮想マシンのメタ情報を収集します。 各カテゴリで、次の内容を確認できます。
server_package:インストールされているパッケージです。server_inventory:CPU、MEMORY、DISK、NICの仕様です。server_pending_security_update:Linuxのセキュリティパッチの待機リストです。
- Linux Shell
- Windows Powershell
echo "inventory.product.enabled=true" |sudo tee -a /usr/whatap/infra/conf/whatap.conf
# 管理者権限が必要です。
Add-Content -Path "C:\Program Files\WhatapInfra\whatap.conf" -Value "inventory.product.enabled=true"
Linuxコンテナの性能収集
LinuxコンテナのCPU、MEMORY、DISK、NIC性能を収集します。収集された性能情報は、カテゴリserver_containerで確認できます。
echo "container.enabled=true" |sudo tee -a /usr/whatap/infra/conf/whatap.conf
Windowsサーバーサービスの動作状態を収集する
ウィンドウサーバーサービスの運用状態を収集します。収集されたサービスの運用状態はカテゴリ server_windows_serviceで確認できます。
# 管理者権限が必要です。
Add-Content -Path "C:\Program Files\WhatapInfra\whatap.conf" -Value "winservice.enabled=true"
ファイルモニタリング
ファイルシステム上に存在または存在する可能性のあるファイルおよびディレクトリをモニタリングできます。
- Linux Shell
- Windows Powershell
echo "filecheck.enabled=true" |sudo tee -a /usr/whatap/infra/conf/whatap.conf
echo "モニタリングするファイルまたはディレクトリのフルパス" |sudo tee -a /usr/whatap/infra/conf/filesystem.conf
Add-Content -Path "C:\Program Files\WhatapInfra\whatap.conf" -Value "filecheck.enabled=true"
Add-Content -Path "C:\Program Files\WhatapInfra\filesystem.conf" -Value "モニタリングするファイルまたはディレクトリの全体パス"
Nvidia GPUモニタリング
nvidia-smiコマンドがマウントされている場合、GPU性能を5秒間隔で収集し、サーバーへアップロードします。収集された情報は、メトリクスカテゴリserver_nvidiasmiに収集されます。
- Linux Shell
- Windows Powershell
echo "nvidiasmi.enabled=true" |sudo tee -a /usr/whatap/infra/conf/whatap.conf
Add-Content -Path "C:\Program Files\WhatapInfra\whatap.conf" -Value "nvidiasmi.enabled=true"
-
category server_nvidiasmi
メトリクス 備考 DecoderUtil gauge、Decoder utilization (in %) EncoderUtil gauge、Encoder utilization (in %) FreeFbMemoryUsageGpu gauge、Framebuffer memory free (in MiB). UsedFbMemoryUsageGpu gauge、Framebuffer memory used (in MiB). GpuTemp gauge、GPU temperature (in C). GpuUtil gauge、GPU utilization (in %). MemClock gauge、Memory clock frequency (in MHz). MemoryUtil gauge、Memory utilization (in %). SmClock gauge、SM clock frequency (in MHz).
WhaTapエージェントログの場所を変更する
WhaTapエージェントログ(whatap_infrad.log、whatap_infra.log、whatap_infrad.fork.stdout.log)のパスを変更します。指定パスがない場合は、WhaTapエージェントは指定パスの作成を試みます。エージェント2.0.6バージョン以降に対応されています。
- Linux Shell
- Windows Powershell
echo "agent.log.prefix=変更するディレクトリ" |sudo tee -a /usr/whatap/infra/conf/whatap.conf
Add-Content -Path "C:\Program Files\WhatapInfra\whatap.conf" -Value "agent.log.prefix=変更するディレクトリ"
Windowsの場合、パスの区切り文字を\\と入力できます。
Netstatモニタリング
netstatコマンドが入力された場合、1分間隔で収集され、カテゴリserver_netstat(netstat connection統計)、server_netstat_s(netstat -sコマンドの結果)がアップロードされます。
- Linux Shell
- Windows Powershell
echo "netstats.enabled=true" |sudo tee -a /usr/whatap/infra/conf/whatap.conf
Add-Content -Path "C:\Program Files\WhatapInfra\whatap.conf" -Value "netstats.enabled=true"
ユーザースクリプトモニタリング
- Linux Shell
- Windows Powershell
Linuxサーバーで実行可能なユーザースクリプトを定期的に実行して結果をアップロードします。 次の例を参考にして、ユーザースクリプトを作成してください。
-
スクリプトを次のように作成して実行してください。
Linux Shell#!/bin/bash
urls=("https://www.whatap.io" "https://blog.whatap.io" "https://service.whatap.io")
for url in ${urls[*]}; do
echo "M $url url $url"
curl -w @- -o /dev/null -s "$url" <<'EOF'
M %{url_effective} url %{url_effective}\n
H %{url_effective} time_namelookup %{time_namelookup}\n
H %{url_effective} time_connect %{time_connect}\n
H %{url_effective} time_appconnect %{time_appconnect}\n
H %{url_effective} time_pretransfer %{time_pretransfer}\n
H %{url_effective} time_redirect %{time_redirect}\n
H %{url_effective} time_starttransfer %{time_starttransfer}\n
H %{url_effective} time_total %{time_total}\n
EOF
done -
次のように出力されるか確認してください。
Linux Shell$ ./curl.sh
M https://www.whatap.io/ url https://www.whatap.io/
H https://www.whatap.io/ time_namelookup 0.007289
H https://www.whatap.io/ time_connect 0.010702
H https://www.whatap.io/ time_appconnect 0.033637
H https://www.whatap.io/ time_pretransfer 0.033831
H https://www.whatap.io/ time_redirect 0.000000
H https://www.whatap.io/ time_starttransfer 0.043230
H https://www.whatap.io/ time_total 0.043312
M https://blog.whatap.io/ url https://blog.whatap.io/
H https://blog.whatap.io/ time_namelookup 0.000000
H https://blog.whatap.io/ time_connect 0.000000
H https://blog.whatap.io/ time_appconnect 0.000000
H https://blog.whatap.io/ time_pretransfer 0.000000
H https://blog.whatap.io/ time_redirect 0.000000
H https://blog.whatap.io/ time_starttransfer 0.000000
H https://blog.whatap.io/ time_total 0.005654
M https://service.whatap.io/ url https://service.whatap.io/
H https://service.whatap.io/ time_namelookup 0.004296
H https://service.whatap.io/ time_connect 0.007282
H https://service.whatap.io/ time_appconnect 0.038404
H https://service.whatap.io/ time_pretransfer 0.038607
H https://service.whatap.io/ time_redirect 0.000000
H https://service.whatap.io/ time_starttransfer 0.055226
H https://service.whatap.io/ time_total 0.055307 -
スクリプトの正常収集を確認し、次のようにWhaTapサーバーのモニタリングエージェントにスクリプトを登録してください。
Linux Shellexport USER_SCRIPT=実行するユーザースクリプトのフルパス
suco chmod +x $USER_SCRIPT
sudo mkdir /usr/whatap/infra/ext/
sudo cp -r $USER_SCRIPT /usr/whatap/infra/ext/
export RUNAS_USER=ユーザースクリプトを実行するアカウント、rootアカウントを除く
sudo WHATAP_HOME=/usr/whatap/infra/conf /usr/whatap/infra/whatap_infrad --user=$RUNAS_USER init-script
sudo service whatap-infra restart
収集されたデータは、分析 > メトリクスチャートのカテゴリserver_ext_フォルダ_実行スクリプトで確認できます。
Windowsサーバーで実行可能なユーザースクリプトを定期的に実行して結果をアップロードします。 次の例を参考にして、ユーザースクリプトを作成してください。
- BAT
- PowerShell
BATスクリプト実行
-
スクリプトを次のように作成して実行してください。
BAT@echo off
setlocal enabledelayedexpansion
set urls=https://www.whatap.io https://blog.whatap.io https://service.whatap.io
for %%u in (%urls%) do (
echo M %%u url %%u
rem Use curl to fetch the URL and get the total time taken for the request
for /f "tokens=*" %%i in ('curl -o nul -s -w "M %%{url_effective} url %%{url_effective}" %%u') do (
echo %%i
)
rem Measure the start time
set startTime=!time!
rem Perform the curl request and measure the end time
curl -o nul -s %%u
set endTime=!time!
rem Parse the start time
for /F "tokens=1-4 delims=:.," %%a in ("!startTime!") do (
set /A "startH=%%a, startM=%%b, startS=%%c, startMS=%%d"
)
rem Parse the end time
for /F "tokens=1-4 delims=:.," %%a in ("!endTime!") do (
set /A "endH=%%a, endM=%%b, endS=%%c, endMS=%%d"
)
rem Calculate the elapsed time in milliseconds
set /A "elapsedMS=(endH*3600000 + endM*60000 + endS*1000 + endMS) - (startH*3600000 + startM*60000 + startS*1000 + startMS)"
rem Convert milliseconds to seconds and milliseconds part
set /A "elapsedSec=elapsedMS/1000"
set /A "elapsedMSPart=elapsedMS %% 1000"
echo H %%u time_total !elapsedSec!.!elapsedMSPart!
)
endlocal -
次のように出力されるか確認してください。
BAT>webcheck.bat
M https://www.whatap.io url https://www.whatap.io
M https://www.whatap.io/ url https://www.whatap.io/
H https://www.whatap.io time_total 0.38
M https://blog.whatap.io url https://blog.whatap.io
M https://blog.whatap.io/ url https://blog.whatap.io/
H https://blog.whatap.io time_total 0.1
M https://service.whatap.io url https://service.whatap.io
M https://service.whatap.io/ url https://service.whatap.io/
H https://service.whatap.io time_total 0.922 -
スクリプトの正常収集を確認し、次のようにWhaTapサーバーのモニタリングエージェントにスクリプトを登録してください。
BATcd "\Program Files\WhatapInfra"
whtap_infra.exe init-script
sc stop "Whatap Infra"
sc start "Whatap Infra"
PowerShellスクリプト実行
-
スクリプトを次のように作成して実行してください。
PowerShell$urls = @("https://www.whatap.io", "https://blog.whatap.io", "https://service.whatap.io")
# Hide progress bar
$ProgressPreference = 'SilentlyContinue'
foreach ($url in $urls) {
Write-Output "M $url url $url"
$startTime = Get-Date
try {
$response = Invoke-WebRequest -Uri $url -UseBasicParsing
$endTime = Get-Date
$timeTotal = ($endTime - $startTime).TotalSeconds
Write-Output "M $($response.BaseResponse.ResponseUri) url $($response.BaseResponse.ResponseUri)"
Write-Output ("H {0} time_total {1}" -f $url, $timeTotal)
} catch {
Write-Output "Failed to access $url"
}
} -
次のように出力されるか確認してください。
PowerShell> .\webcheck.ps1
M https://www.whatap.io url https://www.whatap.io
M url
H https://www.whatap.io time_total 0.376979
M https://blog.whatap.io url https://blog.whatap.io
Failed to access https://blog.whatap.io
M https://service.whatap.io url https://service.whatap.io
Failed to access https://service.whatap.io -
スクリプトの正常収集を確認し、次のようにWhaTapサーバーのモニタリングエージェントにスクリプトを登録してください。
PowerShellcd "\Program Files\WhatapInfra"
.\whatap_infra.exe init-script
Restart-Service "Whatap Infra"
サーバー時間同期化モニタリング
事前確認
-
OS:Linux
-
WhaTapサーバーモニタリングエージェントバージョン:2.5.4以降
次のオプションを使用してサーバー時間の同期化(NTP) モニタリング機能を活性化することができます。
echo "ntpq.enabled=true" |sudo tee -a /usr/whatap/infra/conf/whatap.conf
追加指標の案内
サーバー時間の同期化モニタリング機能を活性化する時に追加されるメトリクスは以下の通りです。
server_ntpq
Tags
| タグ名 | 説明 | 備考 |
|---|---|---|
refid | 当該リモート(remote)の時間同期化ソースを意味します。 | - |
remote | ホストが時間同期化を実行する対象サーバーを意味します。 | - |
Fields
| フィールド名 | 単位 | 説明 | 備考 |
|---|---|---|---|
delay | ms | サーバーが送信したクエリへのレスポンスとして返信パケットを返すのにかかった時間を意味します。 | - |
jitter | - | 2つのサンプル間のオフセット測定の違いから推定した誤差の境界値を意味します。 | - |
offset | ms | サーバー設定時間とクライアント設定時間の差を意味します。 | - |
poll | second | ntp.confファイルでminpoll値として定義されたリモートホストへのポーリング間隔を意味します。 | - |
reach | - | サーバーに到達する試みがどれほど成功しているかを確認できます。 2^0の位置に最新のクエリの成否を記録し、8ビットシフトレジスタで動作します。 | - |
st | - | リモートホストのストラタムレベルを意味します。 | - |
sync_client | - | 1:同期化サーバーが存在します。 | - |
| 0:同期化サーバーが存在しません。 | |||
t | - | 使用可能なタイプは次のとおりです。 | - |
| l:ローカル(例:GPS時計) | |||
| u:ユニキャスト(一般的なタイプ) | |||
| m:マルチキャスト | |||
| b:ブロードキャスト | |||
when | second | リモートホストの応答から過ぎた時間(秒)を意味します。 | - |
Linuxシステムログモニタリング
Linuxシステムログをリアルタイムでアップロードして、障害発生時点のログを確認できます。収集対象のログファイルは次のとおりです。
- /var/log/syslog
- /var/log/messages
設定方法は次のとおりです。
echo "systemlog.enabled=true" |sudo tee -a /usr/whatap/infra/conf/whatap.conf
ログモニタリングプラグイン
ランダムなログを収集できます。次の設定の場合、エージェントの再起動が必要です。
Linux Shell
-
基本インストール
Linux Shellexport LOGFILES=/some/path/file1,/some/other/file2
echo "logsink.files=$LOGFILES" | sudo tee -a /usr/whatap/infra/conf/whatap.conf -
カテゴリでインストール
Linux Shellcd /usr/whatap/infra
sudo mkdir extension
cat <<EOL | sudo tee extension/logsink.conf > /dev/null
[[inputs.logsink]]
category = "serverlog"
## ログ発生量統計の別途データとしての送信有無
stats_enabled = true
## 対数発生量の統計カテゴリ
stats_category = "logsink_stats"
## ログファイルパス(path)にアスタリスク(*)が含まれれ、除外するログ非対象ファイル名を設定
excludeNames = [ ".gz",".zip" ]
[[inputs.logsink.file]]
## ログファイルの指定時、日付パターン(strftime.org)指定可能
path = "/some/path/%Y-%m-%d/.log"
disabled = false
encoding = "utf-8"
[[inputs.logsink.file]]
path = "/some/other/log"
disabled = false
encoding = "utf-8"
[[inputs.logsink.file]]
## 行単位ログで該当キーワードを検索する時、以前のログにマージ
nowrap_keywords = ["Caused by:", "Test"]
[[inputs.logsink.file]]
## プロジェクトコード及びプロジェクトライセンスの入力時、ログを同じリージョンの希望するプロジェクトに転送可能
# pcode = プロジェクトコード
# license = "プロジェクトライセンス"
EOL
sudo service whatap-infra restart
Windows Powershell
-
基本インストール
Windows Powershell$LOGFILES="c:\\whatap\\logs\\%Y-%m-%d\\*.log,c:\\whatap\\logs\\*.log"
Add-Content "c:\Program Files\WhatapInfra\whatap.conf" -Value "logsink.files=$LOGFILES" -
カテゴリでインストール
Windows Powershell# 管理者権限が必要
New-Item -type "Directory" -Path "C:\Program Files\WhatapInfra\extension"
$contentToAdd = @"
[[inputs.logsink]]
category = "serverlog"
## ログ発生量統計の別途データとしての送信有無
stats_enabled = true
## 対数発生量の統計カテゴリ
stats_category = "logsink_stats"
## ログファイルパス(path)にアスタリスク(*)が含まれ、除外するログの非対象ファイル名を設定
excludeNames = [ ".gz",".zip" ]
[[inputs.logsink.file]]
## ログ ファイルの指定時、日付パターン(strftime.org)指定可能
path = "c:\\whatap\\logs%Y-%m-%d_.log"
disabled = false
encoding = "utf-8"
[[inputs.logsink.file]]
## 行単位ログで該当キーワードを検索する時、以前のログにマージ
nowrap_keywords = ["Caused by:", "Test"]
[[inputs.logsink.file]]
## プロジェクトコード及びプロジェクトライセンスの入力時、ログを同じリージョンの希望するプロジェクトに転送可能
# pcode = プロジェクトコード
# license = "プロジェクトライセンス"
"@
New-Item -path "C:\Program Files\WhatapInfra\extension" -name "logsink.conf" -type "file" -value $contentToAdd -Force
Restart-Service "Whatap Infra"
オプション設定
-
stats_enabled:収集状態データの収集有無を設定します。 既定値はfalseです。 値をtrueに設定してください。trueに設定すると次のstats_categoryで設定したカテゴリ(logsink_stats)で統計データが作成されます。 -
stats_category:収集データを保存するメトリクスカテゴリを設定します。 値をlogsink_statsに設定してください。 統計データのフィールドは次のとおりです。filecheckIntervalencodingfileposcheckedLocalTimelastupdatedLocalTimefileSizeerrorfirstChecktransferBytes
-
excludeNames:ログのファイルパス(path)にアスタリスク(*)が含まれた場合、ログの非対象ファイルを除外するようにファイル名を設定できます。 コンマ(,)区切り文字として複数設定することができます。ExampleexcludeNames = [ ".gz",".zip" ] -
nowrap_keywords:行単位のログ検索時に、対応するオプション値として指定されたキーワードが検索される場合は、以前のログにマージします。 -
pcode: ログを送信する同じリージョンのプロジェクトコードを入力します。 -
license: ログを送信する同じリージョンのプロジェクトのライセンスコードを入力します。
pcode、licenseオプションの場合、サーバーエージェント2.7.4バージョン以降に対応します。
Windowsイベントログのオプション設定
Windowsイベントログ収集時、次のようにオプションを設定することができます。
# 管理者権限が必要
New-Item -type "Directory" -Path "C:\Program Files\WhatapInfra\extension"

$contentToAdd = @"
[[inputs.win_eventlog]]
    category = "win_event_log"
    stats_category = "win_event_log_stats"
    stats_enabled = true
    enabled = true
    [[inputs.win_eventlog.file]]
        #true | false
        enabled = true
        # Application, Security, Setup, System, Forwarded
        file = "Application"
        #1: Information, 2: Warning 3: Error 4: Audit Success 5 Audit Fail
        #event_type =
        #event id
        #event_id =
        #event source name
        #source_name = ""
        #プロジェクトコード及びプロジェクトライセンスの入力時、ログを同じリージョンの希望するプロジェクトに転送可能
        #pcode = プロジェクトコード
        #license = "プロジェクトライセンス"

"@

New-Item -path "C:\Program Files\WhatapInfra\extension" -name "win_eventlog.conf" -type "file" -value $contentToAdd -Force

Restart-Service "Whatap Infra"
-
カテゴリー指定(
category) 必須例)
win_event_log -
統計カテゴリ指定(
stats_category) 必須例)
win_event_log_stats -
統計カテゴリOn/Off(
stats_enabled) 必須例)
trueまたはfalse -
収集機能On/Off(
enabled) 必須例)
trueまたはfalse -
ファイル別収集機能On/Off(
enabled) 必須例)
trueまたはfalse -
ファイル(
file) 必須例)
Application、Security、Setup、System、Forwarded -
イベントタイプ(
event_type) 非必須例)
1、2、3、4、5ノートイベントタイプ
-
Information
-
Warning
-
Error
-
Audit Success
-
Audit Fail
-
-
イベントID(
event_id) 非必須 -
イベントソース名(
source_name) 非必須 -
プロジェクトコード(
pcode)非必須 -
プロジェクトライセンス(
license)非必須
-
ウィンドウイベントログ収集の場合、サーバーエージェント2.5.2バージョン以降に対応します。
-
ウィンドウイベントログオプションの中で
pcode、licenseオプションの場合、サーバーエージェント2.7.4バージョン以降に対応します。
ログ複数ファイルの指定と分離
複数のファイル指定
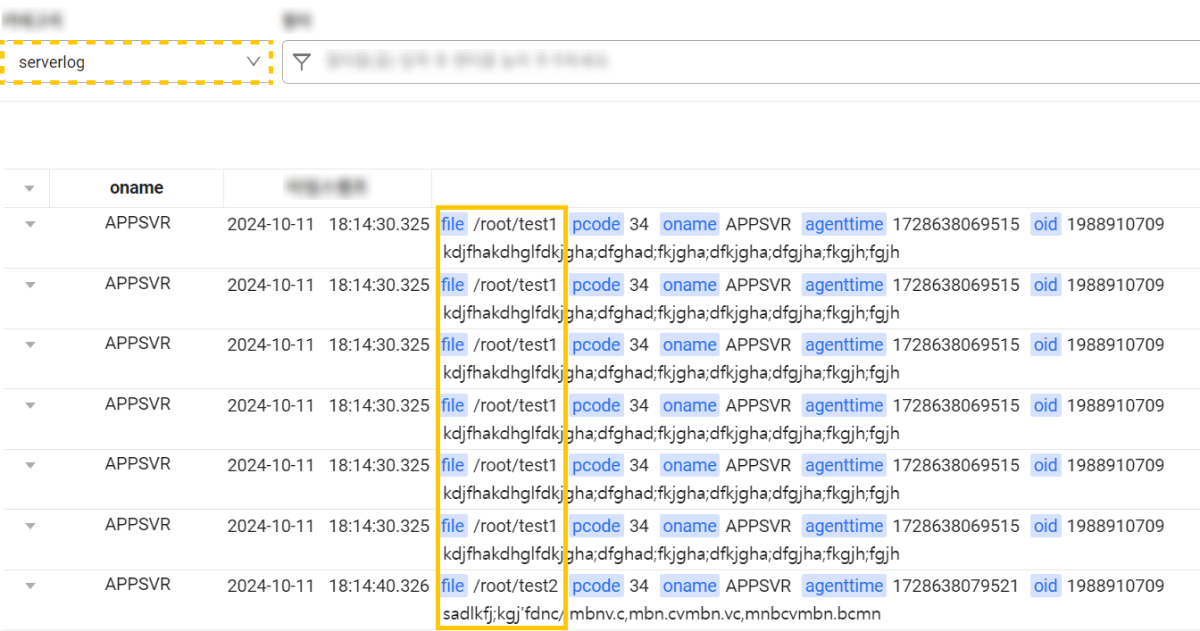
複数のログファイルを同じカテゴリに設定するには、各ログファイルのパスを[[inputs.logsink.file]]項目に追加して、path設定により、ファイルパスを指定します。 また、category、stats_enabled、stats_categoryなどのオプションを使用して、ログ発生量の統計設定などの付加的な設定が可能です。 例は、/root/test1および*/root/test2*ファイルを同一のカテゴリ(serverlog)に指定した場合です。
[[inputs.logsink]]
  category = "serverlog"
  stats_enabled = true
  stats_category = "logsink_stats"
  excludeNames = [ ".gz",".zip" ]

[[inputs.logsink.file]]
  path = "/root/test1"
  disabled = false
  encoding = "utf-8"

[[inputs.logsink.file]]
  path = "/root/test2"
  disabled = false
  encoding = "utf-8"
category、stats_enabled、stats_category、nowrap_keywordsなどのオプションについては、上段 案内を参照してください。
当該例の場合、ログTailメニューでは次のように確認できます。

ファイル分離
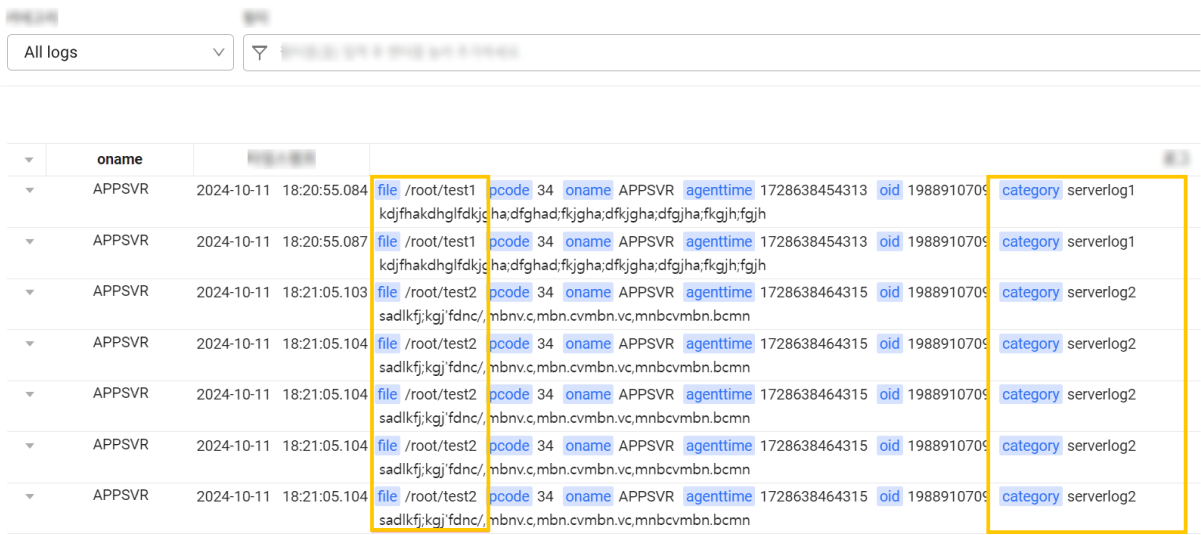
異なるカテゴリでログファイルを指定するには、logsink{숫자}.confファイルをそれぞれ作成し、各ファイル内で異なるcategory値を設定します。 次の例は、logsink.confとlogsink1.confを介して、それぞれ異なるログカテゴリを設定した場合です。
# cat logsink.conf
[[inputs.logsink]]
  category = "serverlog1"
  stats_enabled = true
  stats_category = "logsink_stats"
  excludeNames = [ ".gz",".zip" ]

[[inputs.logsink.file]]
  path = "/root/test1"
  disabled = false
  encoding = "utf-8"
#cat logsink1.conf
[[inputs.logsink]]
  category = "serverlog2"
  stats_enabled = true
  stats_category = "logsink_stats"
  excludeNames = [ ".gz",".zip" ]

[[inputs.logsink.file]]
  path = "/root/test2"
  disabled = false
  encoding = "utf-8"
category、stats_enabled、stats_category、nowrap_keywordsなどのオプションについては、上段 案内を参照してください。
当該例の場合、ログTailメニューでは次のように確認できます。
