Agent Installation
The following guides you to the basic installation method for using the WhaTap Telegraf agent.
Metrics collected by Telegraf can be forwarded to the WhaTap collection server. The collected data can be checked in the WhaTap's project. This page explains how to install the whatap-telegraf agent to relay the data from Telegraf to the collection server.
Enable the socket_writer output plugin of the installed Telegraf to pass the data to the whatap-telegraf (Local TCP) agent.
To use the WhaTap service, after sign in, you must create a project and install the agent to the target server. For more information about sign in, see the following.
Telegraf agents must be installed and configured directly on the service.
Creating a project
Create a project before installing the agent.
-
Log in WhaTap monitoring service.
-
To create a project, on the left of the screen, select All Projects > + Project.
-
Select a product in Select product for installation.
-
Configure the settings for Project name, Data server region, and Time zone.
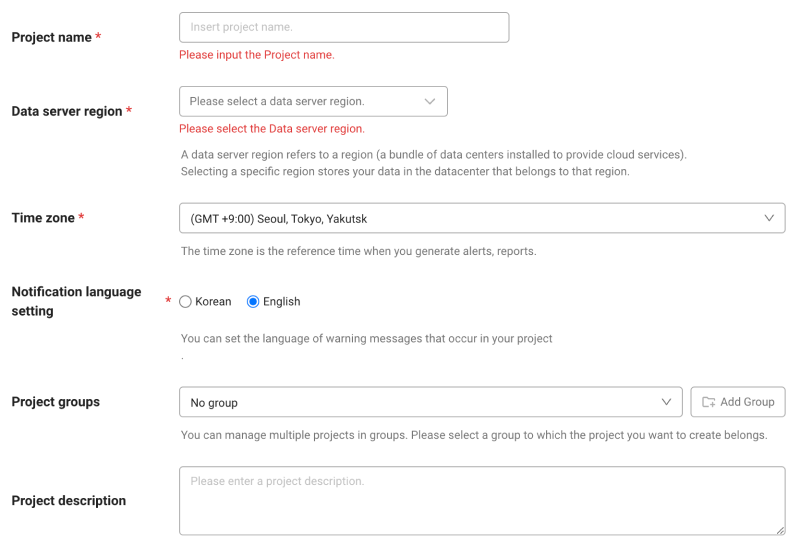
-
In Notification language setting, select the language for alert messages.
-
After all settings are finished, select Creating a project.
-
A Data server region refers to a region (a bundle of data centers installed to provide cloud services). Selecting a specific region stores your data in the datacenter that belongs to that region.
-
Time zone is the reference time for generating alerts and reports.
-
To group multiple projects for management, select a group from Project groups or add a group. For more information about grouping, see the following.
-
To add a project with an organization selected, Groups of organization must be set.
Checking the project access key
Project access key is the unique ID for activating the WhaTap services.
In the installation guide section, select Getting the access key. After automatic reception of project access key, proceed to the next step.
After a project has been created, the Agent installation page appears automatically. If the Agent installation does not appear, select All projects on the left and then select a newly created project.
Installation order and file configuration
- Install the WhaTap repository.
- Install the whatap-telegraf Linux package (yum, apt-get).
- Set the project access key and ** WhaTap server information** settings.
- Set the Telegraf's
socket_writer output pluginto link the data.
Configuring the Telegraf agent file
-
whatap_telegraf
By using the service running file, this program sends the data from Telegraf to the collection server.
-
/etc/init.d/whatap-telegraf (FreeBSD /usr/local/etc/whatap_telegraf)
Service script file.
-
whatap.conf
It is the configuration file. This is the file where the address of the collection server and the server's project access key are entered.
-
whatap-telegraf-#.log
Agent log file. (/usr/whatap/telegraf/logs)
Installing the package
- Red Hat/CentOS
- Debian/Ubuntu
- Amazon Linux
- FreeBSD
-
Install the WhaTap repository.
$ sudo rpm -Uvh http://repo.whatap.io/centos/5/noarch/whatap-repo-1.0-1.noarch.rpm -
Install the package with the following command.
$ sudo yum install whatap-telegraf -
Run the configuration script to start the service.
echo "license=[granted project access key]" |sudo tee /usr/whatap/telegraf/whatap.conf
echo "whatap.server.host=[WhaTap server address]" |sudo tee -a /usr/whatap/telegraf/whatap.conf
sudo service whatap-telegraf restart
-
Install the WhaTap repository.
$ wget http://repo.whatap.io/debian/release.gpg -O -|sudo apt-key add -
$ wget http://repo.whatap.io/debian/whatap-repo_1.0_all.deb
$ sudo dpkg -i whatap-repo_1.0_all.deb
$ sudo apt-get update -
Install the package with the following command.
$ sudo apt-get install whatap-telegraf -
Run the configuration script to start the service.
echo "license=[granted project access key]" |sudo tee /usr/whatap/telegraf/whatap.conf
echo "whatap.server.host=[WhaTap server address]" |sudo tee -a /usr/whatap/telegraf/whatap.conf
sudo service whatap-telegraf restart
-
Install the WhaTap repository.
$ sudo rpm --import http://repo.whatap.io/centos/release.gpg
$ echo "[whatap]" | sudo tee /etc/yum.repos.d/whatap.repo > /dev/null
$ echo "name=whatap packages for enterprise linux" | sudo tee -a /etc/yum.repos.d/whatap.repo > /dev/null
$ echo "baseurl=http://repo.whatap.io/centos/latest/\$basearch" | sudo tee -a /etc/yum.repos.d/whatap.repo > /dev/null
$ echo "enabled=1" | sudo tee -a /etc/yum.repos.d/whatap.repo > /dev/null
$ echo "gpgcheck=0" | sudo tee -a /etc/yum.repos.d/whatap.repo > /dev/null -
Install the package with the following command.
$ sudo yum install whatap-telegraf -
Run the configuration script to start the service.
echo "license=[granted project access key]" |sudo tee /usr/whatap/telegraf/whatap.conf
echo "whatap.server.host=[WhaTap server address]" |sudo tee -a /usr/whatap/telegraf/whatap.conf
sudo service whatap-telegraf restart
-
Install the WhaTap repository.
$ wget https://s3.ap-northeast-2.amazonaws.com/repo.whatap.io/freebsd/10/whatap-telegraf-0.0.4.txz
$ pkg install whatap-telegraf-0.0.4.txz -
Run the configuration script to start the service.
echo "license=[granted project access key]" | tee /usr/whatap/telegraf/whatap.conf
echo "whatap.server.host=[WhaTap server address]" | tee -a /usr/whatap/telegraf/whatap.conf
sudo service whatap_telegraf restart
Telegraf integration
By setting socket_writer output plugin in Telegraf.conf, the data collected via whatap-telegraf is sent.
# # Generic socket writer capable of handling multiple socket types.
 [[outputs.socket_writer]]

#   ## URL to connect to
    address = "tcp://127.0.0.1:6600"

#   # data_format = "influx"
    data_format = "json"
[[outputs.socket_writer]]Uncomment the line- Enter the TCP connection setting in the address field.
- Set the data type in json format.
You have finished installation of the Telegraf agent. In the following check the installation troubleshooting.