Unix
FreeBSD
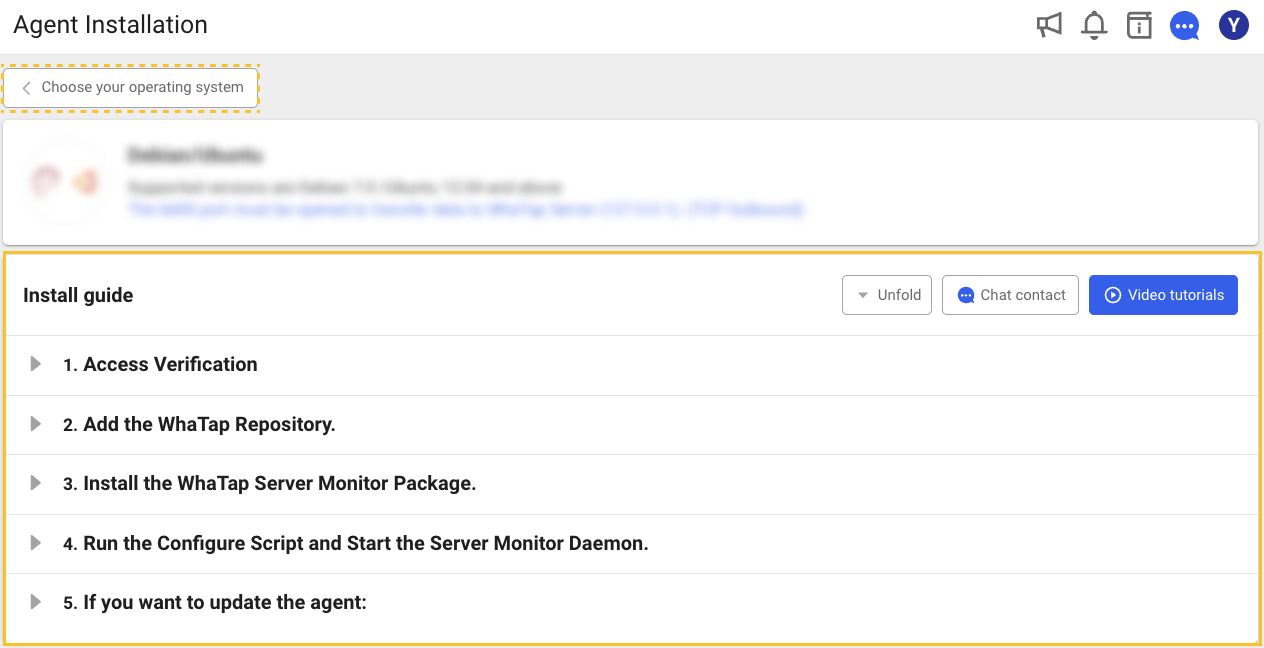
If you select a newly generated server monitoring project, the Agent Installation screen appears. You can also perform this through Management > Agent Installation of the project.

Select a desired OS on the Agent Installation screen, check the project access key, and then proceed with the installation according to the following instructions.
-
Register the WhaTap repository.
In the Add the WhaTap Repository tab, copy the command and enter it.
wget http://repo.whatap.io/freebsd/10/whatap-infra.txz -
Install the package with the following command.
In the Install the WhaTap Server Monitor Package tab, copy the command and enter it.
pkg install whatap-infra.txz -
Run the configuration script.
In the Run the Configure Script and Start the Server Monitor Daemon. tab, get the command or execute the command below after adding the project access key and server IP.
echo "license=[Granted Project Access Key]" |sudo tee /usr/whatap/infra/conf/whatap.conf
echo "whatap.server.host=[Granted WhaTap Server IP]" |sudo tee -a /usr/whatap/infra/conf/whatap.conf
echo "createdtime=`date +%s%N`" |sudo tee -a /usr/whatap/infra/conf/whatap.conf
sudo service whatap-infra restart
Cautions
TCP outbound 6600 PORT must be open for data transmission.
Server agent file configuration
-
Common files
-
ChangeLog.txt: Agent's revision history
-
whatap.conf: In this file, the address of the server to collect data and the server's project access key are entered.
-
-
Linux/FreeBSD
-
whatap_infrad: Agent that collects and transmits data.
-
whatap_infrad.pid: File in which the PID of the running agent has been written.
-
VERSION: File in which the versions of the installed agents have been written.
-
Aix
-
It is available in the AIX 6.1 or later.
-
Additional options need to be set when installing WhaTap AIX agent 1.3.3 or earlier. See the following.
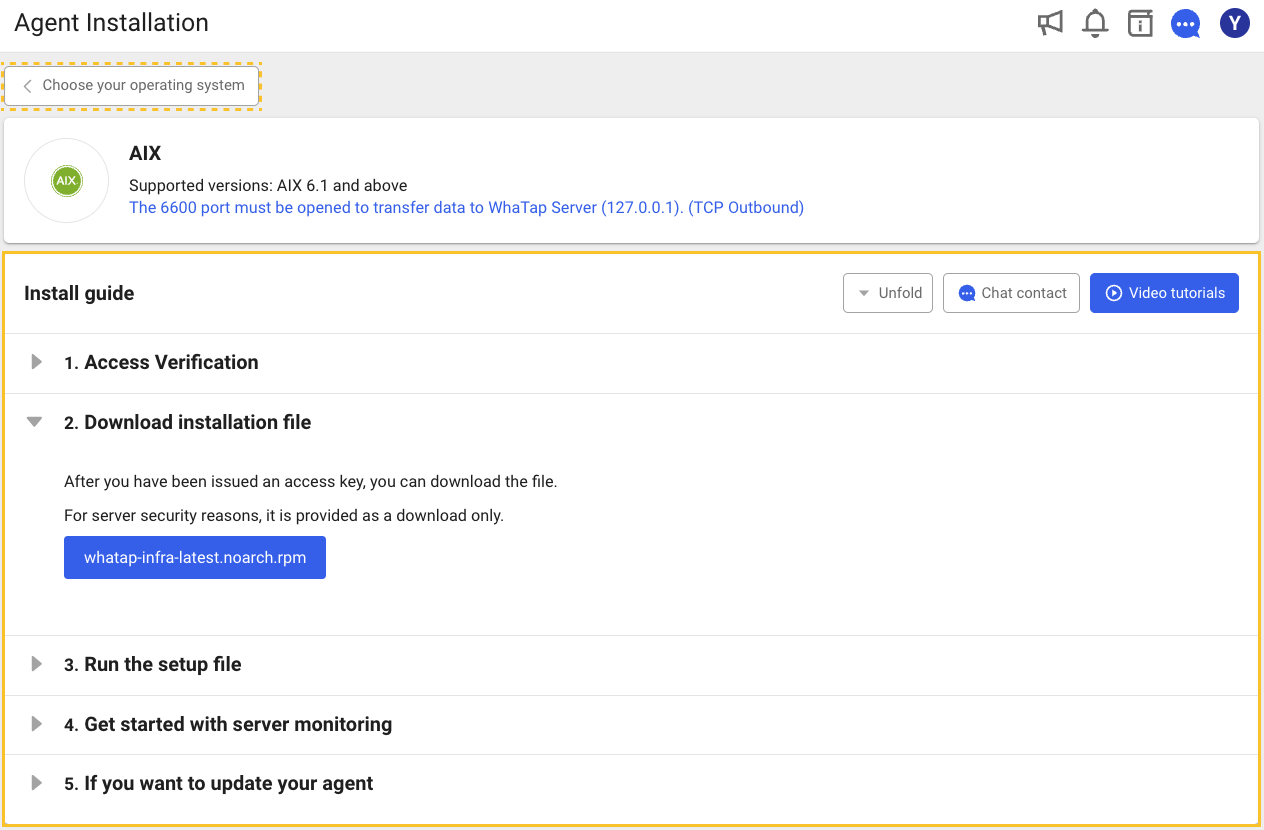
If you select a newly generated server monitoring project, the Agent Installation screen appears. You can also perform this through Management > Agent Installation of the project.

After selecting AIX on the operating system selection screen in Agent Installation and confirming the project access key, proceed with the installation according to the following instructions.
-
In the Download installation file tab, select whatap-infra-latest.noarch.rpm to download the agent installation file.
-
Go to the Run the setup file tab, check the following command, and then run the package.
rpm -Uvh whatap-infra-latest.noarch.rpm
For server security purposes, the installation files are provided only in the download format.
Running the agent
Execute the following command to start the server monitoring. When the application server runs, it begins collecting monitoring information.
echo "license=x4t2322hcqshs-x1q9rv0b9rjvs6-x4jnrqfl5ce5g" |tee /usr/whatap/infra/conf/whatap.conf
echo "whatap.server.host=127.0.0.1" |tee -a /usr/whatap/infra/conf/whatap.conf
echo "createdtime=date +%s%S" |tee -a /usr/whatap/infra/conf/whatap.conf
stopsrc -s whatap-infra
startsrc -s whatap-infra
Precautions
When installing WhaTap AIX agent 1.3.3 or earlier, the following additional options must be set:
-
In the Server List menu, select the Column settings button and then activate OID in the server information.
-
In Server list, check the OID column of the target server.
-
Add the OID's fixed option as follows:
echo "oid=[oid of server]" >> /usr/whatap/infra/conf/whatap.conf
Oracle Solaris
-
Additional options need to be set when installing WhaTap Oracle Solaris agent 1.3.3 or earlier. See the following.
-
Supported versions: Oracle Solaris 10, 11.2, 11.3, 11.4
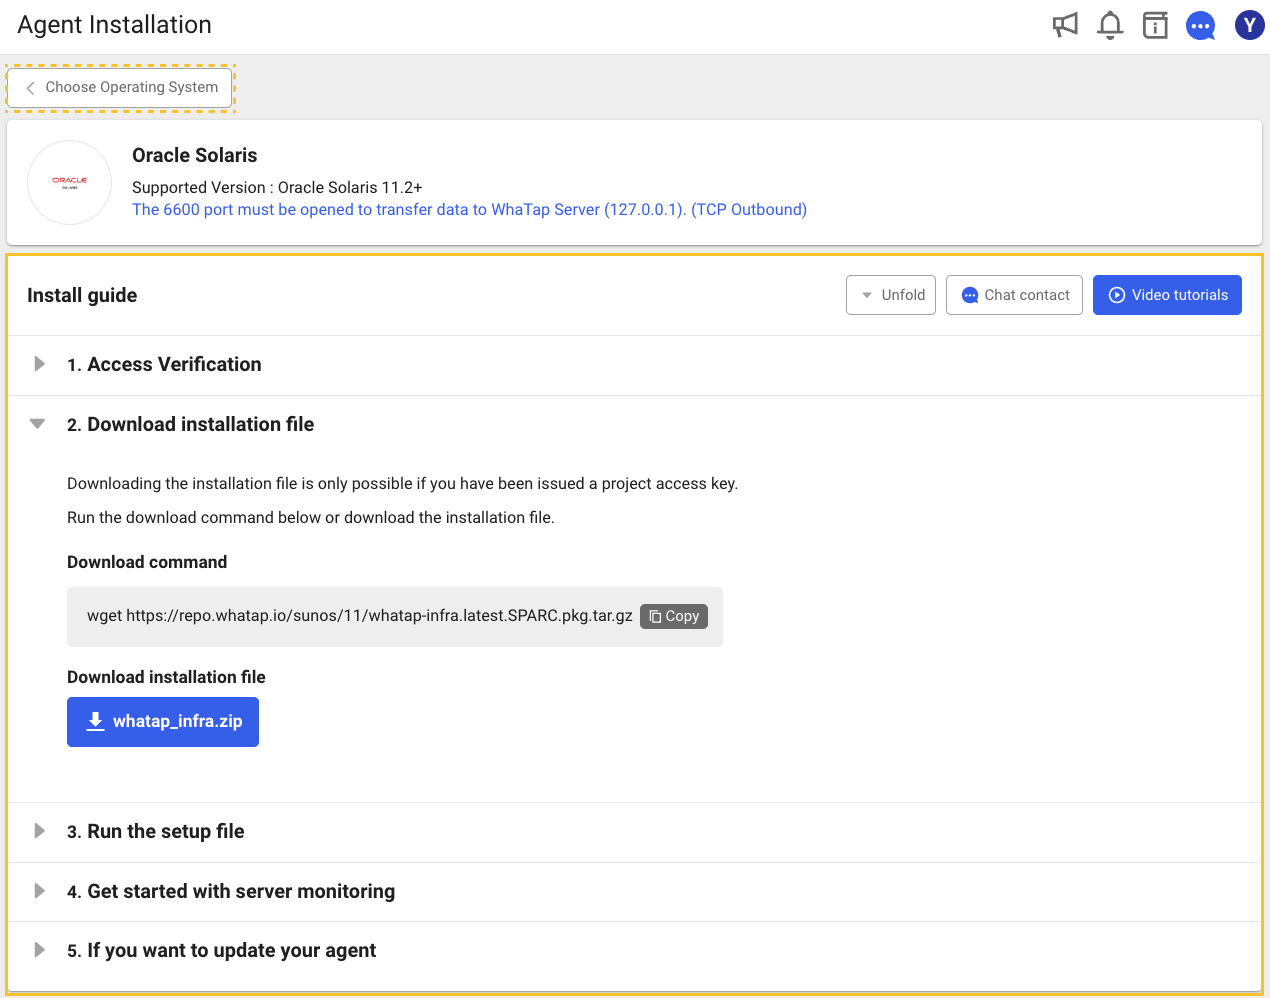
If you select a newly generated server monitoring project, the Agent Installation screen appears. You can also perform this through Management > Agent Installation of the project.

After selecting Oracle Solaris on the operating system selection screen in Agent Installation and confirming the project access key, proceed with the installation according to the following instructions.
-
Execute the download command or select a version in the Download installation file tab, and then download the installation file.
-
Execute the following command to download the agent installation file.
wget https://repo.whatap.io/sunos/11/whatap-infra.latest.SPARC.pkg.tar.gz -
Select whatap_infra.zip to download the agent installation file.
-
-
Go to the Run the setup file tab, check the following command, and then run the package.
tar xzvf whatap-infra.latest.SPARC.pkg.tar.gz
pkgadd -d .
Running the agent
Execute the following command to start the server monitoring. When the application server runs, it begins collecting monitoring information.
echo "license=x4t2322hcqshs-x1q9rv0b9rjvs6-x4jnrqfl5ce5g" |tee /usr/whatap/infra/conf/whatap.conf
echo "whatap.server.host=127.0.0.1" |tee -a /usr/whatap/infra/conf/whatap.conf
echo "createdtime=`date +%s%S`" |tee -a /usr/whatap/infra/conf/whatap.conf
/etc/init.d/whatap-infra start
Precautions
Additional options need to be set as follows when installing WhaTap Oracle Solaris agent 1.3.3 or earlier.
-
In the Server List menu, select the Column settings button and then activate OID in the server information.
-
In Server list, check the OID column of the target server.
-
Add the OID's fixed option as follows:
echo "oid=[oid of server]" >> /usr/whatap/infra/conf/whatap.conf
Server running on Oracle Enterprise Edition
If you install on the server running on Oracle Enterprise Edition, disable the process collection option by referencing the following:
echo "task_proc=false" >> /usr/whatap/infra/conf/whatap.conf
/etc/init.d/whatap-infra restart
Addressing the agent incidents
The following provides guidance on how to address the cases where no data is incorrectly detected in the Oracle Solaris agent.
Checking the OID settings
Check that the oid option is set in the /usr/whatap/infra/conf/whatap.conf file.
-
For the agent 1.3.3 or earlier, set the OID manually. For the setting method, see the following.
-
For the agent 1.3.4 or later, the OID is set automatically.
In case the version of the agent is 1.3.3 or earlier and it is running on Oracle Enterprise Edition
Process collection is not supported on the servers running on Oracle Enterprise Edition.
-
Check that the `
task_proc=falseoption is set in the/usr/whatap/infra/conf/whatap.conffile. -
If it is not set, execute the following command to set the option and then restart the agent.
echo "task_proc=false" >> /usr/whatap/infra/conf/whatap.conf
/etc/init.d/whatap-infra restart
This process disables the process collection option, ensuring that the agent operates in environments running on Oracle Enterprise Edition.
HP-UX
-
It is supported from HP-UX Itanium 11.23 and later.
-
It is supported from HP PA-RISC-UX 11.23 and later.
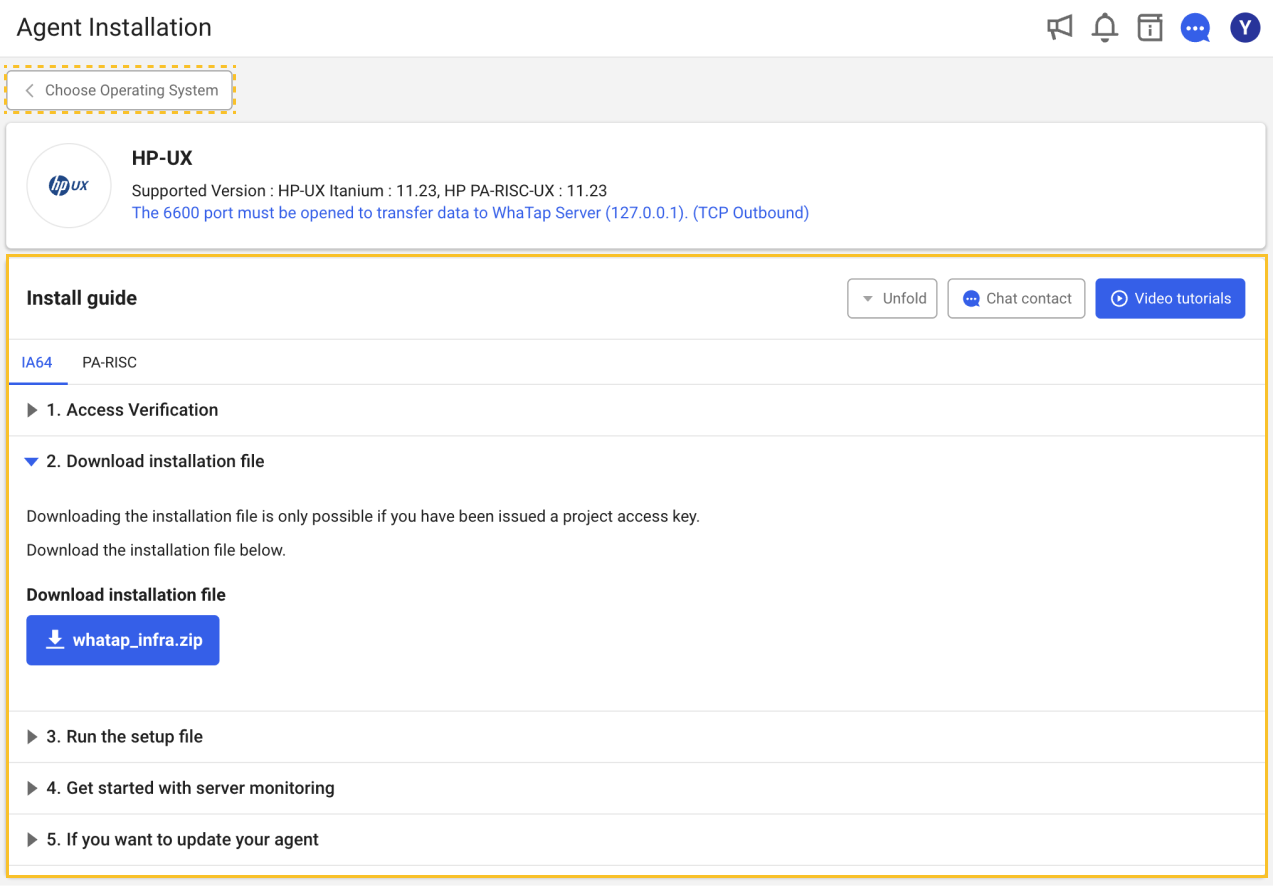
If you select a newly generated server monitoring project, the Agent Installation screen appears. You can also perform this through Management > Agent Installation of the project.

In the OS selection screen in Agent Installation, select HP-UX. Depending on your HP-UX server architecture, select IA64 or PA-RISC from the tab at the top and then check the project access key. Proceed with installation according to the following instructions.
- IA64
- PA-RISC
-
In the Download installation file tab, select the appropriate version of whatap_infra.zip to download the agent installation file.
-
Go to the Run the setup file tab, check the following command, and then run the package.
gunzip -c whatap-infra.latest.ia64.tar.gz	 | tar xvf -
./whatap-infra/install.sh x4t2322hcqshs-x1q9rv0b9rjvs6-x4jnrqfl5ce5g 127.0.0.1
-
In the Download installation file tab, select whatap_infra.zip to download the agent installation file.
-
Go to the Run the setup file tab, check the following command, and then run the package.
gunzip -c whatap-infra.latest.pa.tar.gz   | tar xvf -
./whatap-infra/install.sh x4t2322hcqshs-x1q9rv0b9rjvs6-x4jnrqfl5ce5g 127.0.0.1
Running the agent
Execute the following command to start the server monitoring. When the application server runs, it begins collecting monitoring information.
/sbin/init.d/whatap-infra start