Server Inventory
Home > Select Project > Server List > Server Inventory
On the initial screen of the WhaTap monitoring service, select a project, and then select the Server Inventory menu under the Server List menu. Server Inventory provides configuration information required for server operations and allows you to manually add management items for management convenience.
The Server Inventory menu systematically manages the physical and virtual characteristics of the server, as well as the operating environment. This feature allows for detailed insight and management of the server configuration through automatically collected server components and custom items. Server Inventory provides essential data for performance analysis and troubleshooting of the server.
Supported agent versions
The Server Inventory menu is supported only in the following versions or later for each operating system.
-
Linux: 2.6.6 or later
If an update is needed, check the following commands for each operating system.
- Debian/Ubuntu
- Amazon Linux/RHEL/Fedora/Oracle Linux/CentOS/Rocky Linux/SUSE
sudo apt-get update
sudo apt-get install whatap-infra
sudo yum update whatap-infra -
Unix: 1.3.4 or later
If an update is needed, check the following commands for each operating system.
- AIX
- Oracle Solaris
stopsrc -s whatap-infra
cp /usr/whatap/infra/conf/whatap.conf /tmp/whatap.conf
rpm -e whatap-infra
rpm -Uvh http://repo.whatap.io/aix/noarch/whatap-infra-latest.noarch.rpm
cp /tmp/whatap.conf /usr/whatap/infra/conf/whatap.conf
cp /usr/whatap/infra/conf/whatap.conf /tmp
/etc/init.d/whatap-infra stop
pkgrm whatap-infra
wget https://repo.whatap.io/sunos/11/whatap-infra.latest.SPARC.pkg.tar.gz
tar xzvf whatap-infra.latest.SPARC.pkg.tar.gz
pkgadd -d .
cp /tmp/whatap.conf /usr/whatap/infra/conf/whatap.conf -
Windows: 2.6.6 or later
Download the installation file through the following link and then run it. After the agent update, the service is restarted.
Activation options
The following settings are required to enable the Server Inventory menu viewing feature.
-
Enable the following options in the whatap.conf file.
hostinfov2.enabled=true -
After setting additional options according to the environment, restart the agent.
-
Linux
- Add option command
- Restart agent
grep -q '^hostinfov2.enabled' /usr/whatap/infra/conf/whatap.conf || echo 'hostinfov2.enabled=true' | sudo tee -a /usr/whatap/infra/conf/whatap.confsudo service whatap-infra restart -
Unix
- Add option command
- Restart agent
AIX/Oracle Solarisgrep -q '^hostinfov2.enabled' /usr/whatap/infra/conf/whatap.conf || echo 'hostinfov2.enabled=true' | tee -a /usr/whatap/infra/conf/whatap.confAIXstopsrc -s whatap-infra
startsrc -s whatap-infraOracle Solaris/etc/init.d/whatap-infra restart -
Windows
- Add option command
- Restart agent
if (-not (Select-String -Path "C:\Program Files\WhatapInfra\whatap.conf" -Pattern "^hostinfov2.enabled" -Quiet)) { Add-Content -Path "C:\Program Files\WhatapInfra\whatap.conf" -Value "hostinfov2.enabled=true" }Restart-Service -Name "Whatap Infra"
-
Basic screen guide
The Server Inventory menu provides key configuration items of the server in a list form. You can manage essential information required for server operation and management, as well as custom items that are automatically collected. This allows server administrators to monitor and operate their infrastructure more systematically and efficiently. Use the filters and sorting feature to easily find the information you need.

Filtering
In the ![]() filter input field at the top, you can enter the desired conditions and view only the items that meet those conditions. Enter or select column conditions and then press Enter to add them. Apply
filter input field at the top, you can enter the desired conditions and view only the items that meet those conditions. Enter or select column conditions and then press Enter to add them. Apply == or !=, enter a value for the condition, and then press Enter.
e..g.
Server name==server04
If you click Lookup after entering the filters, you can view the filtered list in the ![]() server inventory list area.
server inventory list area.
Align
Through the sorting option at the top of ![]() , multi-alignment is provided up to 3 levels. You can sort by any desired criteria including custom columns. The default settings for sorting are OS type > Model > Serial.
, multi-alignment is provided up to 3 levels. You can sort by any desired criteria including custom columns. The default settings for sorting are OS type > Model > Serial.
Sorting is reset when moving and refreshing the menu.
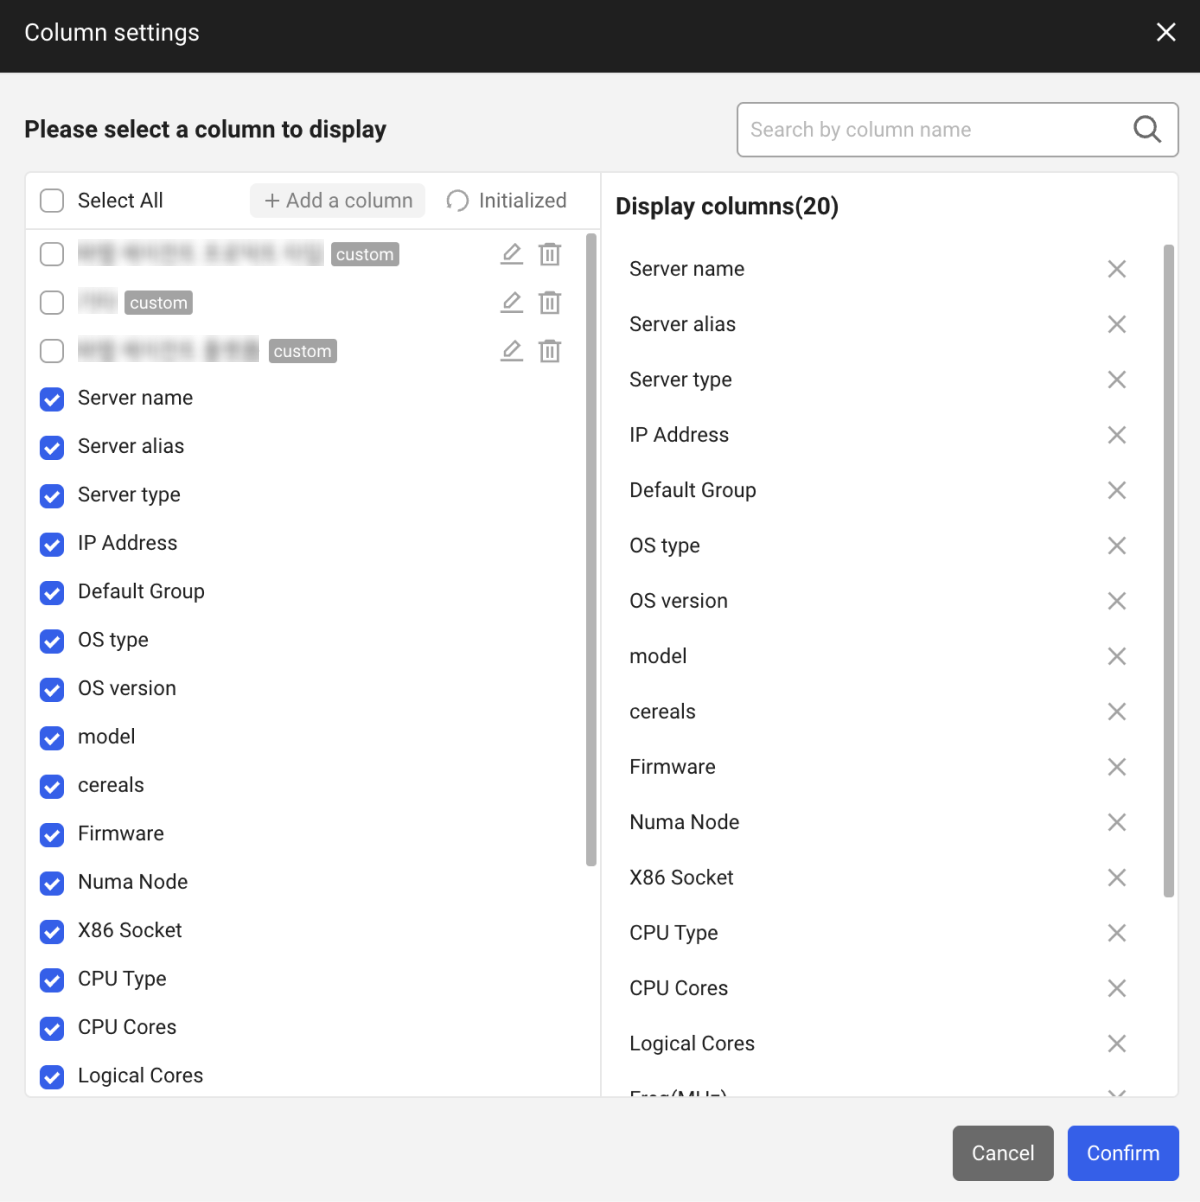
Column Settings
Click ![]() Column settings at the top of the
Column settings at the top of the ![]() area. Select columns and add custom columns as shown below, and then select Confirm at the bottom to save the column settings.
area. Select columns and add custom columns as shown below, and then select Confirm at the bottom to save the column settings.
-
Select Column
Users can select the columns to display in the table. If the Initialized button is selected, it returns to the default selection state.
NoteThe selected columns are saved as browser cookie values and remain in effect even if the page is refreshed. If cookies are deleted or a setting error occurs for any other reason, the default selection state is reset.
-
Adding columns
Users can configure custom columns (
custom) by selecting the + Add a column button and adding their own desired items in addition to the default items. Add columns to your taste and then monitor the server status and performance in more detail.
Download CSV
By selecting ![]() Download at the top of the
Download at the top of the ![]() area, you can download the collected server inventory in CSV file format.
area, you can download the collected server inventory in CSV file format.
Edit
You can edit the server inventory list by selecting ![]() Edit at the top of the
Edit at the top of the ![]() area.
area.
-
You can configure the settings for the Server alias and Default Group columns.
-
You can set the contents of custom columns (
custom) added by users.