Agent Installation
The following guides you to the basic installation method for using the WhaTap database monitoring service.
Checking the project access key
Project access key is the unique ID for activating the WhaTap services.
In the installation guide section, select Getting the access key. After automatic reception of project access key, proceed to the next step.
After a project has been created, the Agent installation page appears automatically. If the Agent installation does not appear, select All projects on the left and then select a newly created project.
Downloading the WhaTap database agent
-
Download the agent file. Use the following two methods.
-
On the WhaTap monitoring service screen, select Download for downloading.
-
You can download with the Linux wget method. Use the following command.
wget -O whatap.agent.database.tar.gz "https://service.whatap.io/download/dbx_agent?type=redis&format=tar.gz"
NoteFor those who cannot download tar files due to security settings, ZIP files are also provided. On the installation screen, select the .zip Download button.
-
-
Copy the downloaded file to the server to be analyzed, and then unzip it. (Same for Windows and Linux)
Agent configuration file
File name Description whatap.conf This is the file where you can enter the address of the collection server that collects data from the database server and the server's project access key. For more information about the agent configuration, see the following. alert/alert.conf This is the file that sets thresholds for monitoring items to be collected. An alert occurs when the threshold is exceeded. scripts/ This directory contains the scripts that can remotely run SQL scripts. ps.sh This script fetches the process ID. When ending the agent process, the ID is referenced. stop.sh This script is used when ending the agent process. uid.sh (uid.bat) This shell script file generates an encrypted UID by combining the database connection data. It creates the db.user file. Once you have set it for the first time, it collects data from the database server to be monitored through the encrypted UID.
For more details about creation of an account for monitoring, see the following.start.sh (start.bat) This shell script file runs the agent. When the agent starts, it starts collecting monitoring data from the database server. startd.sh (startd.bat) This shell script file runs the agent, which can be run in the background. whatap.agent.dbx- X.Y.Z.jarThe Tracer program is a program that collects data from the database server and transmits the collected data to the server. jdbc This directory collects the libraries referenced for database server connection. Download the library for connecting the agent and database server and use it by setting the path in the class path option of Java. xos/ The directory contains the optional agent that can monitor the process usage of the database server. ⎿ xos.conf This file is used to enter the address and communication port of the agent server for collecting the process usage of the database server and transmitting the data. * xcub/ This directory contains additional agent files that collect SQL texts from the CUBRID database and calculate metrics. ⎿ * xcub.conf This file is used to enter the CUBRID database and additional agent connection settings. Note*: The files in the xcub path are dedicated files for CUBRID Monitoring.
-
Enter the unzipped folder and then check the whatap.conf file. In whatap.conf, enter the project access key(
license), WhaTap server data(whatap.server.host), and DB connection data(dbms,db_ip,db_port).whatap.conflicense={Access_Key}
whatap.server.host=13.124.11.223/13.209.172.35 # WhaTap server information
dbms=redis
db_ip={DB_server_IP_address}
db_port={DB_server_port}
-
Depending on the DB configuration, the additional settings may be required in the whatap.conf file. For more information, see the following.
-
To further monitor the DB server's resources, use the XOS agent. For more information, see the following.
Account creation
Create an account with roles required for database monitoring. Log in with the root account and then create accounts.
-
To use the previous accounts, go to Create DB User File. If you do not have any permission, you may not be able to proceed with normal monitoring.
-
In the example code,
whatapis the DB user account name. Change it to your account name.
- Enter your password in
DB_Passwordin the example code.
ACL SETUSER {whatap} on >{DB_Password} +client +config +info +cluster
For more information about the account creation in the Redis environment, see the following link.
Connecting with IAM authentication
See how to set up IAM authentication
In an Amazon ElastiCache environment, you can connect with an AWS IAM authentication token instead of a DB password. It is available for Redis 7 or later and Valkey 7.2 or later. Memcached is not supported.
If you use the password-based method, skip this step.
Step 1. Prepare the connection account
Create a user in the ElastiCache console.
-
Select IAM for the authentication mode.
-
Set User ID and User name to the same value.
-
Allow the commands required for monitoring in the access string.
on ~* +@all
After creating the user, create a User group, add the user to it, and connect it to the cache.
Step 2. Set up whatap.conf
Add the following options to the whatap.conf file.
aws_iam_auth=true
aws_region=ap-northeast-2
db_ssl=true
db_user={db_user}              # The User ID created in Step 1
elasticache_name={cache_name}  # The cache name in the ARN (lowercase)
For elasticache_name, enter the cache name in the ARN, not the endpoint address.
If you use the AssumeRole method, add the aws_arn option. For the EC2 Role method, do not add the option.
aws_arn=arn:aws:iam::{ACCOUNT}:role/{ROLE}
Step 3. Configure AWS in advance
In the IAM console, select the Policies > Create policy > JSON tab and enter the following policy. Replace the { } parts with the values you use.
For the Resource of elasticache:Connect, you must include both the cache ARN and the User ARN.
{
  "Version": "2012-10-17",
  "Statement": [
    {
      "Effect": "Allow",
      "Action": ["elasticache:Connect"],
      "Resource": [
        "arn:aws:elasticache:{REGION}:{ACCOUNT}:serverlesscache:{CACHE_NAME}",
        "arn:aws:elasticache:{REGION}:{ACCOUNT}:user:{USER_ID}"
      ]
    }
  ]
}
For a node-based cluster, use replicationgroup:{GROUP_NAME} instead of serverlesscache:{CACHE_NAME}.
Step 4. Set up the Role
Attach the policy you created to a Role and connect it to the agent. In a production environment, the EC2 Role method is recommended. You do not need to store an access key.
- EC2 Role
- AssumeRole
-
Create an IAM Role with EC2 as the trusted service.
-
Attach the policy you created to the Role.
-
Connect the Role to the EC2 instance that runs the agent. For details, see the AWS documentation.
Use this when delegation is required, such as in a cross-account environment.
-
Create the Role to be delegated and attach the policy you created.
-
Set up the trust relationship so that the Role of the EC2 running the agent can perform
sts:AssumeRole. For details, see the AWS documentation. -
Specify the ARN of this Role in the
aws_arnoption of whatap.conf.
Creating DB users and changing passwords
If you do not use the user and password (you can access Redis without authentication), you can skip the DB user file creation step.
Generate an encrypted UID for database connection. Enter the username and password and then run the shell script (or batch file).
When changing the password, enter the new password and follow the same procedure.
-
Redis 6 or earlier: The uid.sh shell script file (or uid.bat batch file) can be found in the path where the WhaTap's database agent has been installed. When only the password exists without username, set
DB_USERas"". e.g../uid.sh "" whatap\!pwd -
Redis 6 or later: The uid.sh shell script file (or uid.bat batch file) can be found in the path where the WhaTap database agent has been installed. If there is only a password without username, set
DB_USERasdefault. e.g../uid.sh default whatap\!pwd
- Linux
- Windows
./uid.sh {DB_USER} {DB_PASSWORD}
-
After setting it once, it collects data from the database server to be monitored through the encrypted UID.
-
To create a DB user file, enter the project access key in the whatap.conf file. Checking the access key
-
In the Azure database environment, enter
DB_USERin the form of DB_USER@DB_name. -
If special characters are included in
DB_USERorDB_PASSWORD, enter the escape character (\) together before any special characters.Example./uid.sh whatap whatap\!pwd
# If there are multiple special characters, add the escape character(\) for each.
./uid.sh whatap whatap\!\@pwd
uid.bat "DB_USER" "DB_PASSWORD"
-
After setting it once, it collects data from the database server to be monitored through the encrypted UID.
-
To create a DB user file, enter the project access key in the whatap.conf file. Checking the access key
-
In the Azure database environment, enter
DB_USERin the form of DB_USER@DB_name. -
On Windows, the escape character (
\) is not required for special characters in a password. However, it is required when using double quotes (") within the password.
Starting the monitoring
Execute a shell script (or batch file) from the path where you have installed the agent.
- Linux
- Windows
./start.sh
To use it like a daemon, execute the following command. However, it works only in the environment where nohup has been installed.
./startd.sh
start.bat
Check whether there are any errors in the execution log displayed on the screen, and check whether a chart appears normally on the dashboard screen (Instance List). If there is no problem, press Ctrl+C to terminate the execution, and then register it as a Windows service in the following order.
Registering a service
Execute the following command to register a service.
install_WindowsService.bat create WhatapDBXAgent
When a service is registered, you can check it in the service management tools as shown below. Find the service, right-click it, and then select the Start option to start the service.
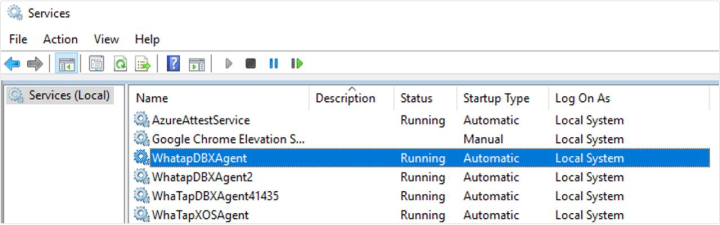
In Control Panel > Windows Tools > Services (services.msc), you can start or stop the WhatapDBXAgent service. Depending on the Windows version, the service path may differ.
Deleting a service
Execute the following command to delete a service.
install_WindowsService.bat delete WhatapDBXAgent
You completed installing the agent for database monitoring. In the following, check the post-installation checklist.
Installing the additional agent (XOS) and applying other options
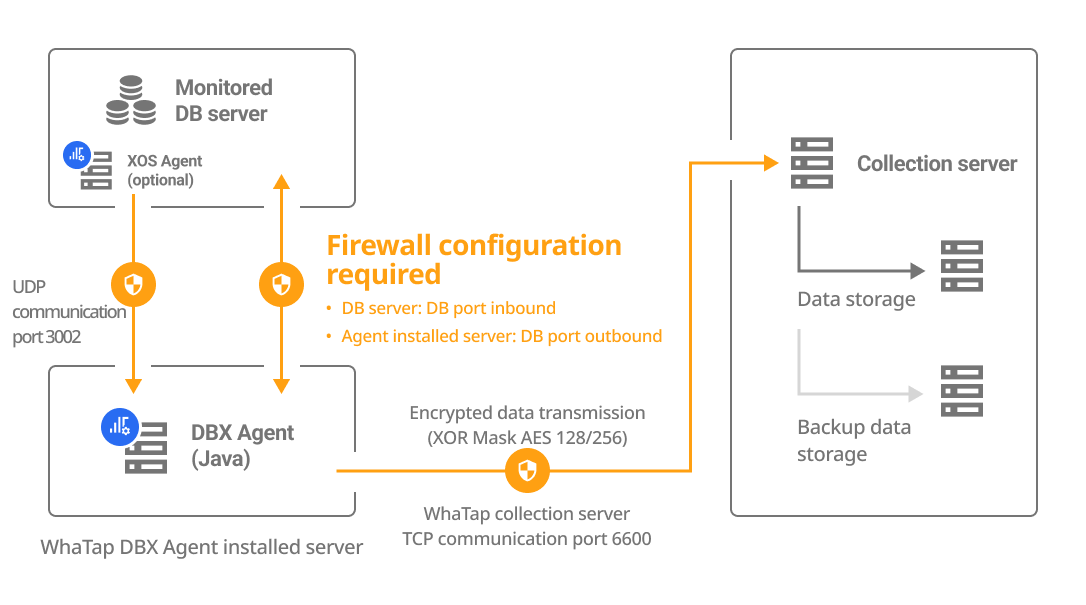
To additionally monitor the resources of the database server, run a separate XOS agent process on the database server to collect data.
-
It can be applied to only the OS environment running on the x86 architecture.
-
The additional agent installation process is optional.
- For more information about the XOS agent configuration options, see the following.
Configuring the whatap.conf file
Set the following options in the whatap.conf file in the path where the DBX agent has been installed.
xos=1
xos_port=3002
Move the xos folder (/unzip folder/xos/) to the database server.
Configuring the xos.conf file
Set the following options in the xos.conf file in the xos path moved to the database server.
dbx_ip={DB_Agent_IP}
dbx_port=3002 # default 3002
cpu_limit=0
mem_limit=10240
In Agent Installation, when you enter the DB data to DB Agent IP and DB Agent Port, the agent options are automatically generated.
Running the XOS agent
Run the XOS agent.
./start.sh
-
To transmit monitored data to the DBX agent, the port set to
dbx_port(default 3002) must have been open. (UDP Outbound) -
To run the XOS agent in the background, run the ./startd.sh file.
Next steps
-
Checking the installation
If you have created a project, installed an agent, and applied all agent options, see the checklist in the following.
-
Installation troubleshooting
It provides various problems that may occur when installing the agent and specific instructions for resolving them. For more information, see the following.
-
Agent setting
It provides various features for monitoring by applying some options to the agent configuration file (whatap.conf). For more information, see the following.
To additionally monitor the database server resources, set more options in the additional agent (XOS). For more information, see the following.
-
Starting the monitoring
After configuring all settings, the agent starts collecting metrics data from the database server. First, check whether the monitoring data has been collected in Instance List. For more information about Instance List, see the following.