Quick Guide
This page is the WhaTap Monitoring overview. This is useful for the users who are new to WhaTap Monitoring.
For more information about installation and utilization of WhaTap Monitoring agents, see the product-specific technical documentation to the left.
Step-by-step guide for quick start
 WhaTap sign up
To use the WhaTap monitoring service, proceed with membership registration.
- Try WhaTap Monitoring for free for 15 days. For more information about the billing, see the following.
- The free trial starts from the date when the project access key has been granted after sign up for membership and creating a project.
- To continue using the service after the trial period ends, register your payment information and convert to a subscribed project.
- Go to the WhaTap website (http://www.whatap.io/).
- On the upper right area, select Get Started for free.
- Enter your name, email address, password, and company name in order.
- Select Sign up.
To receive alerts via SMS, log in the service and then select the profile icon > Manage Accounts on the upper right of the screen. Go to the User phone section and then enter your phone number.
 Project creation
Create a project before installing the agent.
-
Log in WhaTap monitoring service.
-
To create a project, on the left of the screen, select All Projects > + Project.
-
Select a product in Select product for installation.
-
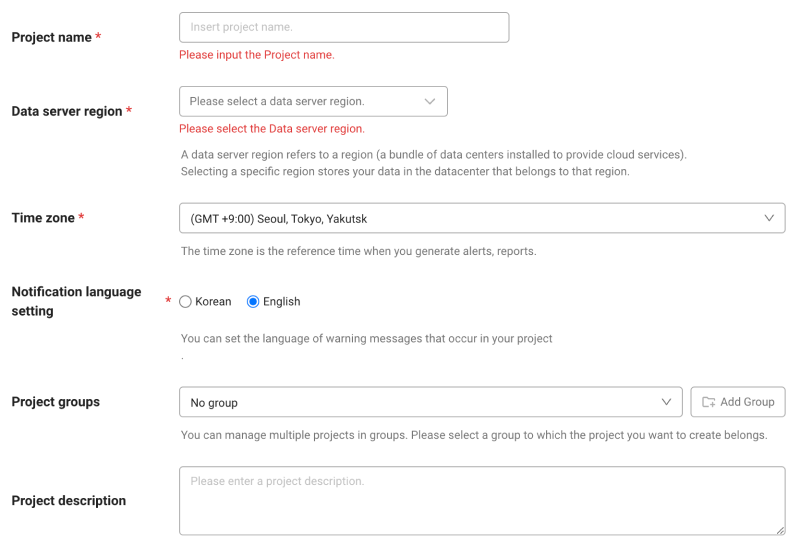
Set items for Project name, Data server region, Time zone, and more in order.
-
In Notification language setting, select the language for alert messages.
-
After all settings are finished, select Creating a project.
-
A Data server region refers to a region (a bundle of data centers installed to provide cloud services). Selecting a specific region stores your data in the datacenter that belongs to that region.
-
Time zone is the reference time for generating alerts and reports.
- To group multiple projects for management, select a group from Project groups or add a group. For more information about grouping, see the following.
- To add a project with an organization selected, Groups of organization must be set.
 Checking the project access key
Project access key is the unique ID for activating the WhaTap services.
In the installation guide section, select Getting the access key. After automatic reception of project access key, proceed to the next step.
After a project has been created, the Agent installation page appears automatically. If the Agent installation does not appear, select All projects on the left and then select a newly created project.
 Agent installation
Once you have been granted a project access key, you can install any WhaTap agent according to the Install Guide section. In Management > Agent installation, you can also access the Install Guide section.
-
Check the support environment.
-
In Management > Agent installation, select the Download agent tab. Follow the instructions to download the agent or install the package.
NoteDownload agent
- Depending on the environment, select the Download or use the command to download from the server.
- Depending on the environment, register the repository and install the package.
-
Enter the project access key and WhaTap server IP, and then run the setup script.
-
Restart the agent.
The WhaTap Monitoring service is started.
For more information about the download and setup, see the product-specific installation guides. Select a product-specific menu on the left and then see the following shortcut.
If you encounter any problem during installation, see the product-specific installation troubleshooting.
 Viewing the dashboard
When data is transferred to the WhaTap server after agent installation, you can view the overall project status in real time through Dashboard. WhaTap Monitoring can show all collected data on the integrated dashboard, which can be freely personalized by user.
-
The displayed performance metrics of applications are collected from the widgets of Application dashboard, Transaction map, Active transaction, Application topology, and Flex board.
-
The server performance metrics collected from each widget of Resource board, Compound eye, and Flex board can be viewed.
-
The database performance metrics collected from each widget of Instance list, Instance monitoring, Multiple instance monitoring, Slow query, and Flex board can be viewed.
-
For Kubernetes, the nodes, containers, applications, logs, and events are dynamically displayed through the widgets of Container Map.
For more information about the creation and configuration of Flex Dashboard, the custom integrated dashboard, see the following.
 External data collection
You can expand the WhaTap service collection data by using Telegraf and Focus. For more information, see the Telegraf and Focus.
- You can install a WhaTap plugin to forward the data collected by Telegraf to the WhaTap collection server.
- By installing the WhaTap Focus, you can upload the values collected by running your own check scripts or database queries to your WhaTap project.
 Alert Settings
WhaTap Monitoring allows you to set threshold-based alerts for all metrics collected. In Alert, you can check events, notification settings, and previous records. The alert reception can be set for each individual and it provides various alert reception channels such as Email, SMS, Messenger, etc.
For more information about alert settings, see the following for each product.Shortcuts to product-specific alert setting guides
 Viewing reports
Reports are the documents that report the service usage and failure records. For example, the monitoring data analysis becomes a metric to determine the direction of service improvement. WhaTap supports task automation by allowing you to create reports through the Report menu. It provides unit reports for each project and the integrated reports for multiple projects.
For more information about reporting, see the following. For product-specific report guides, see product-specific technical documents.
 Member Management
You can add project members in Management > Project member. You can set the permissions for each project and member group, and delete members.
For more information about the member role scheme, see the following.