Agent Installation
To use the WhaTap monitoring service, after Sign in, create a project and install the agent to the target server. For more information about registration as a member, see the following.
See the following video guide.
Creating a project
Create a project before installing the agent.
-
Log in WhaTap monitoring service.
-
To create a project, on the left of the screen, select All Projects > + Project.
-
Select a product in Select product for installation.
-
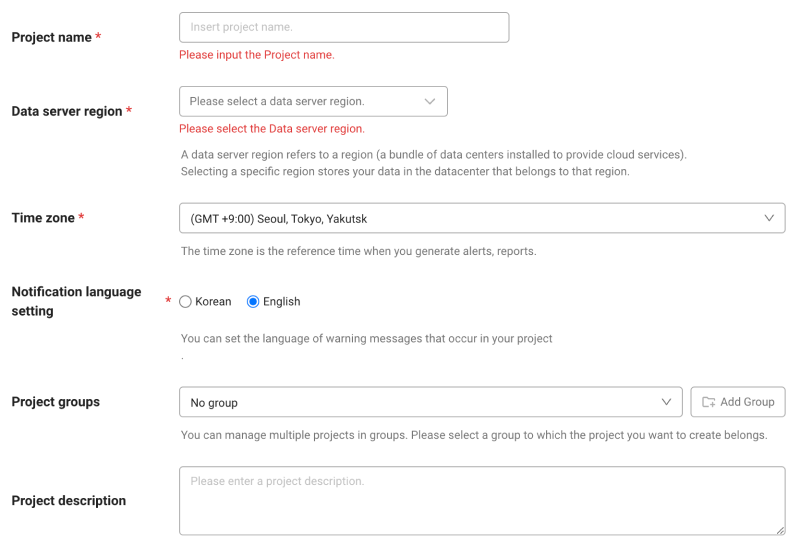
Configure the settings for Project name, Data server region, and Time zone.
-
In Notification language setting, select the language for alert messages.
-
After all settings are finished, select Creating a project.
-
A Data server region refers to a region (a bundle of data centers installed to provide cloud services). Selecting a specific region stores your data in the datacenter that belongs to that region.
-
Time zone is the reference time for generating alerts and reports.
-
To group multiple projects for management, select a group from Project groups or add a group. For more information about grouping, see the following.
-
To add a project with an organization selected, Groups of organization must be set.
Checking the access key
The access key is the unique ID to enable the WhaTap service.
In the installation guide section, select Getting the access key. After the access key has been issued automatically, proceed to the next step.
After a project has been created, the Agent installation page appears automatically. If the Agent installation does not appear, select Management > Agent installation on the left of the screen.
Enabling the virtual environment
While the applications are using virtualenv, enable the virtual environment. Run the bin/activate file.
Download agent
Get the access key and then go to the Download agent section. Copy the following command to install the agent.
pip install whatap-python
If installation is impossible with the pip command, download the installation file in pypi WhaTap page. Unzip the downloaded file and then proceed with installation.
tar xzvf whatap_python-1.x.x.tar.gz \
cd whatap_python-1.X.Y.Z \
python setup.py install
Agent structure file
The Python agent file consists of a tracer that extracts data for application monitoring and passes to the WhaTap collection server, and the elements that help the tracer send the data. For the agent file configuration, see the following.
Agent CONFIG.
WHATAP_HOME default path configuration
Specify the $WHATAP_HOME path for log and configuration files. It is recommended to create a new whatap directory.
$ export WHATAP_HOME=[PATH]
Configuring the access key and collection server IP
Execute the whatap-setting-config command to set the access key and collection server IP.
$ whatap-setting-config \
--host [ COLLECTION_SERVER_IP ] \
--license [ ACCESS_KEY ] \
--app_name [ USER_DEFINED_AGENT_NAME ] \
--app_process_name [ APPLICATION_PROCESS_NAME(uwsgi, gunicorn etc..) ]
Show Configuration
The whatap.conf file is created and set in the path specified in $WHATAP_HOME. Execute the following command to check whether the whatap.conf file has been created.
$ cat $WHATAP_HOME/whatap.conf
license=[ACCESS_KEY]
whatap.server.host=[COLLECTION_SERVER_IP]

# application name
app_name=[ USER_DEFINED_AGENT_NAME ]

# middleware process name ex)uwsgi, gunicorn ..
app_process_name=[ APPLICATION_PROCESS_NAME(uwsgi, gunicorn etc..) ]
In case the role issue occurs
-
Read and write permissions of $WHATAP_HOME/whatap.conf for configuration
-
Read and write permissions of $WHATAP_HOME/logs and the subordinate files for logging
If you have role issues for the $WHATAP_HOME path, execute the following command to assign roles.
echo `sudo chmod -R 777 $WHATAP_HOME`
Applying by the application server environment
The application method may differ depending on the application server environment. Use the application method that suits your environment.
- Command
- uWSGI
- Gunicorn
- Supervisor
- WSGI
- Docker
- Code
In the Command environment, add the whatap-start-agent command before the application startup command as follows:
# $ whatap-start-agent [Application start command]
$ whatap-start-agent python manage.py runserver
In the uWSGI environment, add the whatap-start-agent command before the uwsgi command as follows:
$ whatap-start-agent uwsgi --ini myapp.ini
When running applications by registering uWSGI with the service, see the following example code.
description "uWSGI application server handling myapp"
start on runlevel [2345]
stop on runlevel [!2345]
exec whatap-start-agent [YOUR_APPLICATION_START_COMMAND]
# or if you are using a virtual environment
exec env WHATAP_HOME=[PATH] [ABSOLUTE_PATH]/whatap-start-agent [YOUR_APPLICATION_START_COMMAND]
...
NAME="uwsgi"
PATH=/usr/local/bin:/sbin:/bin:/usr/sbin:/usr/bin
DAEMON=/usr/local/bin/uwsgi
PID=$RUN/$NAME.pid
INI_PATH=/etc/$NAME/$NAME.ini

########## WHATAP_AGENT_CONF ##########
WHATAP_HOME=[PATH]
WHATAP_AGENT=[ABSOLUTE_PATH]/whatap-start-agent
...
do_start(){
  env WHATAP_HOME=$WHATAP_HOME $WHATAP_AGENT [YOUR_APPLICATION_START_COMMAND]
}
-
If the user has been changed, you have to add the
WHATAP_HOMEenvironment variable. -
If the virtual environment has been used, add the agent startup command in the absolute path.
-
Modify the service execution file (/etc/init/uwsgi.conf) and then start the application with the agent startup command.
-
Depending on the user environment, the path of the service executable file may differ.
In the Gunicorn environment, add the whatap-start-agent command before the Gunicorn command as follows:
$ whatap-start-agent gunicorn myapp.wsgi
When running applications by registering Gunicorn with the service, see the following example code.
description "gunicorn application server handling myapp"
start on runlevel [2345]
stop on runlevel [!2345]
exec whatap-start-agent [YOUR_APPLICATION_START_COMMAND]
# or if you are using a virtual environment
exec env WHATAP_HOME=[PATH] [ABSOLUTE_PATH]/whatap-start-agent [YOUR_APPLICATION_START_COMMAND]
...
NAME="gunicorn"
PATH=/usr/local/bin:/sbin:/bin:/usr/sbin:/usr/bin
DAEMON=/usr/local/bin/gunicorn
PID=$RUN/$NAME.pid
INI_PATH=/etc/$NAME/$NAME.ini

########## WHATAP_AGENT_CONF ##########
WHATAP_HOME=[PATH]
WHATAP_AGENT=[ABSOLUTE_PATH]/whatap-start-agent

...
do_start(){
  env WHATAP_HOME=$WHATAP_HOME $WHATAP_AGENT [YOUR_APPLICATION_START_COMMAND]
}
-
If the user has been changed, you have to add the
WHATAP_HOMEenvironment variable. -
If the virtual environment has been used, add the agent startup command in the absolute path.
-
Modify the service execution file (/etc/init/gunicorn.conf) and then start the application with the agent startup command.
-
Depending on the user environment, the path of the service executable file may differ.
In the Supervisor environment, add the following settings in the supervisor.conf file to apply:
[program:app-uwsgi]
environment = WHATAP_HOME=[PATH]
command = [ABSOLUTE_PATH]/whatap-start-agent /usr/local/bin/uwsgi --ini /home/blog/backend/config/uwsgi.ini

[program:nginx-app]
command = /usr/sbin/nginx
-
If the user has been changed, you have to add the
WHATAP_HOMEenvironment variable. -
If the virtual environment has been used, add the agent startup command in the absolute path.
-
Modify the service execution file (/etc/supervisor/conf.d/supervisor.conf) and then start the application with the agent startup command.
-
Depending on the user environment, the path of the service executable file may differ.
Implementing your own WSGI application is provided. See the following:
import whatap

@whatap.register_app
def simple_app(environ, start_response):
    """Simplest possible application object"""
    status = '200 OK'
    response_headers = [('Content-type', 'text/plain')]
    start_response(status, response_headers)
    return ['Hello world!\n']
In case of the application that is serviced to the docker container, add the following content to DockerFile.
-
Installing the Python agent.
DockerfileENV WHATAP_HOME /whatap
RUN mkdir -p /whatap
RUN pip install whatap-pythonNoteIf you use requirements.txt, add whatap-python to that file.
-
Register the settings for access key and collection server IP.
DockerfileRUN touch /whatap/whatap.conf
RUN echo "license=[ ACCESS_KEY ]" > /whatap/whatap.conf
RUN echo "whatap.server.host=[ COLLECTION_SERVER_IP ]" >> /whatap/whatap.conf
RUN echo "app_name=[ AGENT_NAME ]" >> /whatap/whatap.conf
RUN echo "app_process_name=[ APPLICATION_PROCESS_NAME(uwsgi, gunicorn etc..) ]" >> /whatap/whatap.conf -
Before the previous command,
python manage.py runserver, addwhatap-start-agent.DockerfileCMD ["whatap-start-agent", "python", "manage.py", "runserver", "0.0.0.0:8000"]
You can apply the agent by adding the code that calls the API at the top line of the code as follows:
import whatap
whatap.agent()
When you run the application server, the agent starts collecting the monitoring data.
Checking the service running
Execute the following command to check whether the WhaTap Python service is running properly.
ps -ef | grep whatap_python
Next steps
-
Checking the installation
If you have applied all for project creation and agent installation, check the checklist in [the following] (install-check).
-
Installation troubleshooting
It provides various problems that may occur when installing the agent and specific instructions for resolving them. For more information, see the following.
-
Agent setting
It provides various features for monitoring by applying some options to the agent configuration file (whatap.conf). It includes basic configuration, configuration for server connection and data transfer, how to manage the configuration files for multiple application servers, and transaction tracing, and more. For more information, see the following.
-
Starting the monitoring
After all settings are made, restart the application server. The agent starts collecting data. First, check whether the monitoring data has been collected in Application Dashboard. For more information about Application Dashboard, see the following.