Flex board screen modes
The following describes the functions available depending on the screen mode on the Flex board.
-
In the Flex Board menu within the project, only the users with the dashboard editing role can access Edit Mode, Admin Mode, and Filter. The roles of members who can access are as follows:
-
Project Edit role
-
Project flexboard update role
-
Site Admin role
-
-
For more information about the member roles, see the following.
Screen modes
Flex Board provides the following screen modes. The functions that can be set differ depending on the screen mode.
-
Edit Mode: From the widget template list, you can place, modify, delete, or reposition widgets on the Flex board layout.
-
Admin: You can manage the attributes of widgets in json format. Select
 on the upper right of the widget placed on the layout.
 -
View mode: After finishing the settings such as widget placement, resizing, and option selection, you can monitor data for each widget including the dashboard in real time.
You can use the following common features in Flex Board.
- Data filtering
- Real-time data lookup range setting
- Print mode
- Flex Board Management
- Data merging option
Data filtering
In the Flex board, you can handle hundreds of types of data. Organize your Flex board by using the data filtering feature to narrow down what you want to monitor.
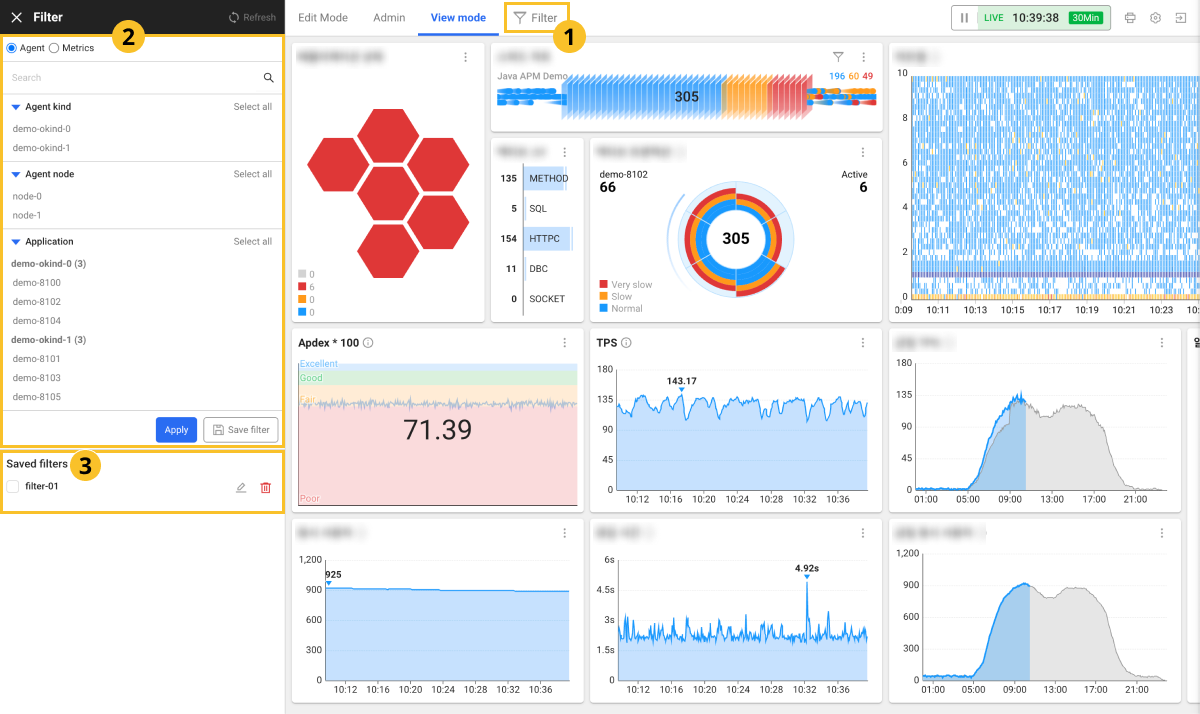
-
Select

 Filter on the screen.
 -
On the left of the screen, the
 Filter window appears.
-
If the Agent option has been selected, you can select filtering targets based on the agent type or application list. To select all as the filtering target, select Select all. If necessary, you can select the targets by using the Search function.
-
If the Metrics option has been selected, you can select filtering targets based on the project and agent type in Category. In the Category option, you can add more by selecting + And. If Contain or Exclude has been selected, filtering targets are automatically selected with any string.
-
-
If filtering targets have been selected, select Apply.
To save the filter settings for later use, select Save filter. Enter the filter name and then select Save. ![]() Saved filters appears at the bottom of the Filter window.
Saved filters appears at the bottom of the Filter window.
Filtering conditions are divided into the agent type and metrics type.
| Type | Agent | Metrics |
|---|---|---|
| Option | WhaTap project monitoring targets (applications, servers, DB, containers, and Kubernetes POD & node) | All metrics tags including the agent |
| Application range | All widgets | All widgets using the metrics data |
| Filtering condition | Checkbox | Equal, Contain, Exclude methods |
-
The agent type provides only basic monitoring targets as options.
-
The metrics type provides optional tags for all metrics data being collected in the project. Metrics types are useful when filtering is applied after collecting data in a non-agent manner, such as cloud monitoring.
-
For more information about the metrics, see the following.
Setting the lookup time
You can set the time in which data is retrieved from the widget using the time selector at the upper right of the screen in the Flex Board menu. You can stop the real-time mode and set the query time by selecting the ![]() button. To return to real-time mode, select the
button. To return to real-time mode, select the ![]() button.
button.
For more information on how to use the time selector, see the following.
Printing
The screen of the Flex board can be saved as a PDF file to be printed. Select ![]() on the upper right of the Flex Board screen. Switch the screen to Print mode. After setting the following options, select PDFDownload.
on the upper right of the Flex Board screen. Switch the screen to Print mode. After setting the following options, select PDFDownload.
- Viewing filter options: You can turn on or off the filter option of the screen.
- Convert to {mode} orientation / Convert to {mode} orientation: The screen can be converted to landscape or portrait.
To end the Print mode, select ![]() Exit print mode on the upper right.
Exit print mode on the upper right.
Flex Board Management
It provides management functions such as changing the Flex board layout, repositioning/resizing widgets, and changing the name. Select ![]() on the upper right of the Flex Board screen. The Flex board management window appears.
on the upper right of the Flex Board screen. The Flex board management window appears.
-
Rename: You can change the name of the Flex board. Enter the name to change.
-
Layout: You can reposition or resize the widgets. To delete a placed widget, click
 .
. -
Don't Allow Other Users to Modify.: You can set for other users not to modify the Flex board. Only members with the edit permission can modify, delete, or edit widgets. If you click the button, it is changed to Don't Allow Other Users to Modify.: On.
-
Widget.json: You can edit the widgets on the Flex board into json format for management.
-
Option.json: You can edit the Flex board settings into json format for management. You can edit the settings such as project information, Flex board filtering, and time selection.
After all settings are made, at the lower right of the screen, click Save.
-
Widget.json and Option.json are available only to the users with the dashboard administrator role.
-
Flex board management can also be accessed by selecting
 in Dashboard list of Dashboard > Flex Board.
Registering the dashboard as a favorite
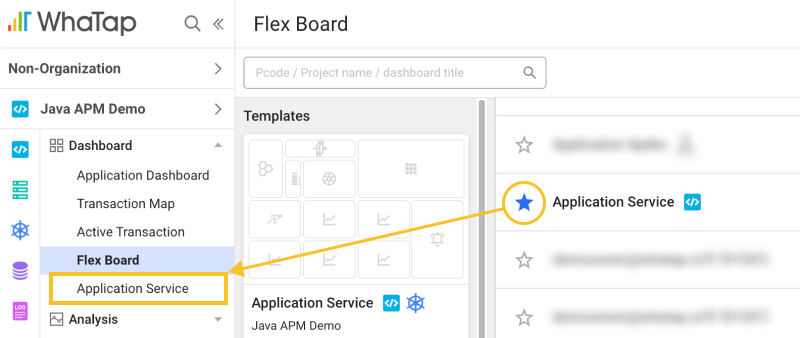
The created Flex board can be registered as a favorite under Dashboard. In Dashboard > Flex Board, select ![]() from the Dashboard list. The item set as a favorite is changed to
from the Dashboard list. The item set as a favorite is changed to ![]() .
.