Agent Installation
This document has been created based on the Oracle Monitoring V2. For the Oracle monitoring V1 document, see the following.
The following guides you to the basic installation method for using the WhaTap database monitoring service.
To use the WhaTap monitoring service, after Sign in, create a project and install the agent to the target server. For more information about registration as a member, see the following.
Creating a project
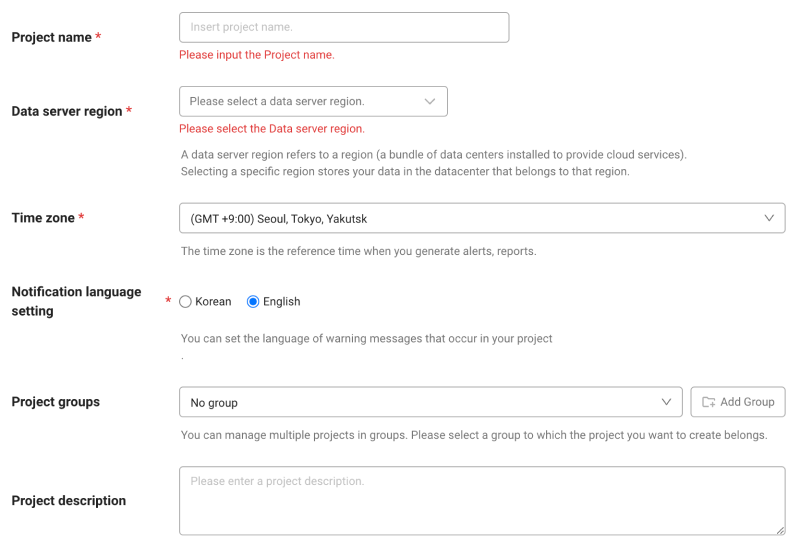
Create a project before installing the agent.
-
Log in WhaTap monitoring service.
-
To create a project, on the left of the screen, select All Projects > + Project.
-
Select a product in Select product for installation.
-
Configure the settings for Project name, Data server region, and Time zone.
-
In Notification language setting, select the language for alert messages.
-
After all settings are finished, select Creating a project.
-
A Data server region refers to a region (a bundle of data centers installed to provide cloud services). Selecting a specific region stores your data in the datacenter that belongs to that region.
-
Time zone is the reference time for generating alerts and reports.
-
To group multiple projects for management, select a group from Project groups or add a group. For more information about grouping, see the following.
-
To add a project with an organization selected, Groups of organization must be set.
Checking the project access key
Project access key is the unique ID for activating the WhaTap services.
In the installation guide section, select Getting the access key. After automatic reception of project access key, proceed to the next step.
After a project has been created, the Agent installation page appears automatically. If the Agent installation does not appear, select All projects on the left and then select a newly created project.
Downloading the WhaTap database agent
-
Download the agent file. Use the following two methods.
-
On the WhaTap monitoring service screen, select Download for downloading.
-
You can download with the Linux wget method. Use the following command.
wget -O whatap.agent.database.tar.gz "https://service.whatap.io/download/dbx_agent?type=oracle&format=tar.gz"
NoteFor those who cannot download tar files due to security settings, ZIP files are also provided. On the installation screen, select the .zip Download button.
-
-
Copy the downloaded file to the server to be analyzed, and then unzip it. (Same for Windows and Linux)
Agent configuration file
File name Description whatap.conf This is the file where you can enter the address of the collection server that collects data from the database server and the server's project access key. For more information about the agent configuration, see the following. alert/alert.conf This is the file that sets thresholds for monitoring items to be collected. An alert occurs when the threshold is exceeded. scripts/ This directory contains the scripts that can remotely run SQL scripts. ps.sh This script fetches the process ID. When ending the agent process, the ID is referenced. stop.sh This script is used when ending the agent process. uid.sh (uid.bat) This shell script file generates an encrypted UID by combining the database connection data. It creates the db.user file. Once you have set it for the first time, it collects data from the database server to be monitored through the encrypted UID.
For more details about creation of an account for monitoring, see the following.start.sh (start.bat) This shell script file runs the agent. When the agent starts, it starts collecting monitoring data from the database server. startd.sh (startd.bat) This shell script file runs the agent, which can be run in the background. whatap.agent.dbx- X.Y.Z.jarThe Tracer program is a program that collects data from the database server and transmits the collected data to the server. jdbc This directory collects the libraries referenced for database server connection. Download the library for connecting the agent and database server and use it by setting the path in the class path option of Java. xos/ The directory contains the optional agent that can monitor the process usage of the database server. ⎿ xos.conf This file is used to enter the address and communication port of the agent server for collecting the process usage of the database server and transmitting the data. * xcub/ This directory contains additional agent files that collect SQL texts from the CUBRID database and calculate metrics. ⎿ * xcub.conf This file is used to enter the CUBRID database and additional agent connection settings. Note*: The files in the xcub path are dedicated files for CUBRID Monitoring.
-
Enter the unzipped folder and then check the whatap.conf file. In whatap.conf, enter the project access key, WhaTap server data, and DB connection data.
whatap.conflicense={AccessKey}
whatap.server.host=13.124.11.223/13.209.172.35 # WhaTap server information
dbms=oracle
db={DB_Name(sid)}
db_ip={DB_Server_IP}
db_port={DB_Server_Port} -
Download the JDBC driver to the following directory. /unzipped folder/jdbc
Download the JDBC driver for the OS and version of your database server.
Oracle 10g R2 or later: https://www.oracle.com/database/technologies/appdev/jdbc-downloads.html
-
Depending on the DB configuration, the additional settings may be required in the whatap.conf file. For more information, see the following.
-
To further monitor the DB server's resources, use the XOS agent. For more information, see the following.
- In /unzipped folder/jdbc/README.md, you can also see the JDBC driver installation paths for each database.
Account creation
Create an account with roles required for database monitoring. Log in with the root account and then create accounts.
-
To use the previous accounts, go to Create DB User File. If you do not have any permission, you may not be able to proceed with normal monitoring.
-
In the example code,
whatapis the DB user account name. Change it to your account name.
- Enter your password in
DB_Passwordin the example code.
-
In general cases
create user whatap identified by DB_PASSWORD;
grant create session to whatap;
grant select any dictionary to whatap; -
In case of multi-tenant in 12c or later (prefix c##)
create user c##whatap identified by DB_PASSWORD;
grant create session to c##whatap;
grant select any dictionary to c##whatap;
alter user c##whatap set container_data = ALL container = CURRENT; -
In case of using the kill session
grant alter system to whatap
Support features for each role
The roles other than the Default role do not need to be assigned depending on the environment. However, some functions may not work.
| Role | command (Single DB) | command (Multitenant DB) | Menu and feature | Details |
|---|---|---|---|---|
| Default role | grant create session to whatap; | grant create session to c##whatap; | Access | - |
grant select any dictionary to whatap; | grant select any dictionary to c##whatap; | Monitoring a Database Instance / Monitoring Multiple Instances / SQL Statistics | When granting individual roles, see the following table | |
| - | alter user c##whatap set container_data = ALL container = CURRENT; | When using a multi-tenant DB (12C or higher), this is a required role to query the pdb. | ||
| Session kill | grant alter system to whatap; | grant alter system to c##whatap; | Active sessions > Session kill | - |
| Hidden parameter query | create view sys.whatap_vw_ksppi as select * from sys.x$ksppi;grant select on sys.whatap_vw_ksppi to DB_User;create synonym DB_User.whatap_vw_ksppi for sys.whatap_vw_ksppi; | Hidden parameters are included in the parameter query menu. | To query hidden parameters, separate view/synonym creation and role assignment are required. | |
create view sys.whatap_vw_ksppcv as select * from sys.x$ksppcv;grant select on sys.whatap_vw_ksppcv to DB_User;create synonym DB_User.whatap_vw_ksppcv for sys.whatap_vw_ksppcv; | ||||
Instead of select any dictionary, you can grant the following roles individually.
| Role | command (Single DB) | command (Multitenant DB) |
|---|---|---|
| Active sessions / Lock tree / Metrics information | grant select on v_$sqlarea to whatap; | grant select on v_$sqlarea to c##whatap; |
grant select on v_$transaction to whatap; | grant select on v_$transaction to c##whatap; | |
grant select on v_$instance to whatap; | grant select on v_$instance to c##whatap; | |
grant select on v_$sysstat to whatap; | grant select on v_$sysstat to c##whatap; | |
grant select on v_$lock to whatap; | grant select on v_$lock to c##whatap; | |
grant select on v_$sesstat to whatap; | grant select on v_$sesstat to c##whatap; | |
grant select on v_$event_name to whatap; | grant select on v_$event_name to c##whatap; | |
grant select on v_$session to whatap; | grant select on v_$session to c##whatap; | |
grant select on v_$sql to whatap; | grant select on v_$sql to c##whatap; | |
grant select on v_$process to whatap; | grant select on v_$process to c##whatap; | |
grant select on v_$statname to whatap; | grant select on v_$statname to c##whatap; | |
grant select on v_$system_event to whatap; | grant select on v_$system_event to c##whatap; | |
grant select on v_$osstat to whatap; | grant select on v_$osstat to c##whatap; | |
grant select on v_$px_session to whatap; | grant select on v_$px_session to c##whatap; | |
grant select on v_$sga to whatap; | grant select on v_$sga to c##whatap; | |
| - | grant select on v_$con_sysstat to c##whatap; | |
| Parameter information | grant select on v_$parameter to whatap; | grant select on v_$parameter to c##whatap; |
| Wait information / Event information | grant select on v_$event_name to whatap; | grant select on v_$event_name to c##whatap; |
grant select on v_$system_event to whatap | grant select on v_$con_system_event to c##whatap; | |
grant select on v_$system_wait_class to whatap; | grant select on v_$system_wait_class to c##whatap; | |
| - | grant select on v_$con_system_wait_class to c##whatap; | |
| Tablespace information | grant select on dba_data_files to whatap; | grant select on cdb_data_files to c##whatap; |
grant select on dba_free_space to whatap; | grant select on cdb_free_space to c##whatap; | |
grant select on dba_temp_files to whatap; | grant select on v_$sort_segment to c##whatap; | |
grant select on v_$temp_extent_pool to whatap; | grant select on v_$tempfile to c##whatap; | |
grant select on v_$containers to whatap; (12c 이상) | grant select on v_$containers to c##whatap; |
DB user file creation
Generate an encrypted UID for database connection. Enter the username and password and then run the shell script (or batch file).
- Linux
- Windows
./uid.sh {DB_USER} {DB_PASSWORD}
-
After setting it once, it collects data from the database server to be monitored through the encrypted UID.
-
To create a DB user file, enter the project access key in the whatap.conf file. Checking the access key
-
In the Azure database environment, enter
DB_USERin the form of DB_USER@DB_name. -
If special characters are included in
DB_USERorDB_PASSWORD, enter the escape character (\) together before any special characters.Example./uid.sh whatap whatap\!pwd
# If there are multiple special characters, add the escape character(\) for each.
./uid.sh whatap whatap\!\@pwd
uid.bat "DB_USER" "DB_PASSWORD"
-
After setting it once, it collects data from the database server to be monitored through the encrypted UID.
-
To create a DB user file, enter the project access key in the whatap.conf file. Checking the access key
-
In the Azure database environment, enter
DB_USERin the form of DB_USER@DB_name. -
If special characters are included in
DB_USERorDB_PASSWORD, enter the escape character (\) together before any special characters.Exampleuid.bat whatap whatap\!pwd
# If there are multiple special characters, add the escape character(\) for each.
uid.bat whatap whatap\!\@pwd
Starting the monitoring
Execute a shell script (or batch file) from the path where you have installed the agent.
- Linux
- Windows
./start.sh
To use it like a daemon, execute the following command. However, it works only in the environment where nohup has been installed.
./startd.sh
start.bat
You can set the service to automatically start the agent when the Windows system starts. See the following commands.
# In case of registering the service
install_WindowsService.bat create WhatapDBXAgent

# In case of deleting the service
install_WindowsService.bat delete WhatapDBXAgent
In Control Panel > Windows Tools > Services (services.msc), you can start or stop the WhatapDBXAgent service. Depending on the Windows version, the service path may differ.
You completed installing the agent for database monitoring. In the following, check the post-installation checklist.
Installing the additional agent (XOS) and applying other options
To additionally monitor the resources of the database server, run a separate XOS agent process on the database server to collect data.
-
It can be applied to only the OS environment running on the x86 architecture.
-
The additional agent installation process is optional.
- For more information about the XOS agent configuration options, see the following.
- To additionally collect and monitor monitoring metrics provided by cloud services on the dashboard of the database project, see the following.
Configuring the whatap.conf file
Set the following options in the whatap.conf file in the path where the DBX agent has been installed.
xos=1
xos_port=3002
Move the xos folder (/unzip folder/xos/) to the database server.
Configuring the xos.conf file
Set the following options in the xos.conf file in the xos path moved to the database server.
dbx_ip={DB_Agent_IP}
dbx_port=3002 # default 3002
cpu_limit=0
mem_limit=10240
In Agent Installation, when you enter the DB data to DB Agent IP and DB Agent Port, the agent options are automatically generated.
Running the XOS agent
-
Grant the role to run the XOS agent.
chmod +x ./whatap.agent.xos* -
Run the XOS agent.
./start.sh
-
To transmit monitored data to the DBX agent, the port set to
dbx_port(default 3002) must have been open. (UDP Outbound) -
To run the XOS agent in the background, run the ./startd.sh file.
Next steps
-
Checking the installation
If you have created a project, installed an agent, and applied all agent options, see the checklist in the following.
-
Installation troubleshooting
It provides various problems that may occur when installing the agent and specific instructions for resolving them. For more information, see the following.
-
Agent setting
It provides various features for monitoring by applying some options to the agent configuration file (whatap.conf). For more information, see the following.
To additionally monitor the database server resources, set more options in the additional agent (XOS). For more information, see the following.
-
Cloud Settings
To additionally collect and monitor monitoring metrics provided by cloud services on the dashboard of the database project, see the following.
-
Starting the monitoring
After configuring all settings, the agent starts collecting metrics data from the database server. First, check whether the monitoring data has been collected in Instance List. For more information about Instance List, see the following.