Agent Installation
To use the WhaTap NPM service, perform Sign up, create a project, and then install the agent to the running server.
Creating a project
Create a project before installing the agent.
-
Log in WhaTap monitoring service.
-
To create a project, on the left of the screen, select All Projects > + Project.
-
Select a product in Select product for installation.
-
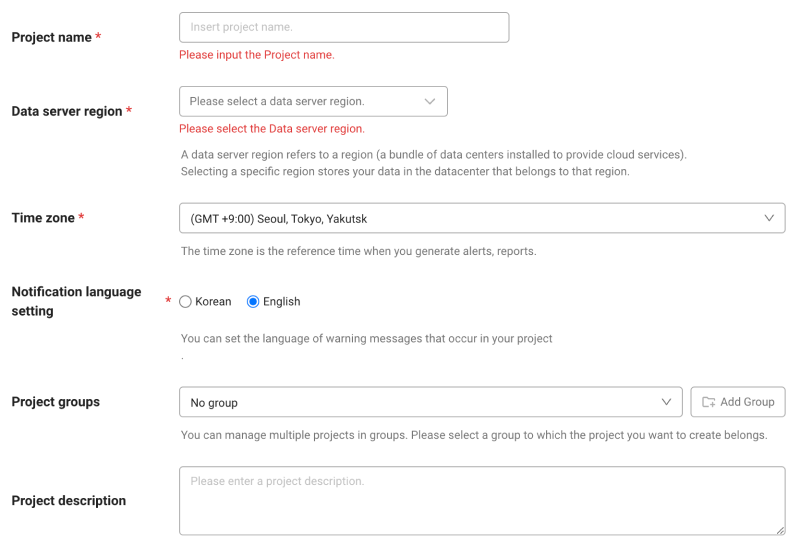
Configure the settings for Project name, Data server region, and Time zone.
-
In Notification language setting, select the language for alert messages.
-
After all settings are finished, select Creating a project.
-
A Data server region refers to a region (a bundle of data centers installed to provide cloud services). Selecting a specific region stores your data in the datacenter that belongs to that region.
-
Time zone is the reference time for generating alerts and reports.
-
To group multiple projects for management, select a group from Project groups or add a group. For more information about grouping, see the following.
-
To add a project with an organization selected, Groups of organization must be set.
Checking the project access key
Project access key is the unique ID for activating the WhaTap services.
In the installation guide section, select Getting the access key. After automatic reception of project access key, proceed to the next step.
After a project has been created, the Agent installation page appears automatically. If the Agent installation does not appear, select All projects on the left and then select a newly created project.
Installation in the Linux environment
In the Install guide section, select the Linux tab and then follow the on-screen instructions to install the agent.
Download agent
Download the agent file to a target monitoring server.
- Amazon Linux
- Debian/Ubuntu
- Red Hat/CentOS
sudo rpm --import https://repo.whatap.io/centos/release.gpg
echo "[whatap]" | sudo tee /etc/yum.repos.d/whatap.repo > /dev/null
echo "name=whatap packages for enterprise linux" | sudo tee -a /etc/yum.repos.d/whatap.repo > /dev/null
echo "baseurl=https://repo.whatap.io/centos/9/\$basearch" | sudo tee -a /etc/yum.repos.d/whatap.repo > /dev/null
echo "enabled=1" | sudo tee -a /etc/yum.repos.d/whatap.repo > /dev/null
echo "gpgcheck=0" | sudo tee -a /etc/yum.repos.d/whatap.repo > /dev/null
sudo yum install whatap-npmd
For installation, the gnupg2 package is required.
wget https://repo.whatap.io/debian/release.gpg -O -|sudo apt-key add -
wget https://repo.whatap.io/debian/whatap-repo_1.0_all.deb
sudo dpkg -i whatap-repo_1.0_all.deb
sudo apt-get update
sudo apt-get install whatap-npmd
sudo rpm -Uvh https://repo.whatap.io/centos/5/noarch/whatap-repo-1.0-1.noarch.rpm
sudo yum install whatap-npmd
To collect resource information in the AWS EC2 environment, see the following.
Compatibility checking and configuration
Check the compatibility of the server in which the agent has been downloaded, and then enter the required settings.
sudo /usr/whatap/whatap-npmd/install.sh {Project access key} {Collection server IP}
You can see the compatibility result and incoming messages as follows.
Supported kernel version : 5.15. OK.
Supported CPU Arch : aarch64, OK.
Move package files
  % Total    % Received % Xferd  Average Speed   Time    Time     Time  Current
                                                        Dload  Upload     Total   Spent    Left     Speed
100    14  100    14        0      0            65            0       --:--:-- --:--:-- --:--:--        65
Start service
Installation complete!
Installation in the Kubernetes environment
In the Install guide section, select the Kubernetes tab and then follow the on-screen instructions to install the agent.
To collect resource information in the AWS EKS environment, see the following.
Agent Creation
-
To create an agent, select Download and then download the YAML file.
-
Upload the downloaded YAML file to the master node.
-
Execute the following command in the master node to create an agent.
kubectl apply -f whatap_npmd.yaml -
Execute the following command and then check whether the agent's status (STATUS) is RUNNING.
kubectl get pod -n whatap-npm-ns
Setting the TagRule option (optional)
NPM can collect irregular and diverse data through the tagRule settings and display the data in a topography or chart. For more details, see the following.
Starting the monitoring
When the agent works, it starts collecting the monitoring data. To check the collected data on the service screen, select Network topology at the lower right of the screen.