Installation of the Node.js agent
To use the WhaTap monitoring service, after Sign in, create a project and install the agent to the target server. For more information about registration as a member, see the following.
See the following video guide.
To use the Node.js monitoring service, the monitoring agent must be installed on the monitored application. For installation, use NPM (Node Package Manager).
-
Install the WhaTap agent module in the active Node.js application directory.
-
Write the configuration of WhaTap agent (whatap.conf).
-
Run the Node.js service again.
Creating a project
Create a project before installing the agent.
-
Log in WhaTap monitoring service.
-
To create a project, on the left of the screen, select All Projects > + Project.
-
Select a product in Select product for installation.
-
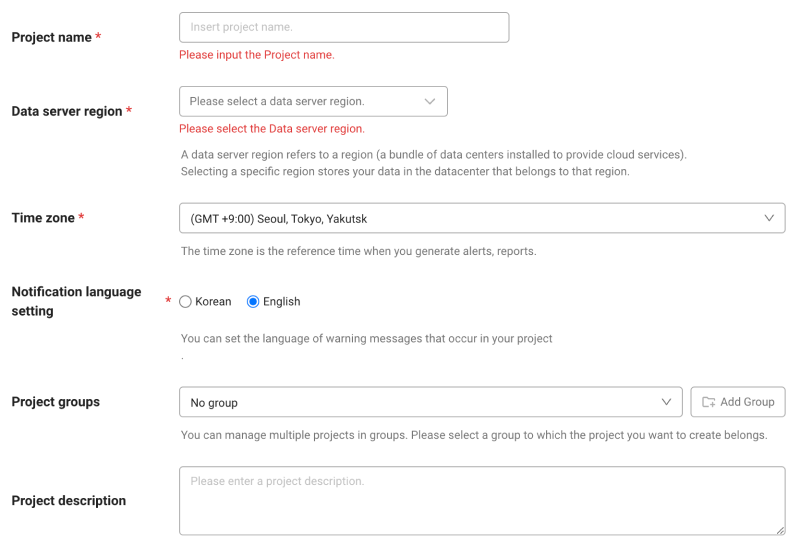
Configure the settings for Project name, Data server region, and Time zone.
-
In Notification language setting, select the language for alert messages.
-
After all settings are finished, select Creating a project.
-
A Data server region refers to a region (a bundle of data centers installed to provide cloud services). Selecting a specific region stores your data in the datacenter that belongs to that region.
-
Time zone is the reference time for generating alerts and reports.
-
To group multiple projects for management, select a group from Project groups or add a group. For more information about grouping, see the following.
-
To add a project with an organization selected, Groups of organization must be set.
Checking the access key
The access key is the unique ID to enable the WhaTap service.
In the installation guide section, select Getting the access key. After the access key has been issued automatically, proceed to the next step.
After a project has been created, the Agent installation page appears automatically. If the Agent installation does not appear, select Management > Agent installation on the left of the screen.
Download agent
-
Install the agent in the active Node.js application directory.
$ npm install --save whatap -
Copy the whatap.conf file in the node_modules/whatap path and then paste it into the root path of the project (same location as in the package.json file).
-
Go to the WhaTap Monitoring Service.
-
Select the created project and then copy the following among the downloaded items from the agent in the Install guide section.
Examplelicense={access key}
whatap.server.host={collection server IP} -
Paste it into the whatap.conf file.
The host (whatap.server.host) address is the server address in which the WhaTap proxy has been installed. You can use a forward slash (/) as the delimiter to enter all addresses of the servers where the proxy server is running among the WhaTap servers.
For the agent configuration file, see the following.
Server-side rendering (SSR) frameworks such as Next.js and Nuxt.js require the Custom Server settings for application monitoring. It requires an approach different from typical Node.js frameworks (e.g. Express.js, Nest.js). For more information, see the following:
Using
Add the following code at the top of the entry point (main module) file of the application. For example, in the Express.js application, app.js and server.js are the entry points (main module). When using a framework like Nest.js, main.ts is the entry point.
- CommonJS
- ECMAScript Module(ESM)
var whatap = require('whatap').NodeAgent;
import WhatapAgent from 'whatap';
WhatapAgent.NodeAgent;
Because the agent executable code needs to be run first after starting node.js, it must be placed before the first import.
Setting agent options by environment
To apply settings tailored to each environment of the application, you can modify the settings in the entry point file of the application instead of the whatap.conf file. Noting the code below, apply the settings tailored to your environment.
process.env.WHATAP_CONF = 'whatapdev'; // Setting for development environment
process.env.WHATAP_NAME = 'NodeAgent-{ip2}-{ip3}-{cluster}'; //Dynamically configure agent name with IP and cluster info
var WhatapAgent = require('whatap').NodeAgent;
-
In case different projects are run for each environment
Even for the same application, settings are required for each environment, such as development (dev), test (test), and operation (prod). As in the example above, you can use the
WHATAP_CONFenvironment variables to apply settings that are appropriate for the development environment. This allows you to easily manage different settings for each environment. -
In case you must configure different agent options depending on the environment
For development environment, you can increase the logging level. In production environment, you can configure different options for performance optimization. In this case, modify the agent options in the application's entry point file to suit the environment.
-
In case of running applications in cluster mode for PM2
When running multiple application instances in cluster mode, you can apply separate agent options to each individual instance. In this case, you can also configure a flexible monitoring by applying environment-specific settings in the entry point file instead of the configuration file.
The arguments that can be set by the WHATAP_NAME option are as follows.
-
ipN: ip0, ip1, ip2, ip3
-
cluster: Cluster ID
-
pid: Process ID
-
hostname: Host name
Using the agent group unit function
Agent group unit function includes group topology and integrated topology. Replace {group identifier} with agent group name in the following code.
process.env.WHATAP_OKIND = '{group identifier}';
var WhatapAgent = require('whatap').NodeAgent;
PaaS application environment
Configuring the default environment variables
When installing the agent in the PaaS application, all settings must be configured in the source file (app.js). The whatap.conf file cannot be used.
Set the access key (WHATAP_LICENSE) and collection server IP (WHATAP_SERVER_HOST) as environment variables.
process.env.WHATAP_LICENSE={Access Key};
process.env.WHATAP_SERVER_HOST={Collection Server IP};
var whatap=require('whatap').NodeAgent;
...
Options that can be configured as environment variables
Because you cannot use the whatap.conf file, set the WhaTap agent options as environment variables in the source file.
process.env.profile_http_header_enabled=false;
process.env.profile_http_parameter_enabled=false;

process.env.profile_basetime=500;

process.env.auto_oname_enabled=false;
process.env.auto_oname_prefix='nodejs';

process.env.mtrace_rate=0;
process.env.mtrace_spec='v1';
process.env.stat_mtrace_enabled=false;
process.env.stat_domain_enabled=false;
For more information about the options that can be set in Node.js, see the following.
Next steps
-
Checking the installation
If you have applied all for project creation and agent installation, check the checklist in [the following] (install-check).
-
Agent setting
It provides various features for monitoring by applying some options to the agent configuration file (whatap.conf). It includes basic configuration, configuration for server connection and data transfer, how to manage the configuration files for multiple application servers, and transaction tracing, and more. For more information, see the following.
-
Starting the monitoring
After all settings are made, restart the application server. The agent starts collecting data. First, check whether the monitoring data has been collected in Application Dashboard. For more information about Application Dashboard, see the following.