Alert Settings
Home > Select Project > Alert > Event Configuration > Log tab
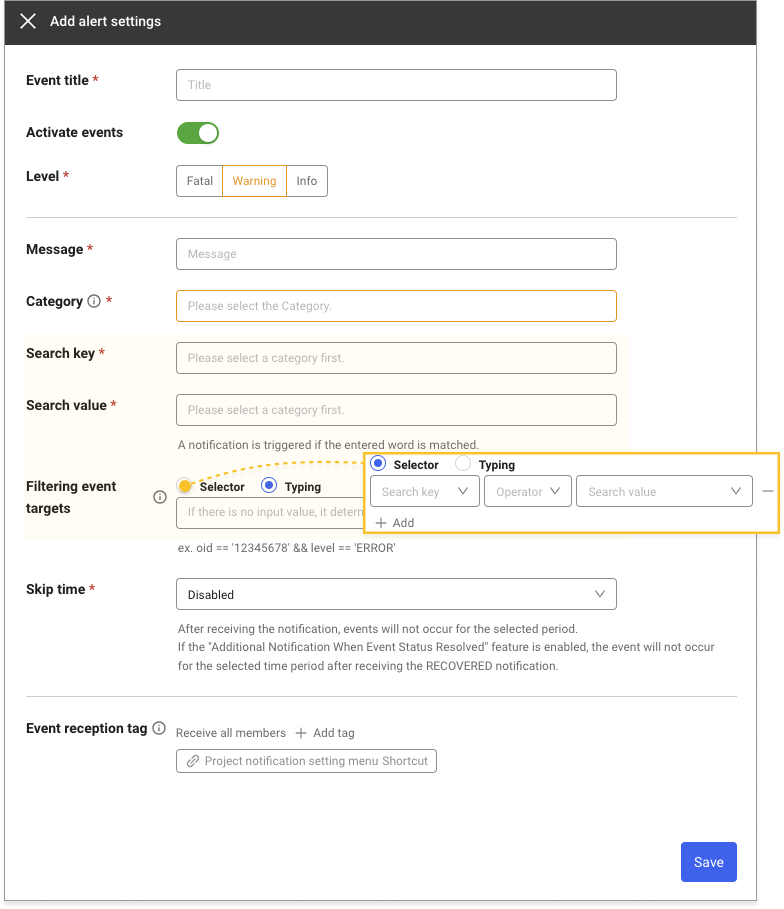
You can set alerts by filtering the collected log data according to the conditions. Select + Add Alert Policy to set the log event alert. After all settings are finished, select Save.
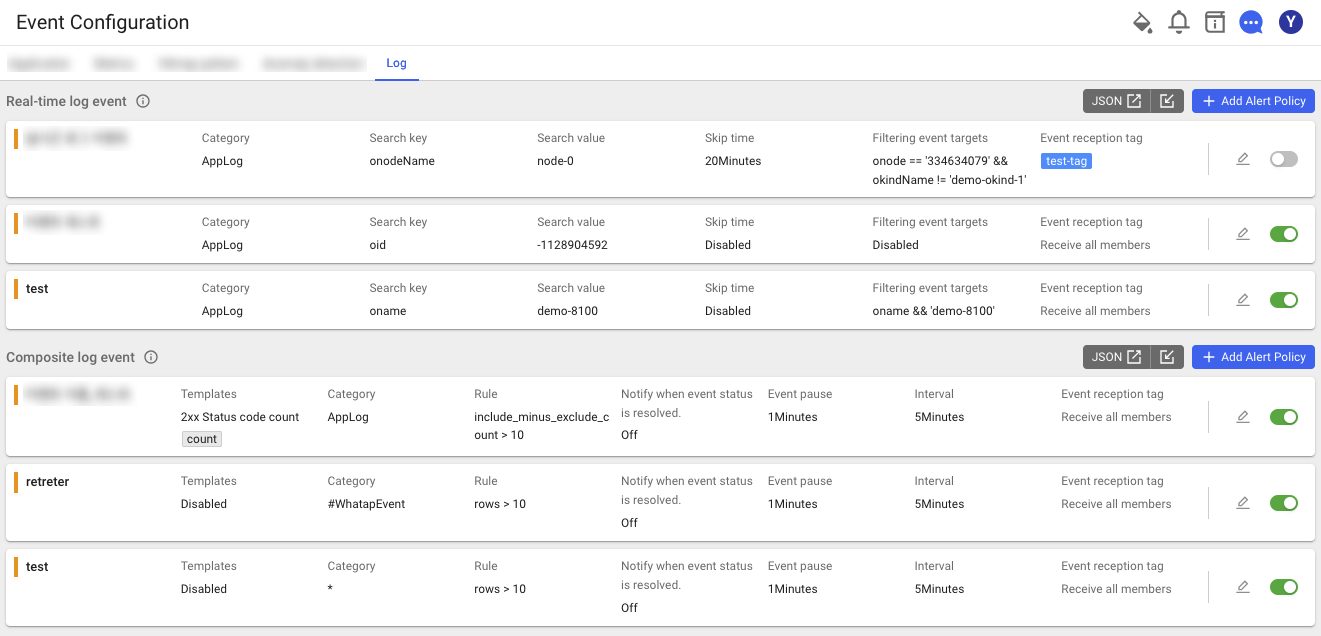
The log events that can be added are as follows:
-
Real-time log event: Alerts are sent when the search value is found in the logs collected in real time.
-
Composite log event: An alert is sent when more than a specific number of logs that meet conditions, are collected among recently collected logs.
-
To add or set an event, you must have the Alert settings role. For more information about the member roles, see the following.
-
For alerts, see the following to find which event types are supported by monitoring platform.
Common options for event addition
The following are common options that can be set when adding an event.
-
Event title: Enter the name of the event to add.
-
Activate events: You can set to enable or disable the alerts by clicking the toggle button.
-
Level: Select one of Fatal, Warning and Info.
-
Message: Enter a notification message to be displayed when events occur. By entering
${Tag}or${Field}, you can apply the variable to the message. The key to enter in the variable must be included in Category of the selected metrics data. -
Category: You can select the log type name (log folder name) from the list or enter it directly.
-
Skip time: This option can prevent excessive alerts from happening. No alerts are sent for the selected period after the first alert notification is generated. In addition, they are not recorded in Event History.
-
Event reception tag: If you select an event receiving tag, alert notifications can be sent to project members and 3rd-party plug-ins with the tag. If the event receiving tag is not selected, alerts are sent to all project members.
If the tag is not added, alerts are sent to all members. Click + Add tag and then select alert receivers in Tag list. Select + Create new tag to add new tags.
NoteIn Alert > Notifications, you can set the tags in project members and 3rd-party plug-ins. For more information about Notifications, see the following.
Add real-time log event
-
Search key: Indicates an identifier for accessing a specific value within the log data. You can select any in the list and directly enter it.
e.g. In case of accessing a value representing the HTTP response status code, Search key
status -
Search value: Indicates actual data that corresponds to the Search key. An alert is sent if the log includes the specified word. You can select any in the list and directly enter it.
For example, in case of setting the Search key
statusSearch value200, a warning notification is generated when collecting the log data with the HTTP response status code 200. -
Filtering event targets: Select Search key, Operator, and Search value through the Selector option to filter the targets. Otherwise, select the Typing option. If there is no input, it determines whether or not to generate notifications for all data collected in real time.
For example, among the logs in the
AppLogcategory, it searches for the logs whoselevelisERROR. An alert is sent when oid is 12345678 among the matching logs.
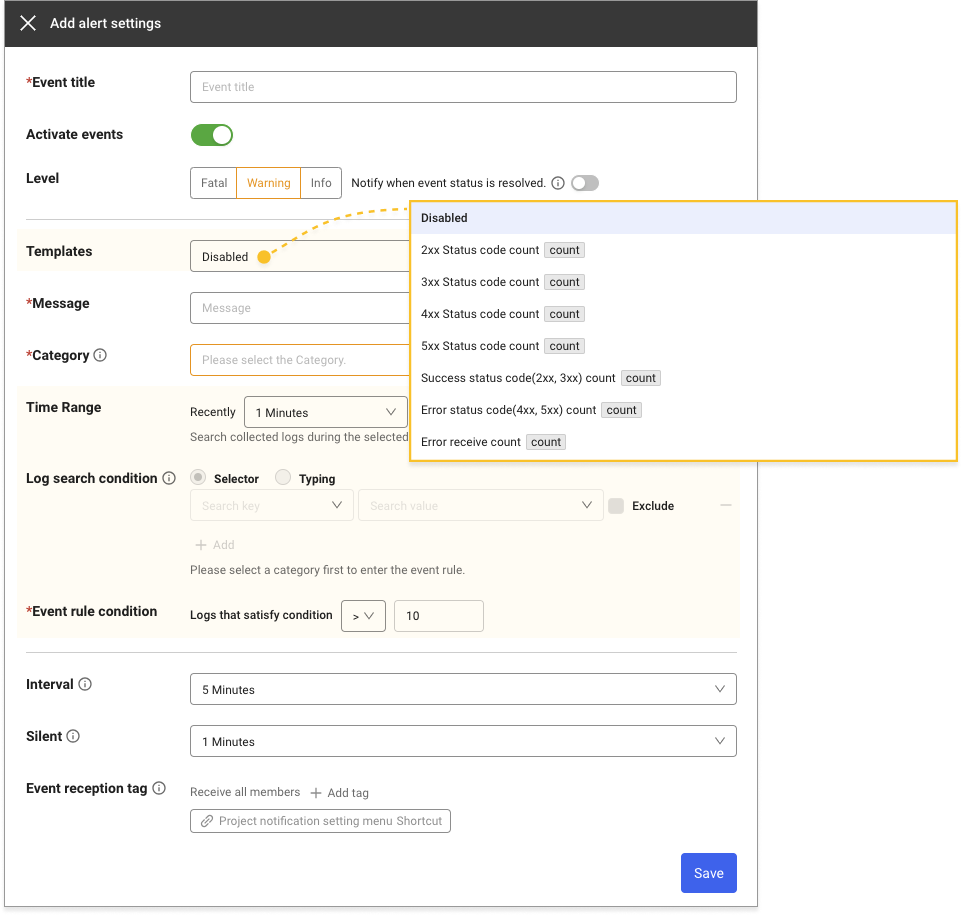
Add composite log event
-
Templates: Composite log templates are provided.
-
Time Range: You can view the logs collected during the selected period. If you select 5 minutes as the time range, the event rule condition is checked after searching for the data collected during the last 5 minutes.
-
Log search condition
-
In Search key, you can select any event rule. You can select any value that meets the selected Search key.
-
If you add a same item in Search key, the "OR" condition works. Otherwise, the "AND" condition works.
-
You can select Exclude to exclude the selected search value from the event rules.
-
You can select + Add to add or exclude multiple event rule conditions.
-
-
Event rule condition: Alerts are sent when events occur as many as the entered number and they occur by meeting the selected operator's condition.
For example, among the logs in the
AppLogcategory, the logs that meetEnter conditionsare filtered. If Exclude is checked for condition, it indicates that the logs searched by the condition are excluded. Thus, the logs whoselevelisERRORare excluded. Alerts are sent when the event is less than5among the logs collected in the last 10 minutes.
Modifying the log event settings
-
Go to Alert > Event Configuration.
-
Select Log tab.
-
Select
 on the right of the event to modify in the log event list.
 -
If the Event configuration window appears, modify the options and then select Save.
To delete the selected log event, select Delete on the upper right of the Event Setting window.
Turning off the log event
-
Go to Alert > Event Configuration.
-
Select Log tab.
-
In the log event list, select the toggle button on the utmost right of the event to turn off the alert.
If you select the toggle button again, the alert is enabled.
Exporting and importing the log event
After saving the log event settings in a json file, you can load them for reuse.
-
Go to Alert > Event Configuration.
-
Select Log tab.
-
Select JSON
 on the log event list. The Export JSON window appears.
 -
Modify or edit the items to export.
-
On the upper right of the screen, select
Export. Download the json file through your browser. -
On the log event list, select
 .
. -
If the file selection window appears, select the downloaded json file.
-
If the Import JSON window appears, modify the content and then select + Add to list.
ID exists in the event. After deleting the ID, try again.
-
If a message appears, in the Import JSON window, delete the
idand then select + Add to list. -
To overwrite an existing item, delete the
iditem and then select Overwrite.