Installation of the master and node agents
The following guides you to the master and node agent installation procedure as follows: This procedure is the same as in Install guide.
EKS Fargate is to be supported later.
Pre-environment checking and setting
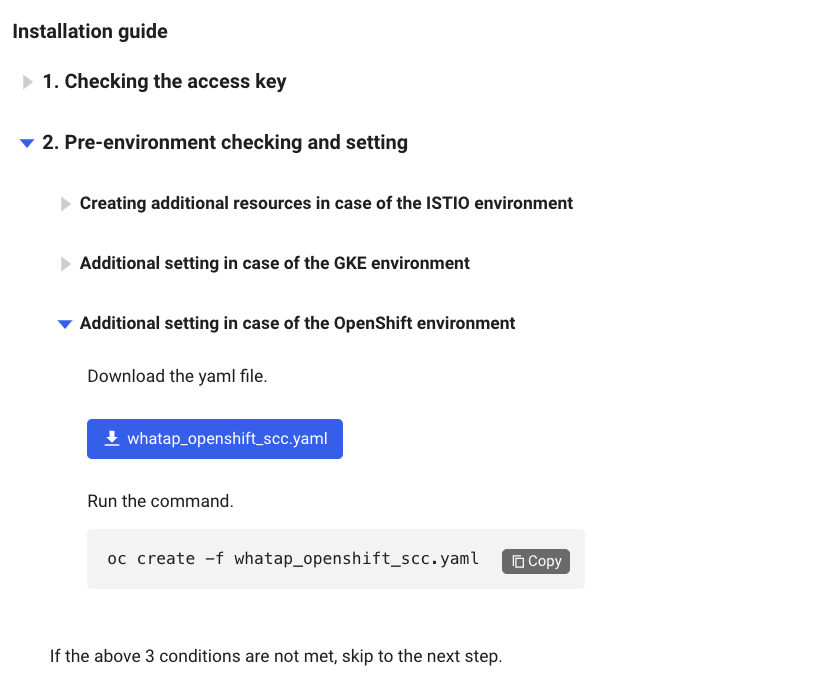
Depending on the Kubernetes environment, pre-environment configuration may be required. If this does not apply to the Istio, GKE, and OpenShift environments, skip to Next step.
- ISTIO environment
- GKE Environment
- OpenShift Environment
In the Istio environment, execute the following command to create the ServiceEntry, the resource that communicates with the WhaTap collection server.
kubectl create namespace whatap-monitoring
kubectl label namespace whatap-monitoring istio-injection=enabled
kubectl apply -f - <<EOF
apiVersion: networking.istio.io/v1alpha3
kind: ServiceEntry
metadata:
  name: whatap-external
spec:
  hosts:
  - whatap-proxy1
  - whatap-proxy2
  addresses:
  - 13.124.11.223
  - 13.209.172.35
  ports:
  - name: proxy
    number: 6600
    protocol: tcp
    location: MESH_EXTERNAL
EOF
In case of Google Kubernetes Engine (GKE), create a user cluster and then execute the following command to set roles.
ACCOUNT=$(gcloud info --format='value(config.account)')
kubectl create clusterrolebinding owner-cluster-admin-binding \
  --clusterrole cluster-admin \
  --user $ACCOUNT
For more information about installation with the gcloud commands, see Google Cloud Document

On the Installation guide screen, open the Additional setting in case of the OpenShift environment section and then select whatap_openshift_scc.yaml. After downloading the file, execute the following command.
oc create -f whatap_openshift_scc.yaml
Creating the Kubernetes agent
When installing the WhaTap Kubernetes agent, the guides based on helm charts and yaml files are provided as follows.
- Helm Chart
- YAML
Checking the Helm version and WhaTap repository network connection status
-
Check the helm version by using the following command. It is available in the version 3.x or later.
helm version
# version.BuildInfo{Version:"v3.x", GitCommit:"xxx", GitTreeState:"clean", GoVersion:"go1.20.8"} -
Check the network connectivity to the WhaTap Helm repository.
curl https://whatap.github.io/helm/ping
# pong
Helm chart-based installation
After adding the WhaTap Helm repository, create a default configuration file appropriate for Container Runtime and then install the agent.
-
Execute the following command to add the WhaTap Helm repository.
helm repo add whatap https://whatap.github.io/helm/
helm repo update -
Check the user CONTAINER-RUNTIME by executing the following command:
kubectl get nodes -o wide
-
After checking the CONTAINER-RUNTIME, create a default configuration file (values.yaml) required for installation as follows.
containerRuntime: #CONTAINER-RUNTIME
whatap:
    license: #WHATAP-LICENESE-KEY
    host: "13.124.11.223/13.209.172.35"
port: "6600" -
Install the agent application as follows.
-
For users who install the agent for the first time, run the following command to install the agent application.
helm install whatap-kube-agent whatap/kube -f values.yaml -
In case of existing WhaTap Kubernetes agent users, run the following command to install the agent application.
kubectl delete ns whatap-monitoring
kubectl delete clusterrole whatap
kubectl delete clusterrolebinding whatap
helm install whatap-kube-agent whatap/kube -f values.yaml
NoteIf you have installed the WhaTap Kubernetes agent by using the existing yaml file, Clean Install is required. After deleting the existing Kubernetes agent, installation is possible using the helm chart.
-
Major configuration items for values.yaml
To modify the WhaTap Kubernetes agent settings, modify the default configuration file (values.yaml). The major settings in the values.yaml file are as follows:
| Key | Type | Default | Description |
|---|---|---|---|
whatap.license | String | # <license-key> | Whatap license key |
whatap.host | String | # <whatap-server-host> | Host address of the Whatap server |
whatap.port | Int | # <whatap-server-port> | Whatap port number |
containerRuntime | String | "docker" | Container runtime in use. Select any of "docker", "containerd", and "crio". |
daemonSet.name | String | whatap-node-agent | Name of DaemonSet |
daemonSet.label | String | whatap-node-agent | Label to assign to DaemonSet |
daemonSet.initContainers.nodeDebugger.enabled | Bool | true | Whether to enable the Whatap node debugger container |
daemonSet.containers.nodeHelper.image | String | whatap/kube_mon | Image of the nodeHelper container |
daemonSet.containers.nodeHelper.requests.memory | String | 100Mi | nodeHelper MEMORY request |
daemonSet.containers.nodeHelper.requests.cpu | String | 100m | nodeHelper CPU request |
daemonSet.containers.nodeHelper.limits.memory | String | 350Mi | nodeHelper MEMORY limit |
daemonSet.containers.nodeHelper.limits.cpu | String | 200m | nodeHelper CPU limit |
daemonSet.containers.nodeAgent.image | String | whatap/kube_mon | Image of the nodeAgent container |
daemonSet.containers.nodeAgent.requests.memory | String | 300Mi | nodeAgent MEMORY request |
daemonSet.containers.nodeAgent.requests.cpu | String | 100m | nodeAgent CPU request |
daemonSet.containers.nodeAgent.limits.memory | String | 350Mi | nodeAgent MEMORY limit |
daemonSet.containers.nodeAgent.limits.cpu | String | 200m | nodeAgent CPU limit |
deployment.name | String | whatap-master-agent | Name of Deployment |
deployment.label | String | whatap-master-agent | Label to assign to Deployment |
deployment.replicas | Int | 1 | Number of replicas in Deployment |
deployment.containers.controlPlaneHelper.enabled | Boolean | true | Whether to enable the whatap-control-plane-helper container |
deployment.containers.controlPlaneHelper.image | String | "whatap/kube_mon" | Image of the controlPlaneHelper container |
deployment.containers.controlPlaneHelper.port | String | 9496 | Port number of the controlPlaneHelper container. |
deployment.containers.controlPlaneHelper.resources.requests.memory | String | "300Mi" | MEMORY request of the controlPlaneHelper container. |
deployment.containers.controlPlaneHelper.resources.requests.cpu | String | "100m" | CPU request of the controlPlaneHelper container |
deployment.containers.controlPlaneHelper.resources.limits.memory | String | "350Mi" | MEMORY limit of the controlPlaneHelper container. |
deployment.containers.controlPlaneHelper.resources.limits.cpu | String | "200m" | CPU limit of the controlPlaneHelper container. |
deployment.containers.masterAgent.name | String | whatap-master-agent | Name of the masterAgent container. |
deployment.containers.masterAgent.image | String | "whatap/kube_mon" | Image of the masterAgent container |
deployment.containers.masterAgent.port | Int | 6600 | Port number of the masterAgent container. |
deployment.containers.masterAgent.resources.requests.memory | String | "300Mi" | MEMORY request of the masterAgent container |
deployment.containers.masterAgent.resources.requests.cpu | String | "100m" | CPU request of the masterAgent container |
deployment.containers.masterAgent.resources.limits.memory | String | "350Mi" | MEMORY limit of the masterAgent container |
deployment.containers.masterAgent.resources.limits.cpu | String | "200m" | CPU request of the masterAgent container |
For the guide to Installation troubleshooting based on the Helm chart, see the following.
YAML file-based installation
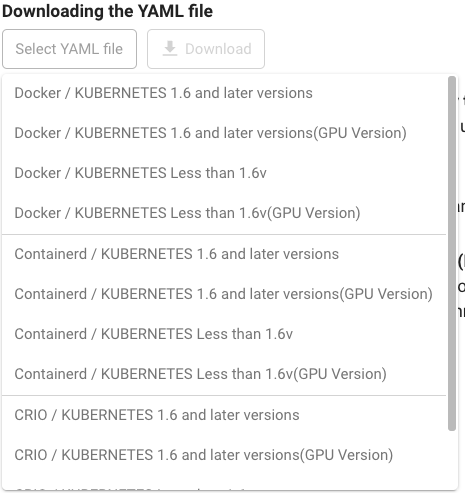
Download the YAML file that is suitable for your Kubernetes version and container runtime, and then create an agent.
-
Check the VERSION and CONTAINER-RUNTIME by executing the following command:
kubectl get node -o wide -
On the Agent Installation screen, select the YAML file that matches the VERSION and CONTAINER-RUNTIME and then click Download.

-
Upload the downloaded YAML file to the master node.
-
Execute the following command to create an agent.
# Modify the {whatap_kube_X.YZ.yaml} filename to match the downloaded filename.
kubectl apply -f {whatap_kube_X.YZ.yaml} -
Check that the agent has been created successfully as follows:
The amount of resources used by the Master Agent is somewhat proportional to the number of nodes in your environment. In other words, if there are a large number of nodes in the cluster, OOM (Out Of Memory) may occur when resources exceed the default memory limit (350 MB). The memory limit allocated to the master agent can be changed through the agent installed YAML file.
Checking the Kubernetes agent installation
If the Kubernetes agent installation has been completed, you can check the status of the master agent and node agent by executing the following command:
kubectl get pod -n whatap-monitoring
In case the status is Running
If STATUS is in Running, it indicates the installation has been finished as follows. After installing the master and node agents, start monitoring the resources in your Kubernetes environment. Go to Whatap Monitoring Service and then check the performance data collection in Project List and Dashboard > Container Map.
In case the status is not Running
If the STATUS is not Running, it indicates that the installation has not been completed successfully as follows.
-
Execute the following command on the master node to determine the cause of the Pod creation failure.
kubectl describe pod {POD_NAME} -n whatap-monitoring -
Check the Events: item at the bottom of the execution result.
When using the kubectl command, the -n {namespace} option performs the task for specific namespaces. Because the WhaTap agent is installed in the namespace named whatap-monitoring by default, add the -n whatap-monitoring option.
- To proceed with the application agent installation, select Application Agent Installation at the lower right of the screen. For more information, see the following.
- To update the agent to the latest version, see the following.


