Agent Installation
To use the WhaTap monitoring service, after Sign in, create a project and install the agent to the target server. For more information about registration as a member, see the following.
See the following video guide.
Creating a project
Create a project before installing the agent.
-
Log in WhaTap monitoring service.
-
To create a project, on the left of the screen, select All Projects > + Project.
-
Select a product in Select product for installation.
-
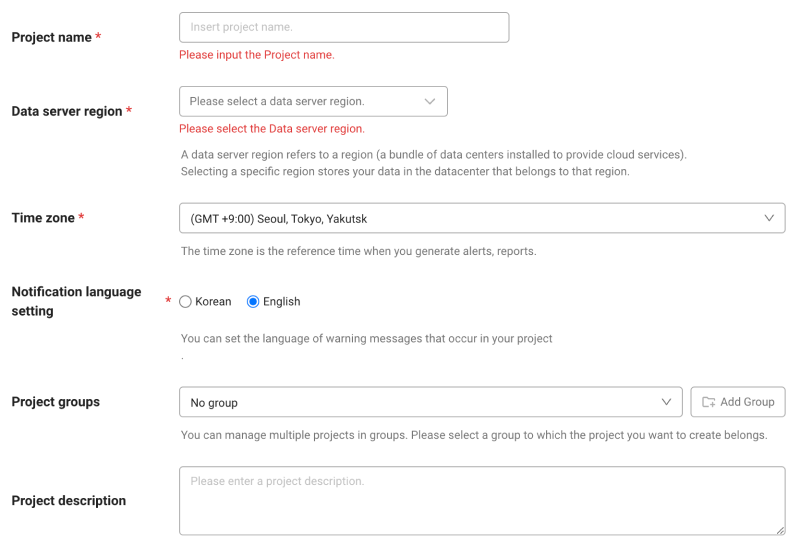
Configure the settings for Project name, Data server region, and Time zone.
-
In Notification language setting, select the language for alert messages.
-
After all settings are finished, select Creating a project.
-
A Data server region refers to a region (a bundle of data centers installed to provide cloud services). Selecting a specific region stores your data in the datacenter that belongs to that region.
-
Time zone is the reference time for generating alerts and reports.
-
To group multiple projects for management, select a group from Project groups or add a group. For more information about grouping, see the following.
-
To add a project with an organization selected, Groups of organization must be set.
Checking the access key
The access key is the unique ID to enable the WhaTap service.
In the installation guide section, select Getting the access key. After the access key has been issued automatically, proceed to the next step.
After a project has been created, the Agent installation page appears automatically. If the Agent installation does not appear, select Management > Agent installation on the left of the screen.
Download Agent
If the access key has been granted, in the Download agent section, the Download button is enabled.
-
Select Download to download the WhaTap agent file.
TipYou can directly download it from the server by using the following command:
wget https://api.whatap.io/agent/whatap.agent.java.tar.gz -
Connect the server to be monitored.
-
Unzip the agent file at the desired location of the target server to monitor. The unzipped path becomes
$WHATAP_HOME.tar -zxvf whatap.agent.java.tar.gz
Agent installation file configuration
The agent file consists of a tracer that extracts data for application monitoring and passes to the WhaTap collection server, and the elements that help the tracer send the data.
Configuring the whatap.conf file
Entry of basic information
Go to the unzipped $WHATAP_HOME path. Enter the access key and data collection server's IP address in the $WHATAP_HOME/whatap.conf file. Go to the WhaTap monitoring service screen and then copy and paste the access key and collection server IP address from the Download agent item of the Install guide section.
license={access key}
whatap.server.host={collection server IP}
For more information about whatap.conf, see the following.
Setting the security key
Set a security key to query SQL variables and perform HTTP queries, or use the Thread stop function.
-
Java Agent 2.2.2 or later
After creating the security.conf file in the
$WHATAP_HOMEpath, enter a 6-character password consisting of alphabets and numbers as follows:security.confparamkey=ABCDEF # SQL variable and HTTP query lookup
threadkill=ABCDEF # Thread stop function -
Java agent 2.2.2 or earlier
After creating the paramkey.txt file in the
$WHATAP_HOMEpath, enter a 6-character password consisting of alphabets and numbers as follows:paramkey.txtABCDEF # SQL variable and HTTP query lookup, thread stop function
When updating the Java agent version to 2.2.2, the key values in the existing paramkey.txt file are automatically applied to the security.conf file. For example, if you used FEDCBA in paramkey.txt and updated to the version 2.2.2, it is applied to the security.conf file as follows:
paramkey=FEDCBA
threadkill=FEDCBA
If the paramkey.txt file does not exist, the key value of the security.conf file is automatically created as the key value of WHATAP.
-
For agent settings related to recording SQL parameters, see the following.
-
For agent settings related to recording the HTTP parameters, see the following.
Adding the JVM options
The method how to set depending on the application server environment is provided as follows. Before installing and applying the agent, check Support environment first. The following provides the detailed guide on how to add Java Virtual Machine (JVM) options to integrate the WhaTap monitoring solution into Tomcat applications. Through this document, users can learn step by step how to apply the required JVM settings to monitor the performance and availability of Tomcat applications after installing the Java agent. It includes the configuration of essential JVM options during agent installation, optimal configuration for smooth integration with Tomcat, and histogram query. The following provides the detailed guide on how to add Java Virtual Machine (JVM) options to integrate the WhaTap monitoring solution into JBoss applications. Through this document, users can learn step by step how to apply the required JVM settings to monitor the performance and availability of JBoss applications after installing the Java agent. It includes the configuration of essential JVM options during agent installation, optimal configuration for smooth integration with JBoss, and histogram query. The following provides the detailed guide on how to add Java Virtual Machine (JVM) options to integrate the WhaTap monitoring solution into JEUS applications. Through this document, users can learn step by step how to apply the required JVM settings to monitor the performance and availability of JEUS applications after installing the Java agent. It includes the configuration of essential JVM options during agent installation, optimal configuration for smooth integration with JEUS, and histogram query. The following provides the detailed guide on how to add Java Virtual Machine (JVM) options to integrate the WhaTap monitoring solution into WebLogic application. Through this document, users can learn step by step how to apply the required JVM settings to monitor the performance and availability of WebLogic applications after installing the Java agent. It includes the configuration of essential JVM options during agent installation, optimal configuration for smooth integration with WebLogic, and histogram query. The following provides the detailed guide on how to add Java Virtual Machine (JVM) options to integrate the WhaTap monitoring solution into WebSphere applications. Through this document, users can learn step by step how to apply the required JVM settings to monitor the performance and availability of WebSphere applications after installing the Java agent. It includes the configuration of essential JVM options during agent installation, optimal configuration for smooth integration with WebSphere, and histogram query. We provide detailed instructions on how to add the Java Virtual Machine (JVM) option to integrate the WhaTap monitoring solution into the Resin applications. Through this document, you can learn step by step how to apply the required JVM settings to monitor the performance and availability for Resin applications after installing the Java agent. It includes the configuration of required JVM options during agent installation, optimal configuration for smooth integration with Resin, and histogram query methods. We provide detailed instructions on how to add the Java Virtual Machine (JVM) option to integrate the WhaTap monitoring solution into the Liberty applications. Through this document, you can learn step by step how to apply the required JVM settings to monitor the performance and availability for Liberty applications after installing the Java agent. It includes the configuration of required JVM options during agent installation, optimal configuration for smooth integration with Liberty, and histogram query methods. We provide detailed instructions on how to add the Java Virtual Machine (JVM) option to integrate the WhaTap monitoring solution into the Jetty applications. Through this document, you can learn step by step how to apply the required JVM settings to monitor the performance and availability for Jetty applications after installing the Java agent. It includes the configuration of required JVM options during agent installation, optimal configuration for smooth integration with Jetty, and histogram query methods. The following provides the detailed guide on how to add Java Virtual Machine (JVM) options to integrate the WhaTap monitoring solution into Spring Boot applications. Through this document, users can learn step by step how to apply the required JVM settings to monitor the performance and availability of Spring Boot applications after installing the Java agent. It includes the configuration of essential JVM options during agent installation, optimal configuration for smooth integration with Spring Boot, and histogram query. The following explains how to add the Java Virtual Machine (JVM) option to integrate the WhaTap monitoring solution into the Play2 applications. Through this document, you can learn step by step how to apply the required JVM settings to monitor the performance and availability of Play2 applications after installing the Java agent. It includes the configuration of required JVM options during agent installation, optimal configuration for smooth integration with Play2, and how to view the histogram. The following explains users who run Java applications on the IBM Bluemix cloud platform on how to set JVM options to effectively apply WhaTap's Java monitoring agent. Through this document, users can check step by step the processes of installing WhaTap's Java agent in the IBM Bluemix environment, configuring the agent, and adding the required JVM options. Additionally, it includes the histogram query method. The following explains users who run Java applications on the AWS Elastic Beanstalk environment on how to set JVM options to effectively apply WhaTap's Java monitoring agent. You can check the processes of installing and configuring WhaTap's Java agent in the Elastic Beanstalk and adding and configuring the required JVM options. Additionally, it includes the histogram query method. The step-by-step instructions on how to apply the WhaTap Java monitoring agent to Java applications in the Docker environment are provided. Users can add more Whatap Java agent settings to the existing Docker image to see the processes for building a new image, creating the whatap.conf file, writing a Dockerfile, and modifying JAVA_OPT. Additional JVM options for Java 17 or later and the method how to configure the heap histogram lookup for various Java versions are also provided. The following explains how to apply WhaTap's Java agent to batch applications. It also describes how the batch applications differ from web applications due to unique repetitive start and stop operations, and provides the methods for downloading the required agents, configuring agents and batch hosts, running batch jobs with agents, and monitoring the execution times by setting the time_limits. The following explains how to apply the Java agent in versions lower than Java 1.6. You can see the agent installation and setup procedures for Java 1.5 and 1.4 respectively, as well as restrictions related to the -javaagent option.Tomcat
JBoss
JEUS
WebLogic
WebSphere
Resin
Liberty
Jetty
Spring Boot
Play2
IBM BlueMix
Elastic Beanstalk
Docker
Batch application
Versions earlier than Java 1.6