Batch Program Monitoring
Describes how to install and configure the WhaTap agent for batch applications.
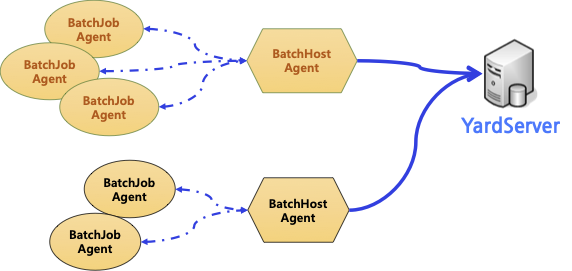
Batch monitoring architecture
Unlike a WAS, a batch application starts and stops repeatedly. Batch monitoring therefore uses two separate processes.
| Process | Role | Instances |
|---|---|---|
| Batch Host | Sends data received from the Batch Agent to the collection server | One per host |
| Batch Agent | Collects batch job data and sends it to the Batch Host | One per batch job |
The two processes communicate over UDP. This design lets you run multiple batch jobs in parallel. Install the Batch Host and the Batch Agent on the same server that runs the batch jobs.
Network requirements
| Path | Protocol/Port |
|---|---|
| Batch Host → collection server | TCP 6600 (outbound) |
| Batch Agent → Batch Host | UDP 6611 |

Batch program monitoring is an add-on to Java monitoring, but it runs as an independent system separate from the Java monitoring agent. Java agent options do not apply to batch monitoring. Use only the options described in this document. Options that use the profile_ prefix in the Java agent use the trace_ prefix in batch programs.
Downloading the agent
Run the following command to download the agent for batch application monitoring.
wget https://api.whatap.io/agent/whatap.agent.batch.tar.gz
tar xzf whatap.agent.batch.tar.gz
The extracted files are structured as follows.
{BATCH_HOME}/
├── whatap.agent.batch.host-X.Y.Z.jar   Batch Host
├── whatap.agent-X.Y.Z.jar              Java agent
├── whatap.conf                         Batch Host configuration file
└── agent/
    ├── whatap.agent.batch-X.Y.Z.jar    Batch Agent
    └── whatap.conf                     Batch Agent configuration file
If the whatap.conf file does not exist, create it and add the license and whatap.server.host values found in the Settings > Agent installation menu.
Configuration file location
This is where deployments fail most often. Be sure to check it.
WhaTap determines the location of configuration files and logs based on whatap.home. How whatap.home is resolved depends on how you start the process. If the configuration file is not found, the startup banner shows PCODE(0) and no data is collected.
How whatap.home is resolved
The resolution order is as follows.
- If you specify
-Dwhatap.home, that value always takes precedence. - Without it, a process started with
-javaagent(the Batch Agent) uses the directory containing the agent jar aswhatap.home. - A process started by specifying a main class with
-cp(the Batch Host) does not get this automatic resolution, so the working directory at startup becomeswhatap.home.
| Process | Startup method | whatap.home | Configuration file read |
|---|---|---|---|
| Batch Host | -cp + main class | Working directory | whatap.conf in the working directory |
| Batch Agent | -javaagent | Directory containing the agent jar | whatap.conf in the same directory as the jar |
Always move to the installation directory before starting the Batch Host. When a job scheduler or job management product starts the process, the working directory may differ from what you expect. Change the working directory explicitly inside the startup script.
Batch Host configuration
You can find the license and whatap.server.host values in the project's Settings > Agent installation menu.
license=
whatap.server.host=
whatap.server.port=6600
| Option | Default | Description |
|---|---|---|
license | - | Project access key |
whatap.server.host | - | Collection server address. Separate redundant servers with a slash (/). Example) 10.0.0.1/10.0.0.2 |
whatap.server.port | 6600 | Collection server port |
These three items are enough to run. Add the options described below only when you need them.
UDP listener configuration
The address and port on which the Batch Host receives data from the Batch Agent.
net_udp_listen_ip=0.0.0.0
net_udp_listen_port=6611
| Option | Default | Description |
|---|---|---|
net_udp_listen_port | 6611 | Port that receives UDP data. Change it if the default port is already in use |
net_udp_listen_ip | 0.0.0.0 | IP address to bind for receiving UDP data. Can be changed, but the default is recommended |
If you change the UDP port, you must change it on both the Batch Host and the batch job.
| Target | Configuration file | Option |
|---|---|---|
| Receiver (Batch Host) | {BATCH_HOME}/whatap.conf | net_udp_listen_port |
| Sender (batch job) | whatap.conf of the batch job | net_udp_port |
If you change only one side, transaction data is lost without any error. The batch job keeps sending to the old port while the Batch Host listens only on the new one. Restart both the Batch Host and the batch jobs after the change.
Trace step collection
An individual transaction trace cannot collect steps indefinitely. Trace steps are stored in a length-limited buffer per transaction, and the default configuration collects up to 1,000 steps per batch job.
split_trace_enabled=false
| Option | Default | Description |
|---|---|---|
split_trace_enabled | false | Splits the trace before sending |
Steps beyond the limit are dropped without any indication in the trace. If the step numbers in the trace analysis screen stop near 1,000, this is the cause.
Contact technical support if you need the full processing history of a batch job with a large number of steps.
Profiling expiration time
The Batch Host periodically checks running jobs and force-terminates profiling for any job that has not sent a step for a certain period.
profile_expired_time=30000
| Option | Default | Description |
|---|---|---|
profile_expired_time | 30000 | Force-terminates profiling when this time (ms) passes after the last step was received |
This cleans up automatically so that transactions do not remain in a running state when a batch job terminates abnormally. A lost-profile step is recorded on force-terminated transactions.
If a period with no instrumented processing, such as waiting for an external system response, exceeds this time, profiling is force-terminated even while the job is running normally. For batch jobs with such periods, set a value with enough margin over the actual idle period.
Batch Agent configuration
net_udp_ip=127.0.0.1
net_udp_port=6611

job_name=sample-batch-job
time_limit=300000

trace_httpc_limit=1000000
trace_sql_limit=1000000

active_stack_enabled=true
active_stack_start_wait_time=1000
active_stack_time1=5000
active_stack_time2=10000
| Option | Default | Description |
|---|---|---|
net_udp_ip | 127.0.0.1 | IP address of the Batch Host to send data to. No change needed when running on the same server |
net_udp_port | 6611 | UDP port of the Batch Host to send data to. Must match the Batch Host's net_udp_listen_port |
job_name | - | Name identifying the batch job. Shown as the transaction name. Set a unique value per job |
time_limit | 300000 | Threshold (ms) for showing a delay warning. Does not stop the job |
trace_httpc_limit | 1000000 | Maximum HTTP calls collected per batch job |
trace_sql_limit | 1000000 | Maximum SQL statements collected per batch job |
active_stack_enabled | true | Whether to collect active stacks |
active_stack_start_wait_time | 1000 | Wait time (ms) before collecting the first active stack after the job starts |
active_stack_time1 | 5000 | Active stack collection interval (ms) for the first five collections |
active_stack_time2 | 10000 | Active stack collection interval (ms) from the sixth collection onward |
net_udp_ip and net_udp_port work with their defaults in the typical setup where the Batch Agent runs on the same server as the Batch Host. Add the other options only when you need them.
Setting time_limit
Batch jobs usually run for a long time, and the expected duration differs per job. Set time_limit for each job.
When you set time_limit, the warning thresholds on the active transaction screen are calculated automatically. No separate configuration is needed.
| Elapsed time | Display |
|---|---|
Up to 70% of time_limit | Default color |
Over 70% of time_limit | Yellow |
Over time_limit | Red |
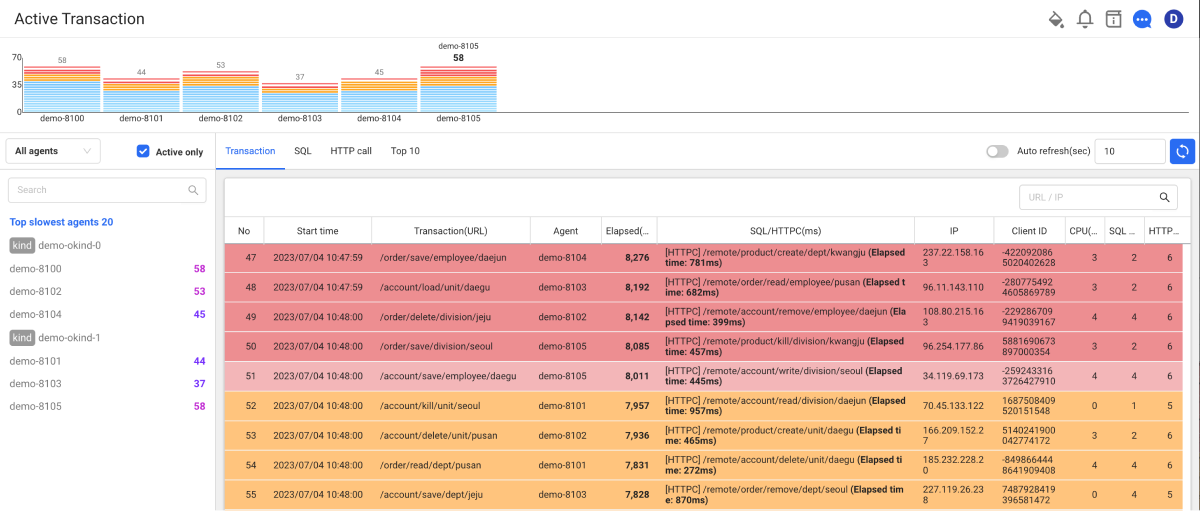
The color is determined by the elapsed time of the entire job. Even when the trace is split, the decision uses the elapsed time of the whole job rather than each segment.
Active stack collection timing
The Batch Agent collects stack traces of the running batch job at fixed intervals. You can review collected active stacks as ActiveStack steps in the trace analysis screen.
active_stack_time1 and active_stack_time2 are collection intervals, not thresholds. With the default values, the collection timing is as follows.
| Collection | Timing | Applied option |
|---|---|---|
| 1st | 1 second after the batch job starts | active_stack_start_wait_time |
| 2nd to 5th | 5 seconds after the previous collection | active_stack_time1 |
| 6th onward | 10 seconds after the previous collection | active_stack_time2 |
With the default values, a batch job running for 90 seconds collects about 12 active stacks.
The switchover point of five collections is fixed and cannot be changed. You can change only the three time settings, active_stack_start_wait_time, active_stack_time1, and active_stack_time2.
The minimum value for active_stack_time1 and active_stack_time2 is 100 milliseconds. Values below 100 are applied as 100.
To stop collecting active stacks, set active_stack_enabled=false.
Collection limits
The maximum number of HTTP calls and SQL statements collected per batch job. Each defaults to one million.
| Option | Default |
|---|---|
trace_httpc_limit | 1000000 |
trace_sql_limit | 1000000 |
When the configured count is exceeded, collection of that data type stops at that point and the excess is not reflected in statistics. The batch job itself keeps running and the transaction completes normally.
No indication is left in the trace when collection stops. If the actual processing count may exceed the limit, set a sufficiently large value in advance.
If the SQL count or HTTP call count shown in the transaction list exactly matches the configured limit, the limit may have been reached.
Neither option has a product-side maximum. However, a large value increases the memory usage of the batch process, so verify it in a test environment before applying it to production.
Separating configuration per job
Set different values of job_name and time_limit for each job. Configuration files are read based on whatap.home, so specifying a per-job directory with -Dwhatap.home is recommended.
Keep the agent jar in one place and prepare only the configuration files per job.
{BATCH_HOME}/agent/whatap.agent.batch-X.Y.Z.jar   Shared by all jobs

{JOB_HOME}/
├── job-a/
│   ├── job-a.jar
│   └── whatap.conf      job_name=job-a, time_limit=600000
└── job-b/
    ├── job-b.jar
    └── whatap.conf      job_name=job-b, time_limit=120000
A logs directory is created in the directory the configuration file was read from. If the job directory has no logs directory, the configuration in that directory was not used. Use this as an indicator when troubleshooting.
Running
Startup order
Start only one Batch Host for all batch jobs.
- Start the Batch Host once before running any batch job.
- Run each batch job with the
-javaagentoption. You can run multiple jobs in parallel. - Stop the Batch Host after all batch jobs have finished.
Configuration files are read only once at startup. After a configuration change, the Batch Agent applies it from the next job, and the Batch Host requires a restart.
Force-terminating the Batch Host process can lose data sent by running jobs. Stop it after all jobs have finished.
Starting the Batch Host
- Linux
- Windows
cd {BATCH_HOME}
java -cp {BATCH_HOME}/whatap.agent.batch.host-X.Y.Z.jar:{BATCH_HOME}/whatap.agent-X.Y.Z.jar \
     -Dwhatap.name=batch whatap.agent.batch.App
For Java 17 or later, add the reflection option.
cd {BATCH_HOME}
java --add-opens=java.base/java.lang=ALL-UNNAMED \
     -cp {BATCH_HOME}/whatap.agent.batch.host-X.Y.Z.jar:{BATCH_HOME}/whatap.agent-X.Y.Z.jar \
     -Dwhatap.name=batch whatap.agent.batch.App
cd /d {BATCH_HOME}
java -cp "{BATCH_HOME}\whatap.agent.batch.host-X.Y.Z.jar;{BATCH_HOME}\whatap.agent-X.Y.Z.jar" -Dwhatap.name=batch whatap.agent.batch.App
For Java 17 or later, add the reflection option.
cd /d {BATCH_HOME}
java --add-opens=java.base/java.lang=ALL-UNNAMED -cp "{BATCH_HOME}\whatap.agent.batch.host-X.Y.Z.jar;{BATCH_HOME}\whatap.agent-X.Y.Z.jar" -Dwhatap.name=batch whatap.agent.batch.App
On Windows the classpath separator is a semicolon (;). The command prompt treats a semicolon as an argument separator, so wrap the entire classpath in double quotation marks.
Running a batch job
- Linux
- Windows
java -javaagent:{BATCH_HOME}/agent/whatap.agent.batch-X.Y.Z.jar \
     -Dwhatap.home={JOB_HOME}/job-a \
     -jar {JOB_HOME}/job-a/job-a.jar
For Java 17 or later, add --add-opens=java.base/java.lang=ALL-UNNAMED.
java -javaagent:{BATCH_HOME}\agent\whatap.agent.batch-X.Y.Z.jar ^
     -Dwhatap.home={JOB_HOME}\job-a ^
     -jar {JOB_HOME}\job-a\job-a.jar
For Java 17 or later, add --add-opens=java.base/java.lang=ALL-UNNAMED.
Verifying startup
Check whether the configuration was applied using the banner shown at startup. The Batch Host and Batch Agent banners differ.
Batch Host
WhaTap vX.Y.Z YYYYMMDD PCODE(project code)
Java <JDK version> asmlib<version> asm<version>
whatap.agent-X.Y.Z.jar
./whatap.conf
| Display | Description |
|---|---|
PCODE(number) | Normal. The number is the project code |
PCODE(0) | The license or the configuration file was not applied. See Troubleshooting |
The third line shows the Java agent jar file name, not the Batch Host jar. This is expected behavior.
Batch Agent
WhaTap vX.Y.Z YYYYMMDD
Java <JDK version> asmlib<version> asm<version>
whatap.agent.batch-X.Y.Z.jar
{JOB_HOME}/job-a/whatap.conf
The Batch Agent banner does not show PCODE. The configuration file path printed on the fourth line is how you confirm that the per-job configuration was applied. If it is not the path of the intended job directory, whatap.home was resolved differently than expected.
The Java and asm values in the banner depend on the JDK that ran the process. Starting the two processes with different JDKs shows different values.
Reviewing in the product
Batch jobs appear as transactions in the Hitmap and the transaction list. The transaction name is the value set in job_name.
Virtual transactions
When split_trace_enabled=true, jobs with many steps have their traces split and sent in fixed-size segments. Each split segment appears as a virtual transaction with a sequence number appended to its name. The default is false, so virtual transactions do not appear with the default configuration.
The following example uses job_name=sample-job with about 5,000 steps.
| Transaction name | Content | Duration shown |
|---|---|---|
sample-job-1 to sample-job-4 | Split segments (virtual transactions) | Processing time of each segment |
sample-job | Actual transaction | Duration of the whole job |
Check the duration of the whole job on the transaction without a sequence number. Step numbers are continuous across the entire job.
- Virtual transactions are reflected in the Hitmap and TPS, but statistics count them as a single job. The transaction count is not inflated.
- Virtual transactions show a CPU time of 0 and a client IP address of
0.0.0.0. - When you download step execution history as a file from the trace analysis screen, a split trace produces files split the same way. Download each virtual transaction if you need the step history of the whole job.
Metrics collected by the Batch Agent
The dashboard collects the Heap Memory of the Batch Host, and collects batch application performance indicators as metrics (TagCount: batch_job_counter).
batch_job_counter
- batch job:
pid,hostname,job_name - gc:
gc_count,gc_time_sum,gc_oldgen_count - heap:
heap_tot,heap_use,heap_max,heap_pending_final,heap_perm - cpu:
cputime - thread count:
thread_total_started,thread_count,thread_daemon,thread_peak_count
Troubleshooting
The Batch Host startup banner shows PCODE(0)
- Check whether
whatap.confexists in the path printed on the fourth line of the banner. - If it does not,
whatap.homewas resolved differently than expected. Check the configuration file location and specify it explicitly with-Dwhatap.homeif needed. - If the configuration file exists, check that the
licensevalue is correct. An invalid value recordsWhaTap AccessKey Errorin the log.
java.net.BindException error
UDP 6611 is already in use. If you force-terminated the Batch Host, a Java process may remain and keep holding the port.
- Linux
- Windows
ss -anu | grep 6611
ps -ef | grep whatap.agent.batch.App
netstat -ano | findstr ":6611"
Terminate the remaining process and restart the Batch Host.
Per-job configuration is not applied
The directory was not recognized as whatap.home. Check the path printed on the fourth line of the startup banner.
The most common cause is keeping the agent jar in a shared location while placing configuration files only in job directories. The directory of the jar specified with -javaagent becomes whatap.home, so the whatap.conf in the job directory is not read. Specify the job directory with -Dwhatap.home.
Monitoring data does not appear
Check the following in order.
- Check that the Batch Host is running.
- Check that
PCODEin the startup banner is not 0. - Check that TCP 6600 from the Batch Host to the collection server is allowed.
- Check that UDP 6611 from the Batch Agent to the Batch Host is reachable.
- If you changed the UDP port, check that the Batch Host's
net_udp_listen_portmatches the batch job'snet_udp_port. - Check whether errors are recorded in
{whatap.home}/logs/whatap.log.
Steps are cut off midway
A collection limit was reached. No indication is left in the trace when a limit is reached, so check the following.
| Check | Related setting |
|---|---|
| Whether step numbers stop near 1,000 | Trace step collection |
Whether the SQL count matches trace_sql_limit | Collection limits |
Whether the HTTP call count matches trace_httpc_limit | Collection limits |
Whether a lost-profile step appears at the end of the trace | Profiling expiration time |
A transaction records lost-profile
Profiling was force-terminated because no step arrived for profile_expired_time (30 seconds by default).
- If the job terminated abnormally, for example with
kill -9, this is the expected automatic cleanup. - If the job was running normally, a period with no instrumented processing, such as waiting for an external system response, may have exceeded 30 seconds. See Profiling expiration time and adjust the value.
Automatically calculated settings
The following values are calculated automatically from time_limit. You do not need to write them in the configuration file.
| Option | Calculation |
|---|---|
warning_time | 70% of time_limit |
yellow_time | 70% of time_limit |
red_time | 100% of time_limit |
Deployment checklist
| # | Item | How to check |
|---|---|---|
| 1 | Agent extracted | Jars exist under {BATCH_HOME} and in the agent directory. |
| 2 | Host configured | license and whatap.server.host are set. |
| 3 | Network requirements | TCP 6600 outbound is allowed. |
| 4 | Batch Host started | PCODE in the Batch Host banner is not 0. |
| 5 | Agent configured | job_name and time_limit are set per job. |
| 6 | Job started | The job directory is specified with -Dwhatap.home. |
| 7 | Configuration applied | A logs directory was created in the job directory. |
| 8 | Data verified | Transactions with job_name appear in the Hitmap. |
| 9 | Duration verified | The whole job duration was checked on the transaction without a sequence number. |
| 10 | Parallel execution | Multiple jobs run at once appear separated by job_name. |
| 11 | Shutdown | The Batch Host was stopped after all jobs finished. |
Next steps
-
Open source tracing
Depending on the framework or open source library used in applications, you may need to add agent options. For example, when using spring-boot-3.x, feign-client-11, or okhttp3-4.4 with a framework or open source, set the options as follows:
whatap.confweaving=spring-boot-3.0,feign-11,okhttp3-4.4For information on how to configure the framework or open source library that suits your application environment, see the following.
-
Checking the installation
If you have created a project, installed an agent, and applied all JVM options, see the checklist in the following.
-
Installation troubleshooting
It provides various problems that may occur when installing the agent and specific instructions for resolving them. It provides solutions against various situations, including firewall configuration, SpringBoot and Tomcat JMX configuration, and server configuration using the OSGI framework. For more information, see the following.
-
Agent setting
It provides various features for monitoring by applying some options to the agent configuration file (whatap.conf). It includes basic configuration, configuration for server connection and data transfer, how to manage the configuration files for multiple application servers, and transaction tracing, and more. For more information, see the following.
-
Starting the monitoring
After all settings are made, restart the application server. The agent starts collecting data. First, check whether the monitoring data has been collected in Application Dashboard. For more information about Application Dashboard, see the following.