Log setting
You can configure the log monitoring related settings in Log Configuration. Using the tab at the top, you can use menus for checking the agent settings, determining whether to enable log monitoring, setting the log data retention period and lookup password, registering the log parser, and setting the quick indexes.
-
To use the Activate log monitoring function, the Edit project role is required.
-
The Log edit role allows you to modify the Log Configuration menu other than Activate log monitoring.
Starting the log monitoring
At the top, select the Getting started with log monitoring tab. If you select the  View guide icon and the View plans button, the corresponding guide screen appears.
Set up the agent and enable log monitoring
Log monitoring data setting
In the  area, you can see the Log usage. You can also change the Log retention period and Log lookup password settings.
Log retention period
This is the default data retention period to be applied commonly. If not specified, the default value is 1 day. In addition to the option to select a log retention period, you can enter a desired period of time. If not set separately in the Log usage list, this log data retention period is applied by default. If you set the data retention periods for each category in the Log usage list and select Initialized, the default data retention period is reset.
Log usage amount
You can specify the log data retention periods for each category in the Log usage list. Log Count means the number of logs stacked for the period. For example, Daily log count is the number of logs accumulated during the day, and Expected log count is the number of logs of the today's log count multiplied by the days of data retention.
You can specify the log data retention period as follows. You can free the space by deleting old data according to the specified period.
-
Trial Project
You can select 1, 2, or 3 days for the data retention period.
-
Paid Project
For the data retention period, you can select one of 1 day, 2 days, 3 days, 4 days, 5 days, 6 days, 7 days, 10 days, 30 days, and 40 days.
-
Data size-based billing
The price differs depending on the data retention period.
For example, if an average of 2 million logs per day accumulates and the data retention period is set to 3 days, an average of 6 million logs is kept on the collection server and subject to billing.
Log lookup password
To enhance security, set the Log lookup password. The log lookup password is optional. If you are using a log lookup password, enter the password to go to the log screen.
In case you forgot the password
If you have the Edit Log role, you can modify it with a new password in Log Configuration.
Log primary parser setting
Select the Log primary parser setting tab at the top of Log Configuration to register parsers for collected logs.
The log primary parser provides GROK and JSON parsers, essential for aggregating log counts by type and searching for specific logs. It extracts search keys and values that match pattern conditions, and the parsed keys are used for log type classification and search indexing.
-
GROK: This parsing is based on the regular expression by default. It provides parsing based on the reserved keywords.
-
JSON: Batch parsing is provided for the JSON output parts of the logs.
In case of no parsing logic registered, keys for search
category, oid, oname, okind, okindName, @txid, @login, httphost
Reserved words that cannot be registered for the parser
timestamp, message, pcode, category, content, logContent
- For the following reserved words, indexes are not created even if a parser has been registered.
For more information about the log parser, see the following.
Setting item
| Set value | Description | ETC |
|---|---|---|
| Category | Category to apply the pattern to | required |
| Log detection condition | Enter the search key and search value to be applied as the filter. The pattern is applied only to the log data that meets the log detection conditions. If you do not enter any log detection condition, the pattern is applied to all logs. | optional |
| Pattern | It is the pattern to parse the log for. Parsing is performed according to the created pattern, and indexes are created. It supports GROK, regular expression syntax. | required |
Parser list
You can search for registered parsers, add, or edit them. Parsers are evaluated in registered order, and only the first matching parser is applied.
-
If you select + Add on the upper right, the Parser Add window appears.
-
You can change the order of parser settings by dragging the
 icon in the Priority column of the parser list.
 -
Through the parser list's
 Enable toggle button, you can set whether or not to enable the parser.
 -
Through the parser list's
 Edit and
  Delete icons, you can modify or delete the registered parser.
Parser registration order
The following shows the common parser registration procedure.
-
In Log primary parser setting, select + Add.
-
In the Parser Add window, select a Parser.
NoteParser and pattern registration method
-
When you select a parser, the Register pattern button is enabled. After clicking Register pattern, enter the pattern and log in the Parser Simulation window.
a. Enter the Pattern.
b. Enter the Log Category and simulation parsing log. Click the Log Search button, then click the Select button to the right of the desired log in the search results to auto-fill the log.
NoteThrough Log Search, you can select a sample log from collected logs. The selected log is automatically reflected in the simulation input field, allowing you to test immediately without copying and pasting.
c. To check whether the pattern is normal, click Simulation and then measure the performance of simulation and pattern.
NoteFor more information on simulation and performance measurement, see the following.
-
After confirming the simulation result parses successfully, click Apply Pattern.
-
Click Add to add the parser.
Personal information de-identification
If the search key name is specified as search-key.p during parser registration, de-identification is applied by default (e.g. myname.p **). WhaTap recommends managing de-identification in the De-identification of personal information tab. For more information, see Personal information de-identification.
GROK parser pattern registration
The default syntax is %{SYNTAX:SEMANTIC}. For more information about the GROK parser, see the following. Pattern registration and simulation are required.
-
SYNTAX
GROK definition pattern.
-
SEMANTIC
It is the key allocated to the parsed data.
NoteIt is recommended to use combination words in SEMANTIC so that reserved words are not used.
Registering the JSON format parser pattern
If all or part of a log is output in JSON format, you can parse the JSON output through the JSON format parser. To detect the JSON output of the log, the prefix and postfix options are combined to specify which part of the log to be recognized by JSON for parsing. For more information about the JSON parser, see the following. Simulation is required.
| Option | Description |
|---|---|
| Prefix | Specify the string before the beginning of JSON string. If not specified, it is identified as a JSON string from the beginning of the log output. |
| Postfix | Specify the string after the end of JSON string. If not specified, it is identified as a JSON string up to the end of the log output. |
| Ignore | Specify fields in the JSON output to exclude from key extraction. |
-
Registration example
Log[2022-10-25 10:15:34:145]...(line feed)
Request : {"key1":"value1","key2":"value2",...}(line feed)
Response : {"key3":"value3","key4":"value4",...}As in the example, to parse both Request JSON and Response JSON for incoming logs, register the following two patterns.
-
Pattern for request parsing
Strings between "Request : " and "Response"
{"key1":"value1","key2":"value2",...} -
Pattern for response parsing
Strings from "Response : " to the end of a log
{"key3":"value3","key4":"value4",...}
-
-
JSON custom pattern registration
If part of a log is output in JSON format, the JSON output can be parsed by a dedicated custom parser. Enter the pattern as follows:
io.whatap.logsink.parser.JsonFormatParser{}To detect the JSON output of the log, the prefix and postfix options are combined to specify which part of the log to be recognized by JSON for parsing.
Specify an option in
{}ofJsonFormatParser{}.-
Registration example
Log[2022-10-25 10:15:34:145]...(line feed)
Request : {"key1":"value1","key2":"value2",...}(line feed)
Response : {"key3":"value3","key4":"value4",...}As in the example, to parse both Request JSON and Response JSON for incoming logs, register the following two patterns.
- Pattern for request parsing
Strings between "Request : " and "Response"
{"key1":"value1","key2":"value2",...}
io.whatap.logsink.parser.JsonFormatParser {prefix:"Request : ",postfix:"Response"}- Pattern for response parsing
Strings from "Response : " to the end of a log
{"key3":"value3","key4":"value4",...}
io.whatap.logsink.parser.JsonFormatParser {prefix: "Response : "} - Pattern for request parsing
-
Parser simulation and performance measurement
After the parser simulation, you can register a pattern. Performance measurement measures the time taken by the parser to perform repeated parsing on the target string for simulation.
-
Enter values for Pattern and Log. Click the Log Search button, then click the Select button to the right of the desired log in the search results to auto-fill the log.
-
Click Simulation to check whether the parsing has been successful with the pattern to register.
-
If the simulation is successful, you can view Simulation result and Performance measurement results.
-
When you click Apply pattern after simulation, the pattern that has been entered for the selected parser is applied.
Parsing success
If a key is generated by registering a parsing logic, the value parsed with the key is added upon log inquiry. As in the following Live Tail menu's example, the parsed key and value are added.

The parsed key can be checked in Live Tail, Log Search, and Log Trend.
Log secondary parser setting
Select the Log secondary parser setting tab at the top of Log Configuration to register log parsers.
The log secondary parser processes the values extracted by the primary parser (GROK or JSON) to generate statistics data or new fields. In addition to the HTTP status code-based statistics parsers, it provides various processors such as keyword filters, field processing, response time classification, and GeoIP conversion.
The log secondary parser provides the special purpose secondary parsing function for the primary parsed results. To use the secondary parser, the primary parser must have been registered.
Parser list
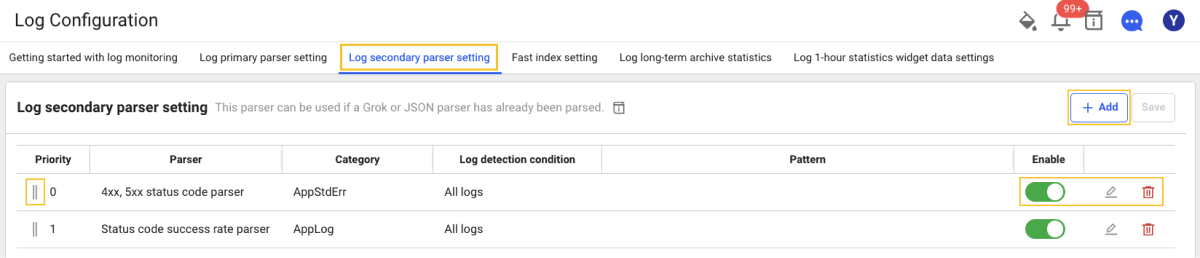
You can search for registered parsers, add, or edit them.
Adding parsers, changing order, enabling/disabling toggles, editing, and deleting work the same as in the primary parser list.
Parser registration order
The following shows the common parser registration procedure.
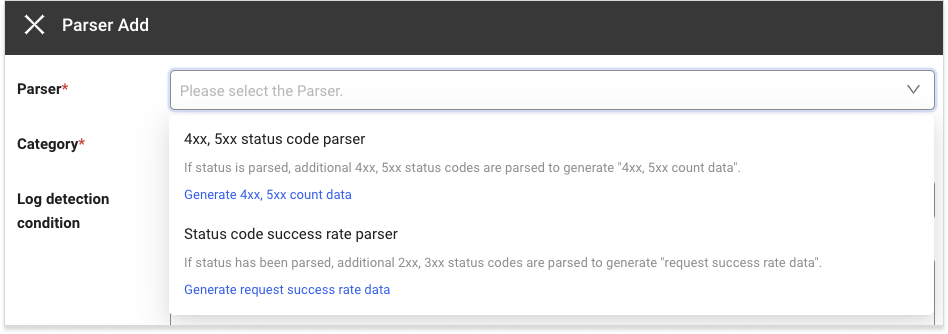
-
If you select + Add, the Parser Add window appears.
-
In the Parser selection window, select a parser. For more information about each parser's setting items, see the following.
-
4xx, 5xx status code parser Setting item
-
Status code success rate parser Setting item
-
-
Enter the Status codes to exclude.
-
In the Category selection window, select a category or enter it.
-
Select Log detection condition or enter it.
-
Select Add to register a parser.
4xx, 5xx status code parser setting item
The 4xx, 5xx status code parser generates 4xx and 5xx count data based on the status values parsed by the primary parser. To exclude specific status codes, enter the status codes to exclude.
Setting item
| Set value | Description | ETC |
|---|---|---|
| Category | It is the category to generate the 4xx, 5xx count data. | required |
| Log detection condition | Enter the search key and search value to be applied as the filter. The 4xx, 5xx count data is generated only for the log data that meets the log detection condition. If you do not enter any log detection condition, the data is generated for all logs. | optional |
| Status codes to exclude | The status codes to exclude upon generation of statistics data. If no entry, the 4xx, 5xx count data is generated for all error status codes that correspond between 4xx and 5xx. | optional |
Registration example for the status parser
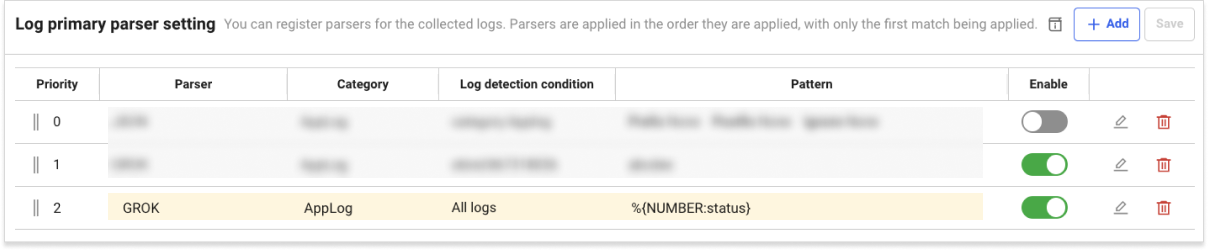
If the incoming log is {"msg":"message","status":404} and its status is parsed by the GROK parser as shown in the example, it is parsed as status: 404. If you confirm that the status has been normally parsed, register the status codes to exclude by the 4xx, 5xx status code parser.
Data Search
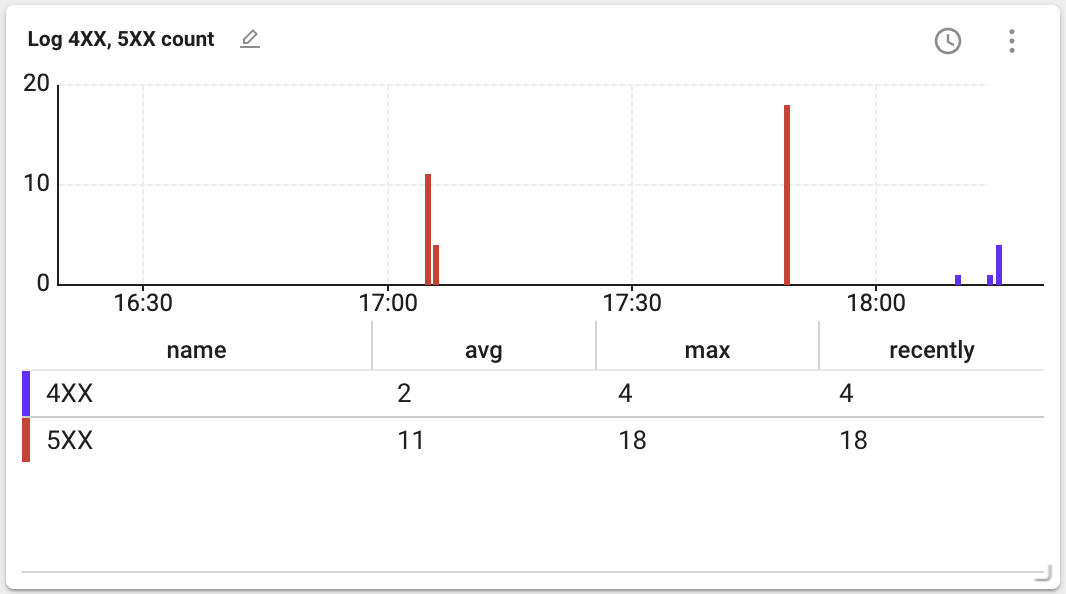
If all parsers have been registered, go to Integrated Flex Board and then create the Log 4XX, 5XX count widget.
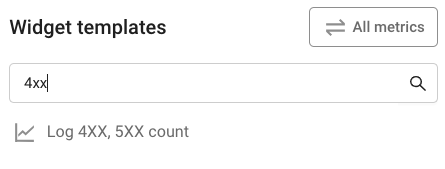
If the widget is created, you can see the following data.
-
avg: Average value of the data during the query period
-
max: Maximum value of the data during the query period
-
recently: Final value of the data during the query period
Status code success rate parser setting item
The Status code success rate parser generates HTTP request success rate data based on the status values parsed by the primary parser. To exclude specific status codes, enter the status codes to exclude. For status parsing, see 4xx, 5xx status code parser setting item.
Setting item
| Set value | Description | ETC |
|---|---|---|
| Category | It is the category to generate the request success rate data. | required |
| Log detection condition | Enter the search key and search value to be applied as the filter. The request success rate data is generated only for the log data that meets the log detection condition. If you do not enter any log detection condition, the data is generated for all logs. | optional |
| Status codes to exclude | The status codes to exclude upon generation of request success rate data. If no entry, the request success rate data is generated for all success rate status codes that correspond between 2xx and 3xx. | optional |
Data Search
If all parsers have been registered, go to Integrated Flex Board and then create the log request success rate widget.
If the widget is created, you can see the following data.
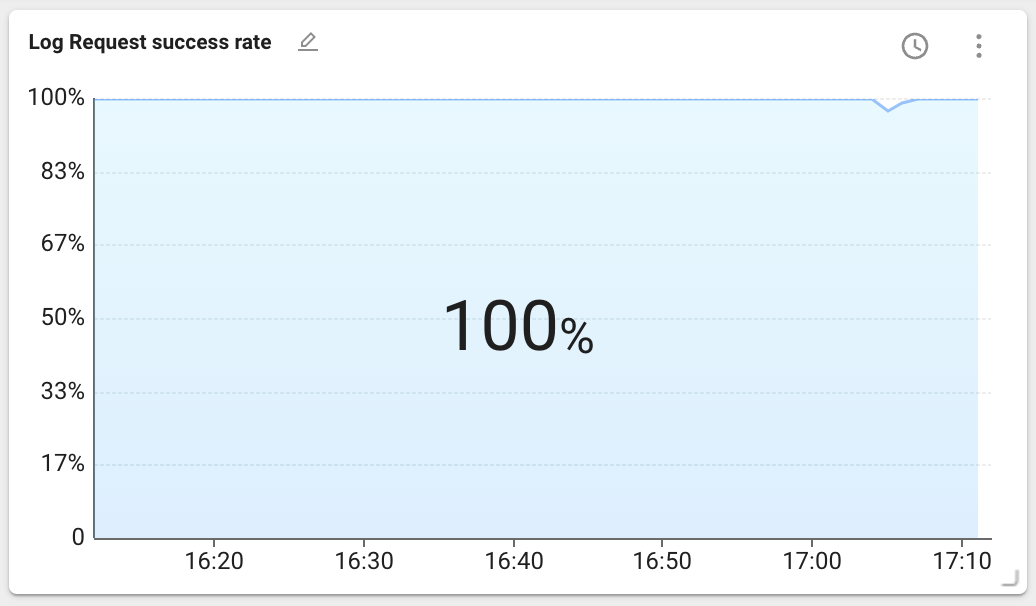
The data above the chart represents statistics for the lookup period. You can select the statistical method with the latest value, maximum value, or average value. The latest value is selected by default.
Secondary parser processors
In addition to 4xx, 5xx status code parser and Status code success rate parser, the log secondary parser provides the following field processing processors.

| Processor | Description |
|---|---|
| Contains all keywords filter | Adds a flag field to logs that contain all of the specified keywords. |
| Contains any keyword filter | Adds a flag field to logs that contain at least one of the specified keywords. |
| Rename field | Renames an existing field name to a different name. |
| Status code group classification | Automatically classifies HTTP status codes into 2xx/3xx/4xx/5xx groups. |
| URL static/dynamic classification | Classifies a URL as static content if it has an extension (.), and as a dynamic servlet if it does not. |
| URL parameter removal | Stores the value with the query parameters after ? removed from the URL. |
| Response time classification | Automatically classifies the response time (ms) into fast/normal/slow/critical ranges. |
| JSON field extraction | Extracts specific keys from a JSON string field and stores them as new fields. |
| GeoIP conversion | Converts an IP address into country/city information. |
| Custom input | Registers a processor directly with an FQN class name. |
Contains all keywords filter
Adds a flag field to logs that contain all of the specified keywords.
| Set value | Description | Default |
|---|---|---|
| Input field | The field name to search for keywords | content |
| Storage field | The field name to store the result | has_str_all |
| keyword | The list of keywords to search (enter separated by commas) | required |
Usage example: If you set the input field to content and the keywords to error, timeout, database, the has_str_all field is added only to logs that contain all three keywords.
Contains any keyword filter
Adds a flag field to logs that contain at least one of the specified keywords.
| Set value | Description | Default |
|---|---|---|
| Input field | The field name to search for keywords | content |
| Storage field | The field name to store the result | has_str_any |
| keyword | The list of keywords to search (enter separated by commas) | required |
Usage example: If you set the input field to content and the keywords to reboot, shutdown, restart, the has_str_any field is added to logs that contain at least one of the keywords.
Rename field
Renames an existing field name to a different name. If the target field name already exists, it is not overwritten.
| Set value | Description | Default |
|---|---|---|
| Source field | The existing field name to rename | required |
| New field name | The field name after renaming | required |
Status code group classification
Automatically classifies HTTP status codes into the status_2xx, status_3xx, status_4xx, and status_5xx groups.
| Set value | Description | Default |
|---|---|---|
| Input field | The field name that contains the status code | status |
| Storage field | The field name to store the group classification result | status_nxx |
Usage example: If the status value is 404, status_4xx is stored in the status_nxx field.
URL static/dynamic classification
Classifies a URL as static content if it contains an extension (.), and as a dynamic servlet if it does not.
| Set value | Description | Default |
|---|---|---|
| Input field | The field name that contains the URL | url |
| Storage field | The field name to store the classification result | url_type |
URL parameter removal
Stores only the path with the query parameters after ? removed from the URL.
| Set value | Description | Default |
|---|---|---|
| Input field | The field name that contains the URL | url |
| Storage field | The field name to store the parameter removal result | url_without_params |
Usage example: /api/v1/users?page=1&size=20 → /api/v1/users is stored in the url_without_params field.
Response time classification
Automatically classifies the response time (ms) by range. You can set the range thresholds directly.
| Set value | Description | Default |
|---|---|---|
| Input field | The field name that contains the response time (ms) | elapsed |
| Storage field | The field name to store the classification result | response_class |
| Fast upper limit (ms) | The upper limit of the fast range | 100 |
| Normal upper limit (ms) | The upper limit of the normal range | 500 |
| Slow upper limit (ms) | The upper limit of the slow range | 2000 |
The classification results based on the default values are as follows.
| Response time | Classification |
|---|---|
| 0 ~ 100ms | fast |
| 101 ~ 500ms | normal |
| 501 ~ 2000ms | slow |
| 2001ms or more | critical |
Usage example: If you filter by response_class: critical in the log explorer, you can query only the logs whose response time exceeds 2 seconds.
JSON field extraction
If a field extracted by the primary parser contains a JSON string, this extracts specific keys from that JSON and stores them as new fields.
| Set value | Description | Default |
|---|---|---|
| Input field | The field name that contains the JSON string | payload |
| Keys to extract | The list of JSON keys to extract (enter separated by commas) | required |
| Storage prefix | The prefix to prepend to the extracted key names (e.g., json_) | optional |
-
If the entire log is JSON, the primary JSON parser parses it automatically. This processor is useful for additionally parsing the JSON part contained within a text log when using the GROK primary parser.
-
To protect performance, parsing is skipped if the JSON field size exceeds 10 KB.
Usage example
payload = {"user":"alice","action":"purchase","product":"laptop","amount":45000}
If you set the input field to payload, the keys to extract to user, action, and the storage prefix to pay_, they are extracted as follows.
pay_user = alice
pay_action = purchase
GeoIP conversion
Converts an IP address into country and city information. It uses the IP2Location database to enable region-based analysis of access logs.
| Set value | Description | Default |
|---|---|---|
| Input field | The field name that contains the IP address | client_ip |
| Storage prefix | The prefix of the result field names | geo |
As a result, two fields, {prefix}_country and {prefix}_city, are created.
Usage example: If the input field client_ip value is 223.130.195.200 and the storage prefix is geo:
geo_country = KR
geo_city = Seongnam
Custom input
You can register a processor that is not in the list directly with an FQN (Fully Qualified Name) class name.
io.whatap.logsink.processor.ClassName{"param1":"value1","param2":"value2"}
The class name and parameter format must be accurate. If the input is incorrect, the processor may not work.
Secondary parser chaining
You can register multiple secondary parsers in the same category and chain them. Each processor runs in the order of registration.
2026-04-23T10:30:00.123+0900|INFO|api-01|192.168.1.10|/api/v1/orders?detail=true|200|1234|{"user":"alice","action":"purchase"}|Request processed
| Order | Parser | Input → Output |
|---|---|---|
| Primary | GROK | timestamp, level, host, client_ip, url, status, elapsed, payload, content |
| Secondary-1 | JSON field extraction | payload → user, action |
| Secondary-2 | Response time classification | elapsed → response_class (slow) |
| Secondary-3 | Status code group classification | status → status_nxx (status_2xx) |
| Secondary-4 | URL parameter removal | url → url_without_params (/api/v1/orders) |
| Secondary-5 | GeoIP conversion | client_ip → geo_country (KR), geo_city (Seoul) |
The Category of the secondary parser must be set identically to that of the primary parser. If you set a different category, the secondary parser is not applied to that log.
Fast Index Setting
Select the Fast index setting tab at the top of Log Configuration. Collecting a large number of logs can significantly decrease the log search performance. The frequently used search conditions are created as index, you can improve the log search performance for quick search. The setting items are as follows:
| Set value | Required | Description |
|---|---|---|
| Category | Mandatory | Category to be set as fast index |
| Search Key | Mandatory | Search key for fast index setting |
| Case insensitive | Option | Whether to be case sensitive |
| Rule | Mandatory | * must be included at least one. |
| Enabled | Mandatory | Active or inactive (default value is true) |
Importing/exporting log settings
You can save parser settings, Fast index setting, and filter settings in JSON file format, and apply them by importing a JSON file from other projects. You can reduce the hassle of creating the settings repeatedly for each project.
-
Add parser settings, Fast index setting, and filter settings to one project.
-
Select JSON
 on the upper right of each configuration tab.
 -
On the upper right of the Export JSON window, select Export.
-
The JSON configuration file is saved on your PC.
-
Move to another project and then go to the Log > Log setting menu.
-
Select the configuration tab where you have exported the JSON configuration file before, and then select
 .
. -
If the file selection window appears, select the JSON configuration file saved on your PC.
-
If the Import JSON window appears, check the configuration file and then select Add to list or Overwrite.
-
Select Save on the upper right of the screen.
After importing the JSON configuration file, you cannot save the imported settings unless you select Save.
Log long-term archive statistics
Select the Log long-term archive statistics tab at the top of Log Configuration. Log data is so large and difficult to retain for a long time. Using the Set log statistics data function, you can save information on how many logs that meet specific conditions are collected every 5 minutes. Even if actual log data has been deleted for a long time, you can check the trend of how many logs that meet the conditions are collected.
Adding the log long-term archive statistics
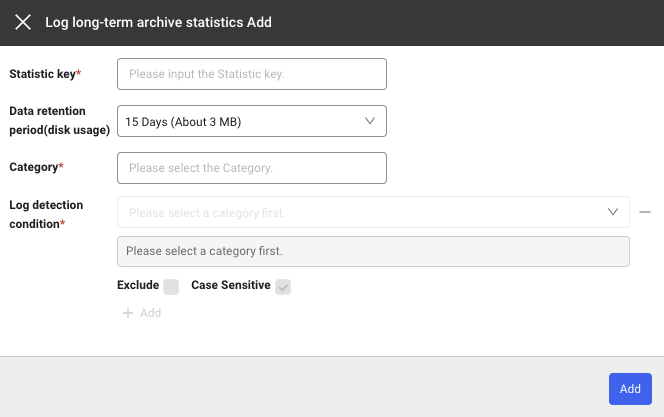
If you select + Add under the Log long-term archive statistics tab, the Log long-term archive statistics Add window appears. You can add rules by using + Add or delete the created rules by using the - icon.
Setting item
| Field | Description |
|---|---|
| Category | Category to apply the rule to. |
| Statistic Key | The same key cannot be set twice to save when a log that meets the rule is generated. |
| Log detection condition | Condition for generating log statistical data. Statistical data is generated based on how many logs that meet this condition are collected. |
| Exclude | If checked, statistical data is generated with values that do not correspond to the entered conditions. |
| Case Sensitive | Specify case sensitivity for the values of the entered log detection conditions. |
| Enabled | Active or inactive (default value is true) |
Example
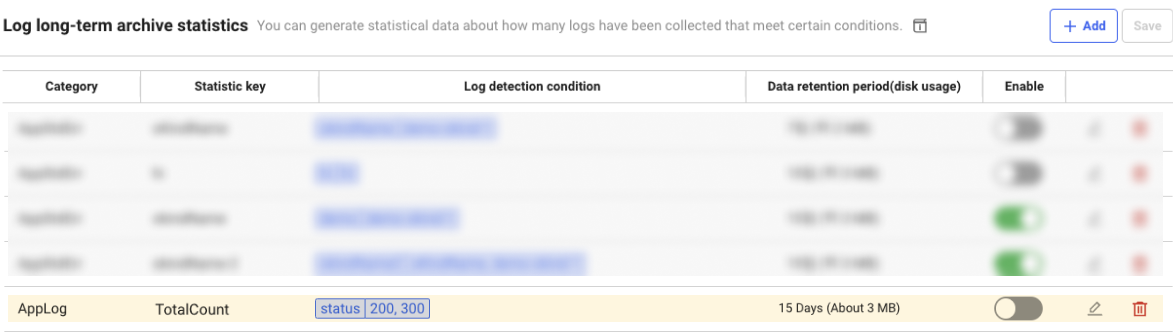
If a setting is added as follows, statistical data is generated with a key value of TotalCount for the logs whose status is 200 or 300.
Data Search
-
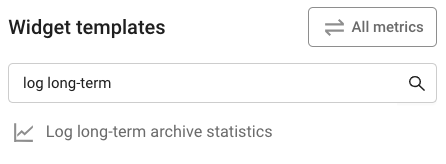
Create a widget by searching Log long-term archive statistics in Widget templates of Integrated Flex Board.
-
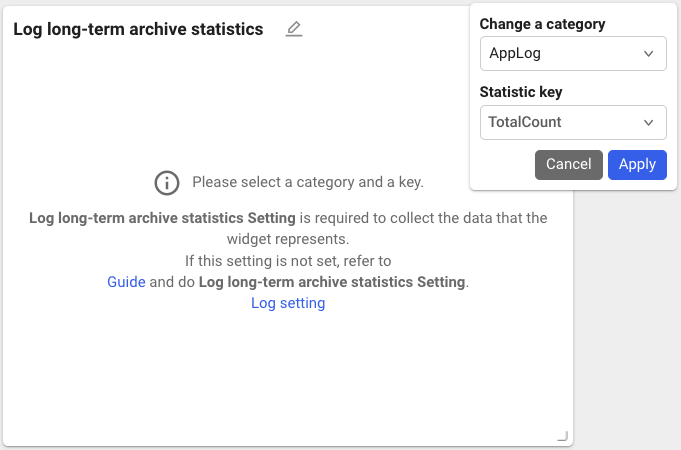
Enter the Category and Statistic key to view and then select Apply.
-
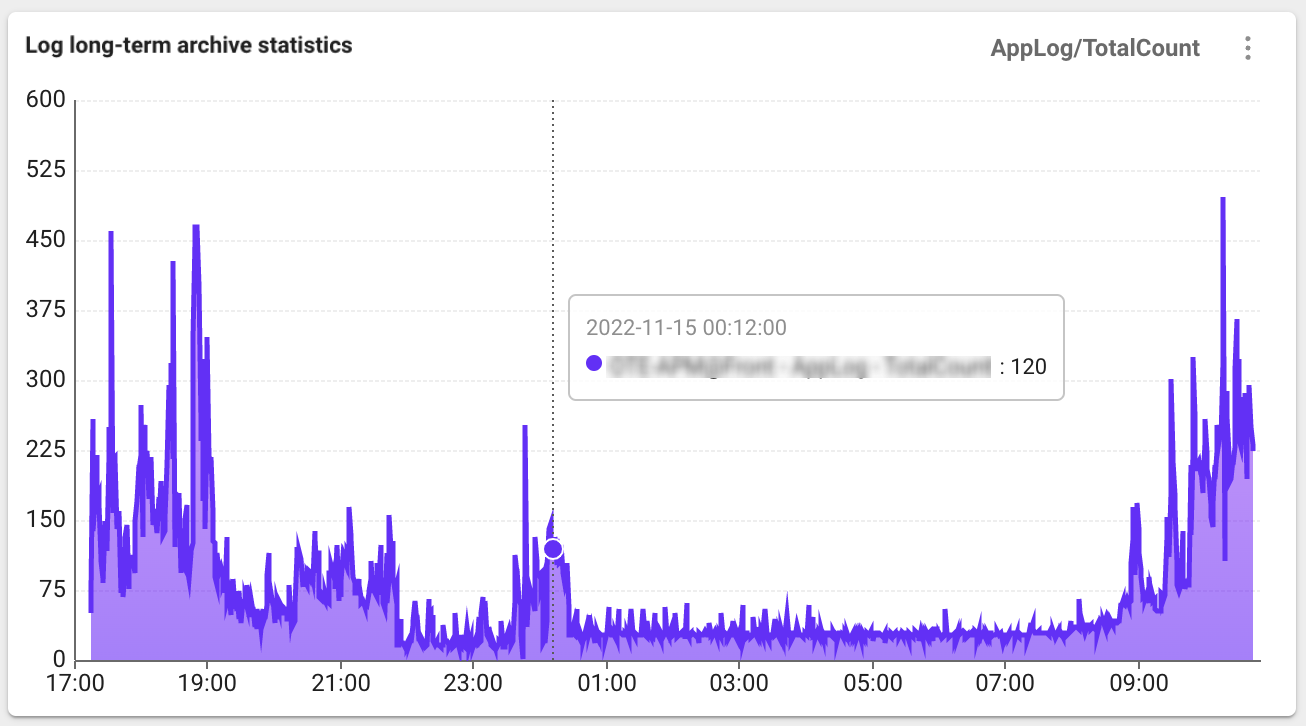
With the added settings, you can check the Log long-term archive statistics data as follows.
Personal information de-identification
In De-identification of personal information, you can mask personal information in log data or replace it with safe values.
-
Encryption: Specified sensitive data is encrypted and stored in the database.
-
Masking: When displayed on the log screen, sensitive data is masked (
***) by default. -
Substitution: Sensitive data is replaced with a user-specified value that is safe.
Personal information classification
The items classified as personal information are as follows: If there are any items that need to be treated as sensitive data in addition to personal information, mask or replace the desired items in the log data by using the De-identification of personal information feature.
- National ID number
-
Passport number
-
Driver's license number
-
Foreigner registration number
-
Credit card number
-
Bank account number
-
Biometric information
Required roles
De-identified personal information is displayed as masked. Only users with the log personal information query role can view original data through the Display personal information toggle. Adding or modifying de-identification target search keys requires the log editing role.
For more information about the log personal information query and log editing roles, see the following.
Setting the personal information de-identification
You can protect sensitive information by applying masking to new log data.
-
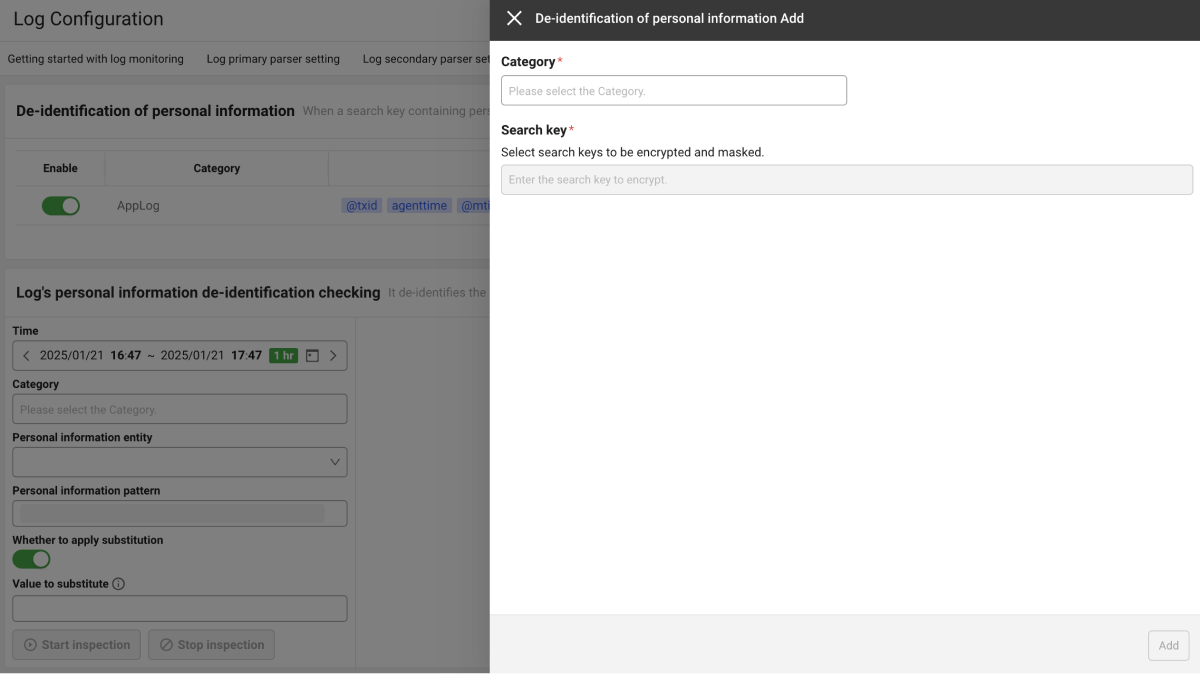
In the De-identification of personal information tab, select Add.
-
In the De-identification of personal information Add pane on the right, select Category and enter the Search key to mask.
-
Click Add to add the setting.
-
After checking the de-identified items in the De-identification of personal information list, click Save on the upper right to save the current settings.

-
The de-identified search keys are output in the format of
search key.piiin the log content. -
You can perform
Enable for de-identified items in the Enable column of the De-identification of personal information list. -
You can
 modify and remove in the edit column of the De-identification of personal information list.
-
If the search key name is specified as search-key.p in the Log primary parser setting tab, it is automatically registered as a de-identification target. You can check or disable auto-registered items in Specified search key after selecting the Category in the De-identification of personal information tab.
We recommend configuring de-identification directly in the De-identification of personal information tab rather than using the .p suffix in parser settings.
Personal information display
De-identified data is displayed as masked in the Live Tail, Log Trend, and Log Search menus. Users with the log personal information query role can click the Display personal information button in the log list to view the original data.
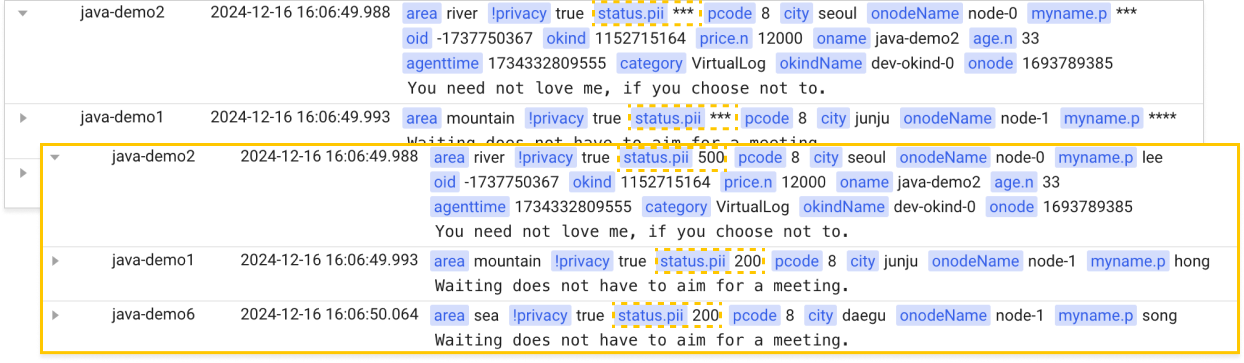
The search key specified in the De-identification of personal information tab appears in the log content of the Log menu in the format of Search key.pii.
Example of status.pii***
Checking the log's personal information de-identification
If you replace the existing data using the Log's personal information de-identification checking feature, the data cannot be recovered.
Log's personal information de-identification checking identifies personal information in existing log data and replaces it with the Value to substitute specified by the user.
Replacement by target key
If you specify a target key, only the value stored in that key is replaced, and the rest of the log content is kept as is. The target key applies to both the field value and the tag value of a log. If you do not specify a target key, personal information is identified and replaced across the entire log content, the same as before.
Replacement applies only to the stored log data. The original value may remain in the search index even after replacement.
You specify the target key in the Target key input field of the log personal information de-identification check form. On the screen, field and tag are not distinguished and are entered as a single target key.
-
Specify the start time and end time.
-
Set values for Category .
-
Select Personal information entity from the examples or Direct Input.
NoteWhen selecting Direct Input, directly enter a regular expression pattern to identify personal information.
-
Select whether to replace personal information, if it is identified via the Whether to apply substitution toggle.
-
Enter Value to substitute to change the string identified by the regular expression pattern in the existing log.
Note-
Value to substitute must not be longer than the original value.
-
When enabling the Whether to apply substitution toggle, be sure to enter Value to substitute.
-
-
Enter the conditions and then select Start inspection.
NoteYou can stop this step at any time by clicking Stop inspection during the checkup.
-
When applying substitution, enter Replace in the Start of inspection for personal information de-identification confirmation window, and then click the OK button.

-
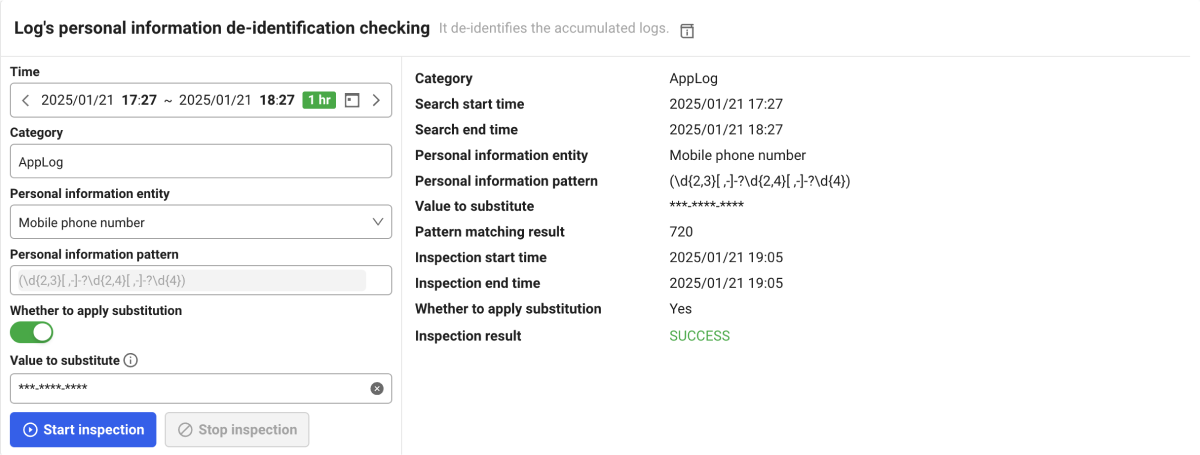
After the inspection is finished, you can see Inspection result on the right as in the example image.
-
Category: It displays the categories checked.
-
Search start time and Search end time: It displays the time range for the checkup.
-
Personal information entity: It displays the personal items that have been checked.
-
Personal information pattern: It displays the regular expression pattern used.
-
Value to substitute: It displays the applied replacement value.
-
Pattern matching result: The number of personal data identified is displayed. You can check the sample logs by clicking Check results.
-
Inspection result: It displays the result where personal information has been identified.
SUCCESS(check success),FAILED(check failure),STOP(check stop),TIMED_OUT(check ended due to timeout)
-
Check inspection history
To view the results of past checks after performing de-identification check for the log's personal information, click the Check inspection history button at the upper right. You can trace the substitution history, inspection time, and applied personal information items. You can also download the list information in CSV file format by clicking the  CSV button at the upper right of the Check inspection history window.

Personal information pattern
Examples of regular expression patterns used to identify personal information in the existing log are as follows:
| Personal information pattern | Personal information example | Regular expression pattern | Replacement value |
|---|---|---|---|
| National ID number | 123456-1234567 | (?<!w)d{2}(0[1-9]|1[0-2])([0-2][0-9]|3[0-1])-[1-4]d{6}(?!w) | ******-******* |
| Passport number | M1234567 | ([MSRODTC][0-9]{7}\b) | ******** |
| Driver's license number | 01-23-456789-00 | (?<!w)d{2}-d{2}-d{6}-d{2}(?!w) | **-**-******-** |
| Foreigner registration number | 987654-1234567 | (?<!w)d{6}-?[5-8]d{6}(?!w) | ******-******* |
| Credit card number | 1234-5678-9012-3456 | (?<!w)d{4}-d{4}-d{4}-d{4}(?!w) | ****-****-****-**** |
| Mobile phone number | 010-1234-5678 | (?<!w)(+82-?1[016789]-?d{3,4}-?d{4}|01[016789]-?d{3,4}-?d{4})(?!w) | ***-****-**** |
| Email address | example@domain.com | ([a-zA-Z0-9][a-zA-Z0-9._%+-]*@[a-zA-Z0-9.-]+.[a-zA-Z]{2,}) | ***@***.*** |
| Bank account number | 123456-01-654321 | (?<!w)d{6}-d{2}-d{6}(?!w) | ******-**-****** |
| Business registration number | 111-11-01111 | (?<!w)d{3}-d{2}-d{5}(?!w) | ***-**-***** |
| Corporate registration number | 111111-1111111 | (?<!w)d{6}-?d{7}(?!w) | ******-******* |