Slow Query
It reads the slow query log provided by the database and displays it as a visual chart. The threshold time for slow queries is set in the DB parameters, and it shows the SQL from the slow query log.
Even for the same SQL, the SQL Elapse Map metric in the Monitoring Multiple Instances menu may show discrepancies because the time is calculated based on active sessions.
Before starting
To use the Slow Query menu, set the following in the cubrid_broker.conf file.
SLOW_LOG=ON
LONG_QUERY_TIME=3
To monitor slow queries, be sure to install the XCUB agent on the DB server. For more information about XCUB agent installation, see the following.
Basic screen guide
-
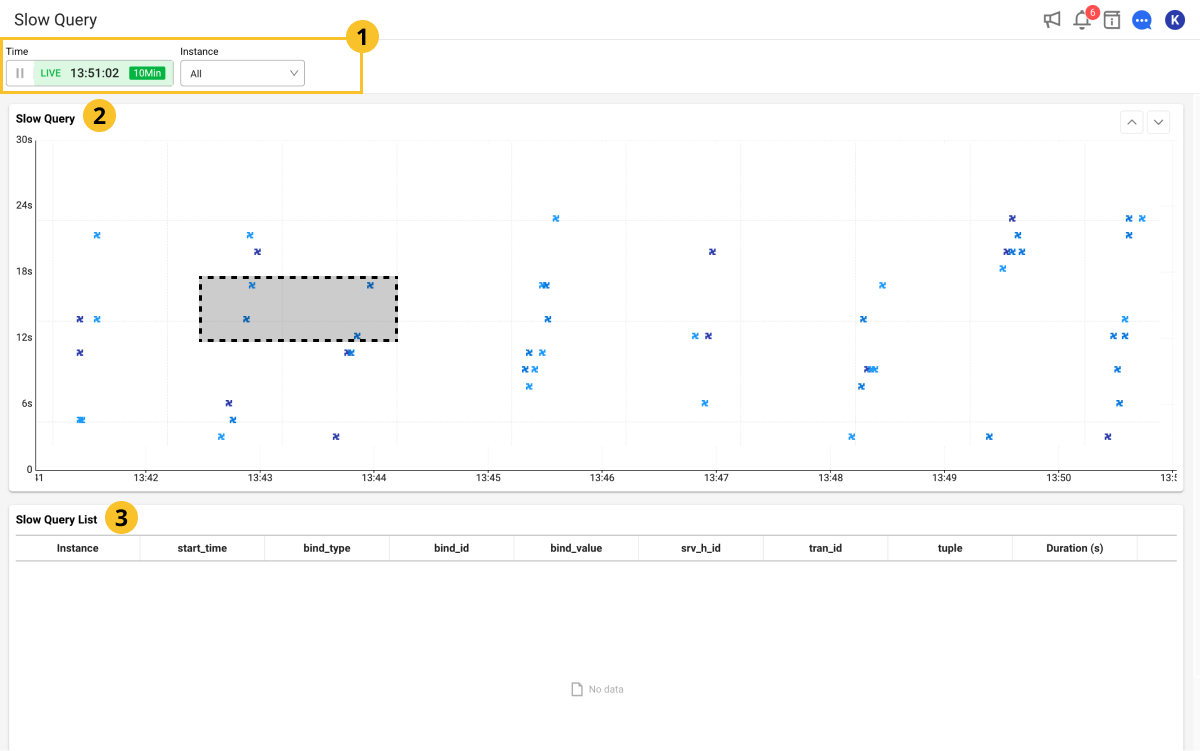
 Time / Instance
You can change the duration of an active session or select individual instances.
NoteFor more information on how to use the Time option.
-
 Slow Query
It displays the times of slow queries with a chart. If you drag a specific area with you mouse, you can see information details in Leader line 3 Slow Query List.
-
 Slow Query List
The slow query details on the area dragged on the Slow Query chart are displayed in the list. If SQL is selected, you can see the (query)'s full text and plan information.
View SQL Details
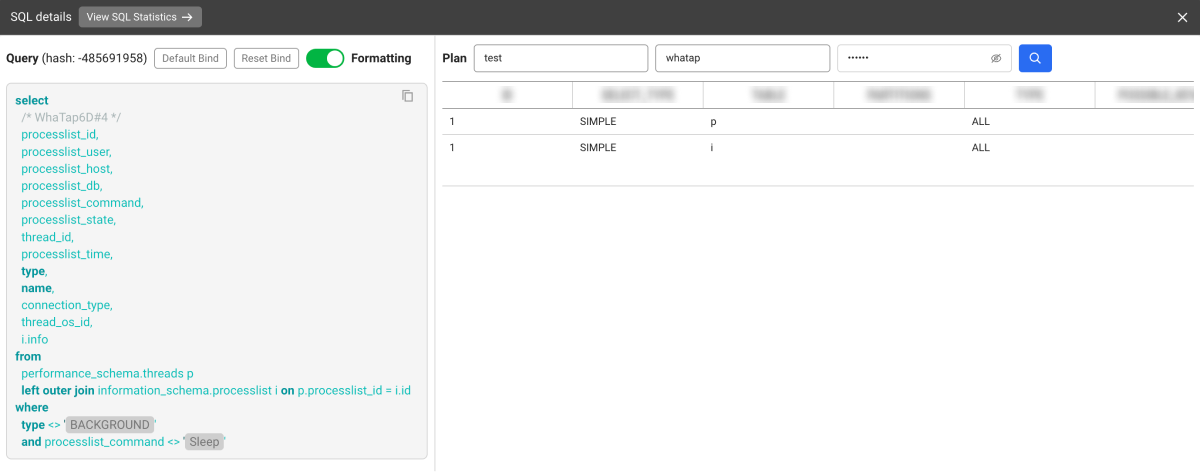
To check the SQL query information of the current running session, select the SQL column in the Slow Query List section. The SQL details window appears. You can check the SQL query statements and plan information.
Click the View SQL Statistics → button to move to SQL statistics,
where you can view statistical information related to the selected SQL query.
-
Default Bind: You can bind the part set as a variable in the query sentence to the default value.
-
Reset Bind: You can release the bound default value and check the variable.
-
Formatting: You can improve readability by applying indentation and formatting to a SQL query statement.
- Plan: To check plan information, enter DB Name, User Name, and Password, and then select
 .
.
Viewing the default plan
When creating the default plan user file, you can configure the agent to automatically view the plan by using the predefined DB information. After checking the box for Default plan inquiry, search for the plan through the specified DB connection information as follows.
- Linux
- Windows
-
Add the
plan_dboption to the agent configuration (whatap.conf) file and then enter the DB name.whatap.confplan_db=(dbname) -
After configuring the DB, use the
planuid.shscript to set the user and password../planuid.sh user pwdNoteIf the user (
user) and password (pwd) include special characters, add backslashes (\) before each special character.e.g.
user$example→user\$example
-
Add the
plan_dboption to the agent configuration (whatap.conf) file and then enter the DB name.whatap.confplan_db=(dbname) -
After configuring the DB, use the
planuid.batscript to set the user and password.planuid.bat user pwd
Analyzing with AI
Click the WhaTap AI button on the screen to open the WhaTap AI chat window, where the queried screen data is summarized and the analysis result is shown as a conversation. After reading the result, you can continue with follow-up questions in the same conversation.
-
The data used for the analysis is the top 20 items with the longest elapsed time among the items selected on the scatter plot.
-
The analysis target is the data queried on the screen. If you change the query conditions and analyze again, the analysis is based on the changed data.
-
The conversation history is recorded in the
AI Analysis - {screen name}format.