Installation
To use the WhaTap monitoring service, after Sign in, create a project and install the agent to the target server. For more information about registration as a member, see the following.
Role
The Edit Project role is required for installation.
See the following video guide for the installation procedure.
Preliminary checking
To collect AWS logs, additional resources are required. WhaTap provides WhatTap Forwarder through the AWS Lambda function so that log information output from your AWS environment can be obtained and transmitted to the WhaTap collection server. Use AWS CloudFormation to run Whatap Forwarder in your AWS environment.
WhatTap Forwarder depends on the lifecycle of the AWS Lambda function. Concurrency constraints can be overcome through control factors. Adjust the following control factors depending on the number of logs of your environment.
ReservedConcurrency: Number of concurrent executionsTimeout: Retention time when there is no log inflow to the Lambda functionMemory: Memory allocated to the Lambda functionConnectionTimeout: Timeout when sending logs to the WhaTap collection server
AWS resource logs supported by AWS Log
CloudWatch Log Group
- WAF
- API Gateway: The log group names must be set to api-gateway/gateway resource for collection.
- RDS
- DocumentDB
- REDIS
- EKS
- ECS
S3
- VPC: S3 bucket names must be set to VPC resource for collection of logs.
- CloudFront: While setting logs, the default prefix is cloudfront. This can be changed when setting parameters.
- ELB
Creating a project
Create a project before installing the agent.
-
Log in WhaTap monitoring service.
-
To create a project, on the left of the screen, select All Projects > + Project.
-
Select a product in Select product for installation.
-
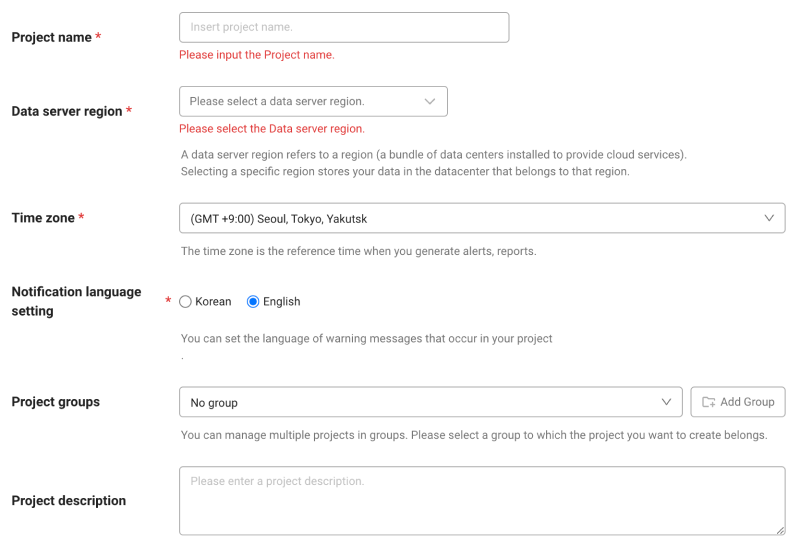
Configure the settings for Project name, Data server region, and Time zone.
-
In Notification language setting, select the language for alert messages.
-
After all settings are finished, select Creating a project.
-
A Data server region refers to a region (a bundle of data centers installed to provide cloud services). Selecting a specific region stores your data in the datacenter that belongs to that region.
-
Time zone is the reference time for generating alerts and reports.
-
To group multiple projects for management, select a group from Project groups or add a group. For more information about grouping, see the following.
-
To add a project with an organization selected, Groups of organization must be set.
Checking the project access key
Project access key is the unique ID for activating the WhaTap services.
In the installation guide section, select Getting the access key. After automatic reception of project access key, proceed to the next step.
After a project has been created, the Agent installation page appears automatically. If the Agent installation does not appear, select All projects on the left and then select a newly created project.
Project access key
If you have already been granted a project access key, the key appears instead of the button.
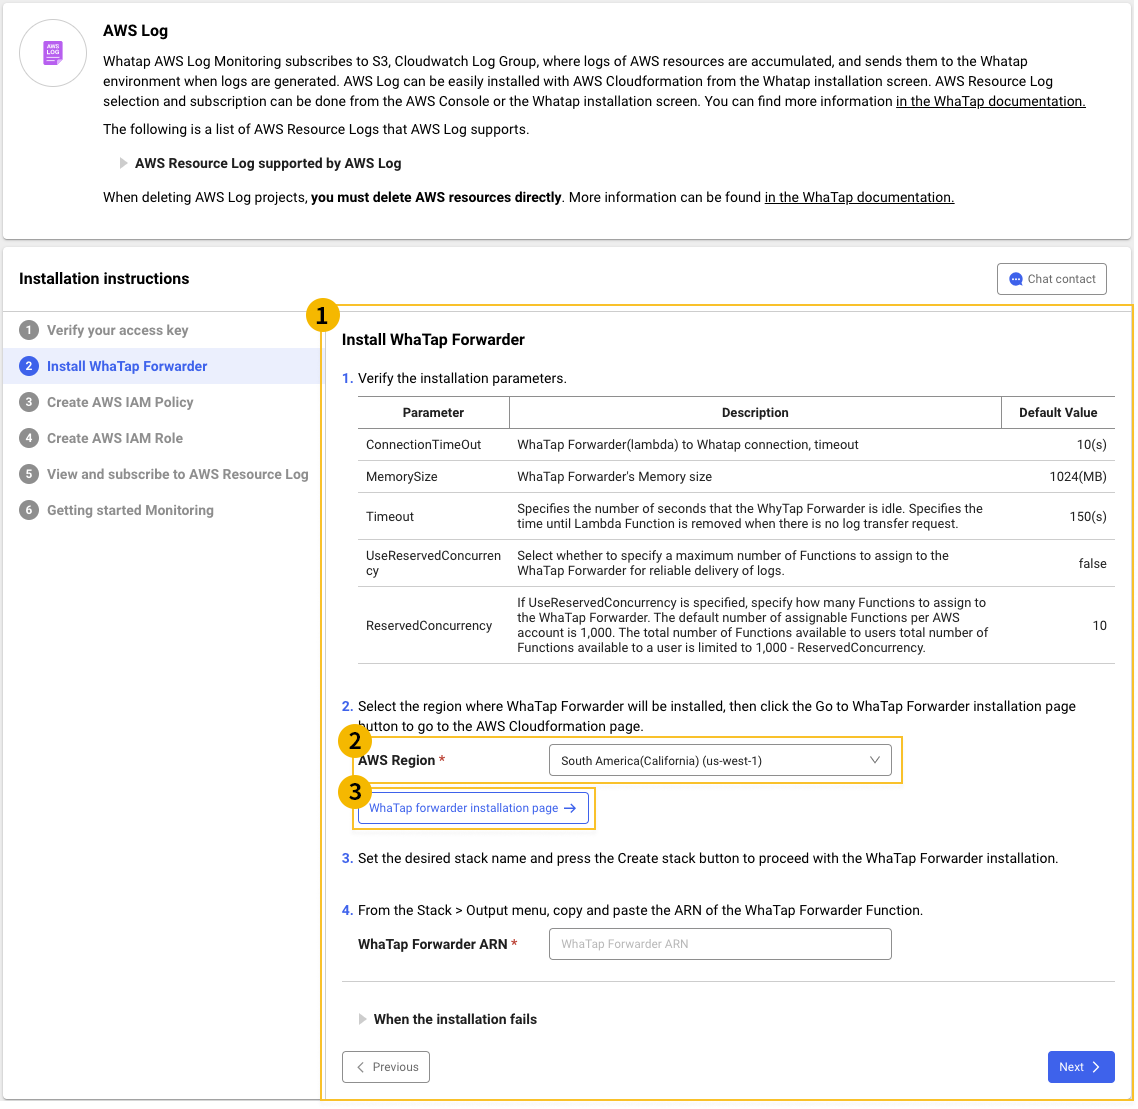
WhaTap Forwarder installation
Install the WhatTap Forwarder for log transmission by using the AWS Lambda function. Proceed with the installation in AWS CloudFormation. Be sure to see the WhatTap Forwarder Installation tab in the WhaTap Agent Installation > Install guide section. The following installation inputs are required.
-
AWS Region
Select an AWS region to install the Whatap Forwarder in. It must be the same as that of resources to collect.
-
CloudFormation Stack Name
Set the name of the CloudFormation Stack used to install or uninstall the Whatap Forwarder.
-
ConnectionTimeOut Second
Default
10Set the timeout period (second) when the Whatap Forwarder connects the WhaTap collection server.
-
MemorySize Int
Default
1024Set the memory allocation size (MB) of the Whatap Forwarder.
-
Timeout Second
Default
150Set the idle period for the Whatap Forwarder in seconds. Specify the time before the Lambda function is removed when there is no log transmission request.
-
UseReservedConcurrency Boolean
Default
falseSet whether or not to specify the maximum number of functions to be assigned to the Whatap Forwarder for stable transmission of logs.
-
ReservedConcurrency Second
Default
10If the value of
UseReservedConcurrencyistrue, specify the number of functions to be assigned to the WhaTap Forwarder. The number of assignable functions per AWS account is 1,000. The total number of functions that a user can use is limited to the value obtained by subtracting theReservedConcurrencyvalue from the total number of assignable functions per account (1,000000). -
cloudfrontPrefix String
Default
cloudfrontIt indicates the prefix value set when sending logs from CloudFront to S3.
Installing the CloudFormation stack
-
In the
 WhaTap Forwarder installation tab of the Install guide section, select
  AWS Region.
 -
Select
 WhaTap Forwarder installation page to go to the CloudFormation execution page.
 -
Specify the installation options on the CloudFormation launch page. Default parameters have been set.
-
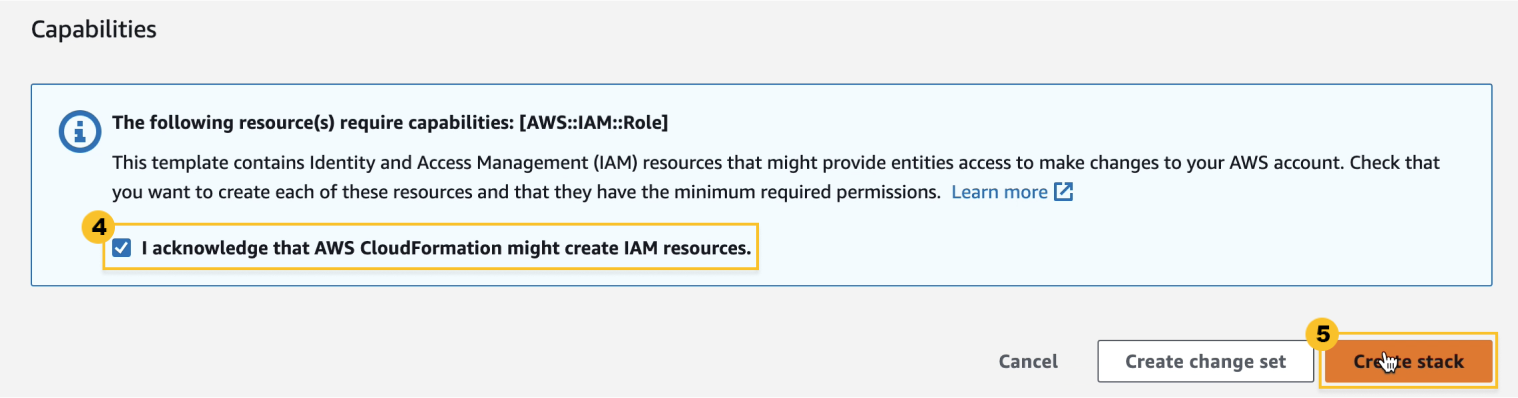
At the bottom, check
 Approve Check and then select
  Create stack. Installation takes about 2 minutes.
Getting the ARN of the WhaTap Forwarder
-
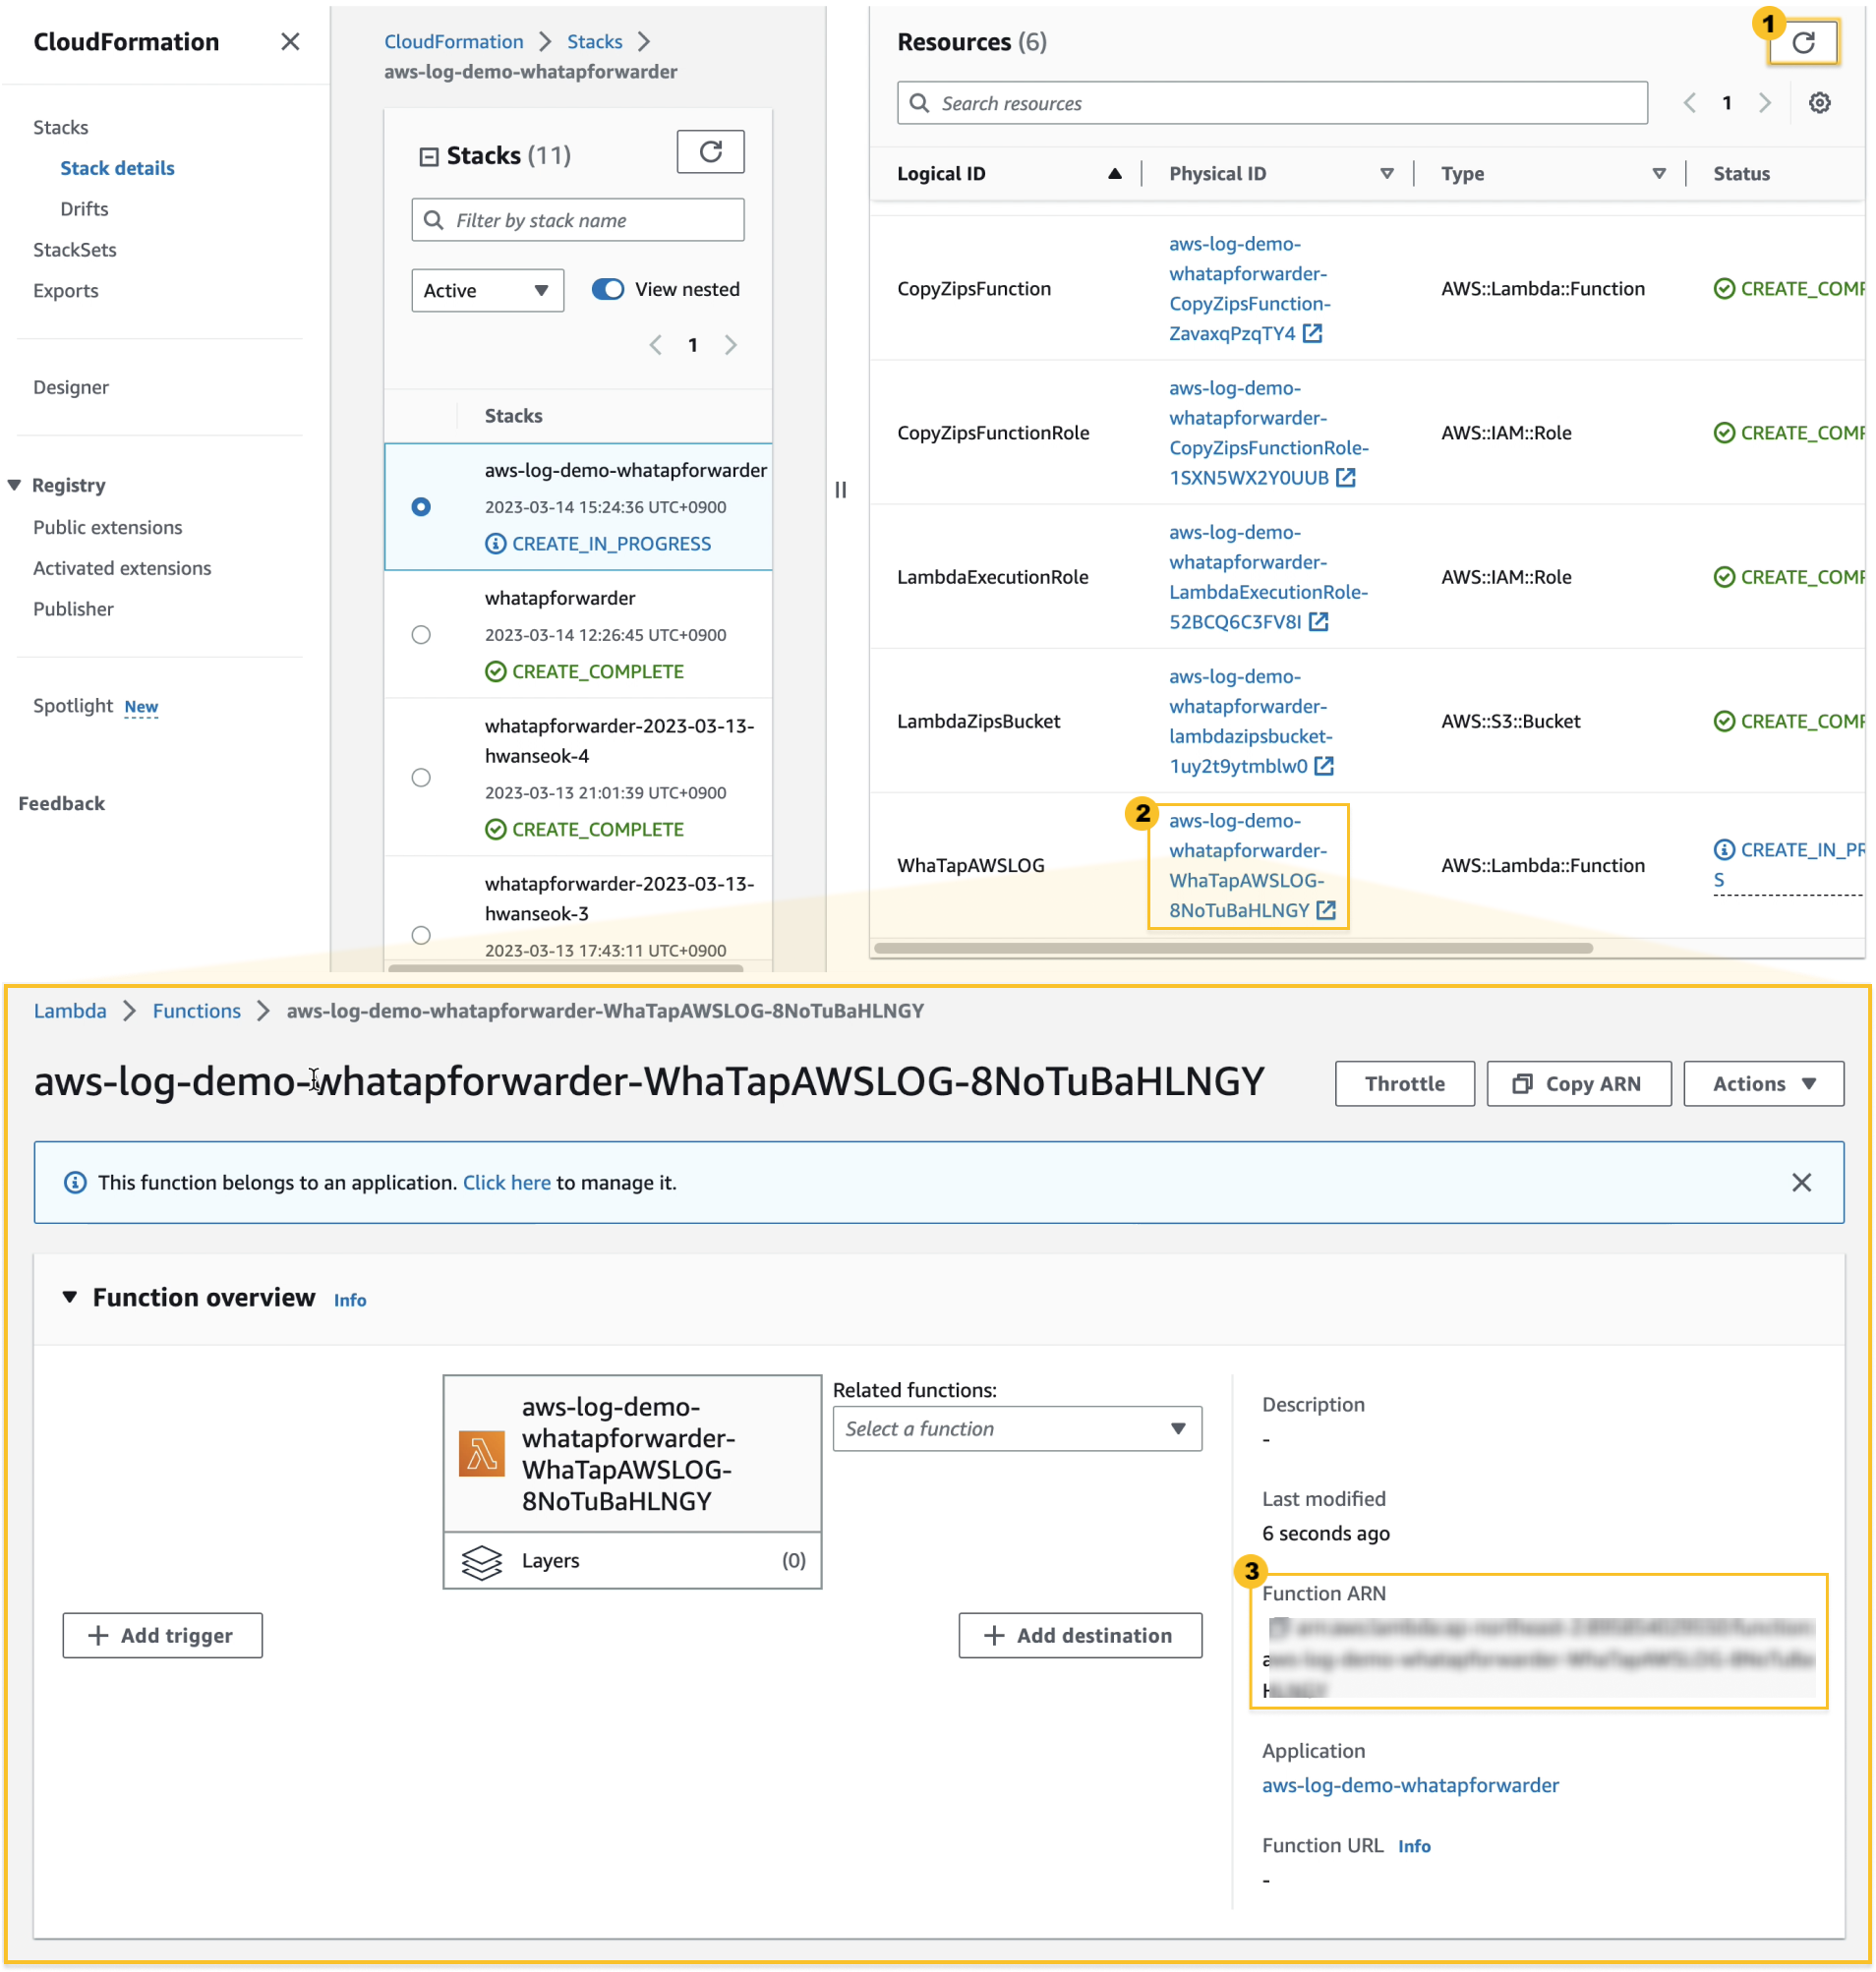
Select
Update on the upper right to check the progress of the stack creation.NoteYou can get the ARN of the Whatap Forwarder if the final step of the stack installation, the creation of the WhataTapAWSLog, is in progress.
-
Select
Pyhsical ID of the resource whose logical ID is designated as WhatapAWSLOG to go to the detail screen of Whatap Forwarder. -
You can check
Function ARN (WhatTap Forwarder ARN) in the Description area on the right of the detail screen. -
Copy it for the next step.
Checklist in case of an installation failure
Role setting
If the following error message occurs, check if any permission is granted.
User {user name} is not authorized to perform
-
Required roles
- Policies for CloudFormation installation
- Policies for fetching the AWS log codes
- Policy to create AWS logs and grant required roles
- Policy for creating a policy in AWS logs
AWS Log Required roles{
"Version": "2012-10-17",
"Statement": [
{
"Sid": "VisualEditor0",
"Effect": "Allow",
"Action": [
"iam:GetRole",
"iam:GetRolePolicy",
"iam:CreateRole",
"iam:PutRolePolicy",
"iam:PassRole",
"iam:AttachRolePolicy",
"cloudformation:ListStacks",
"cloudformation:DescribeStackResource",
"cloudformation:GetTemplateSummary",
"cloudformation:DescribeStacks",
"cloudformation:DescribeStackEvents",
"cloudformation:CreateStack",
"cloudformation:GetTemplate",
"cloudformation:ValidateTemplate",
"lambda:CreateFunction",
"lambda:InvokeFunction",
"lambda:GetFunction",
"lambda:AddPermission",
"s3:CreateBucket",
"s3:GetObject"
],
"Resource": "*"
}
]
}
Stack name
Change the CloudFormation stack name when the following error message occurs.
Stack {stack name} already exists
Creating the AWS IAM policy and role
The IAM policy and IAM role are required for the WhaTap Forwarder to receive logs from your AWS environment resources. If you have not created any IAM policy and IAM role for setting the Whatap Forwarder before, create new ones.
Creating the IAM policy
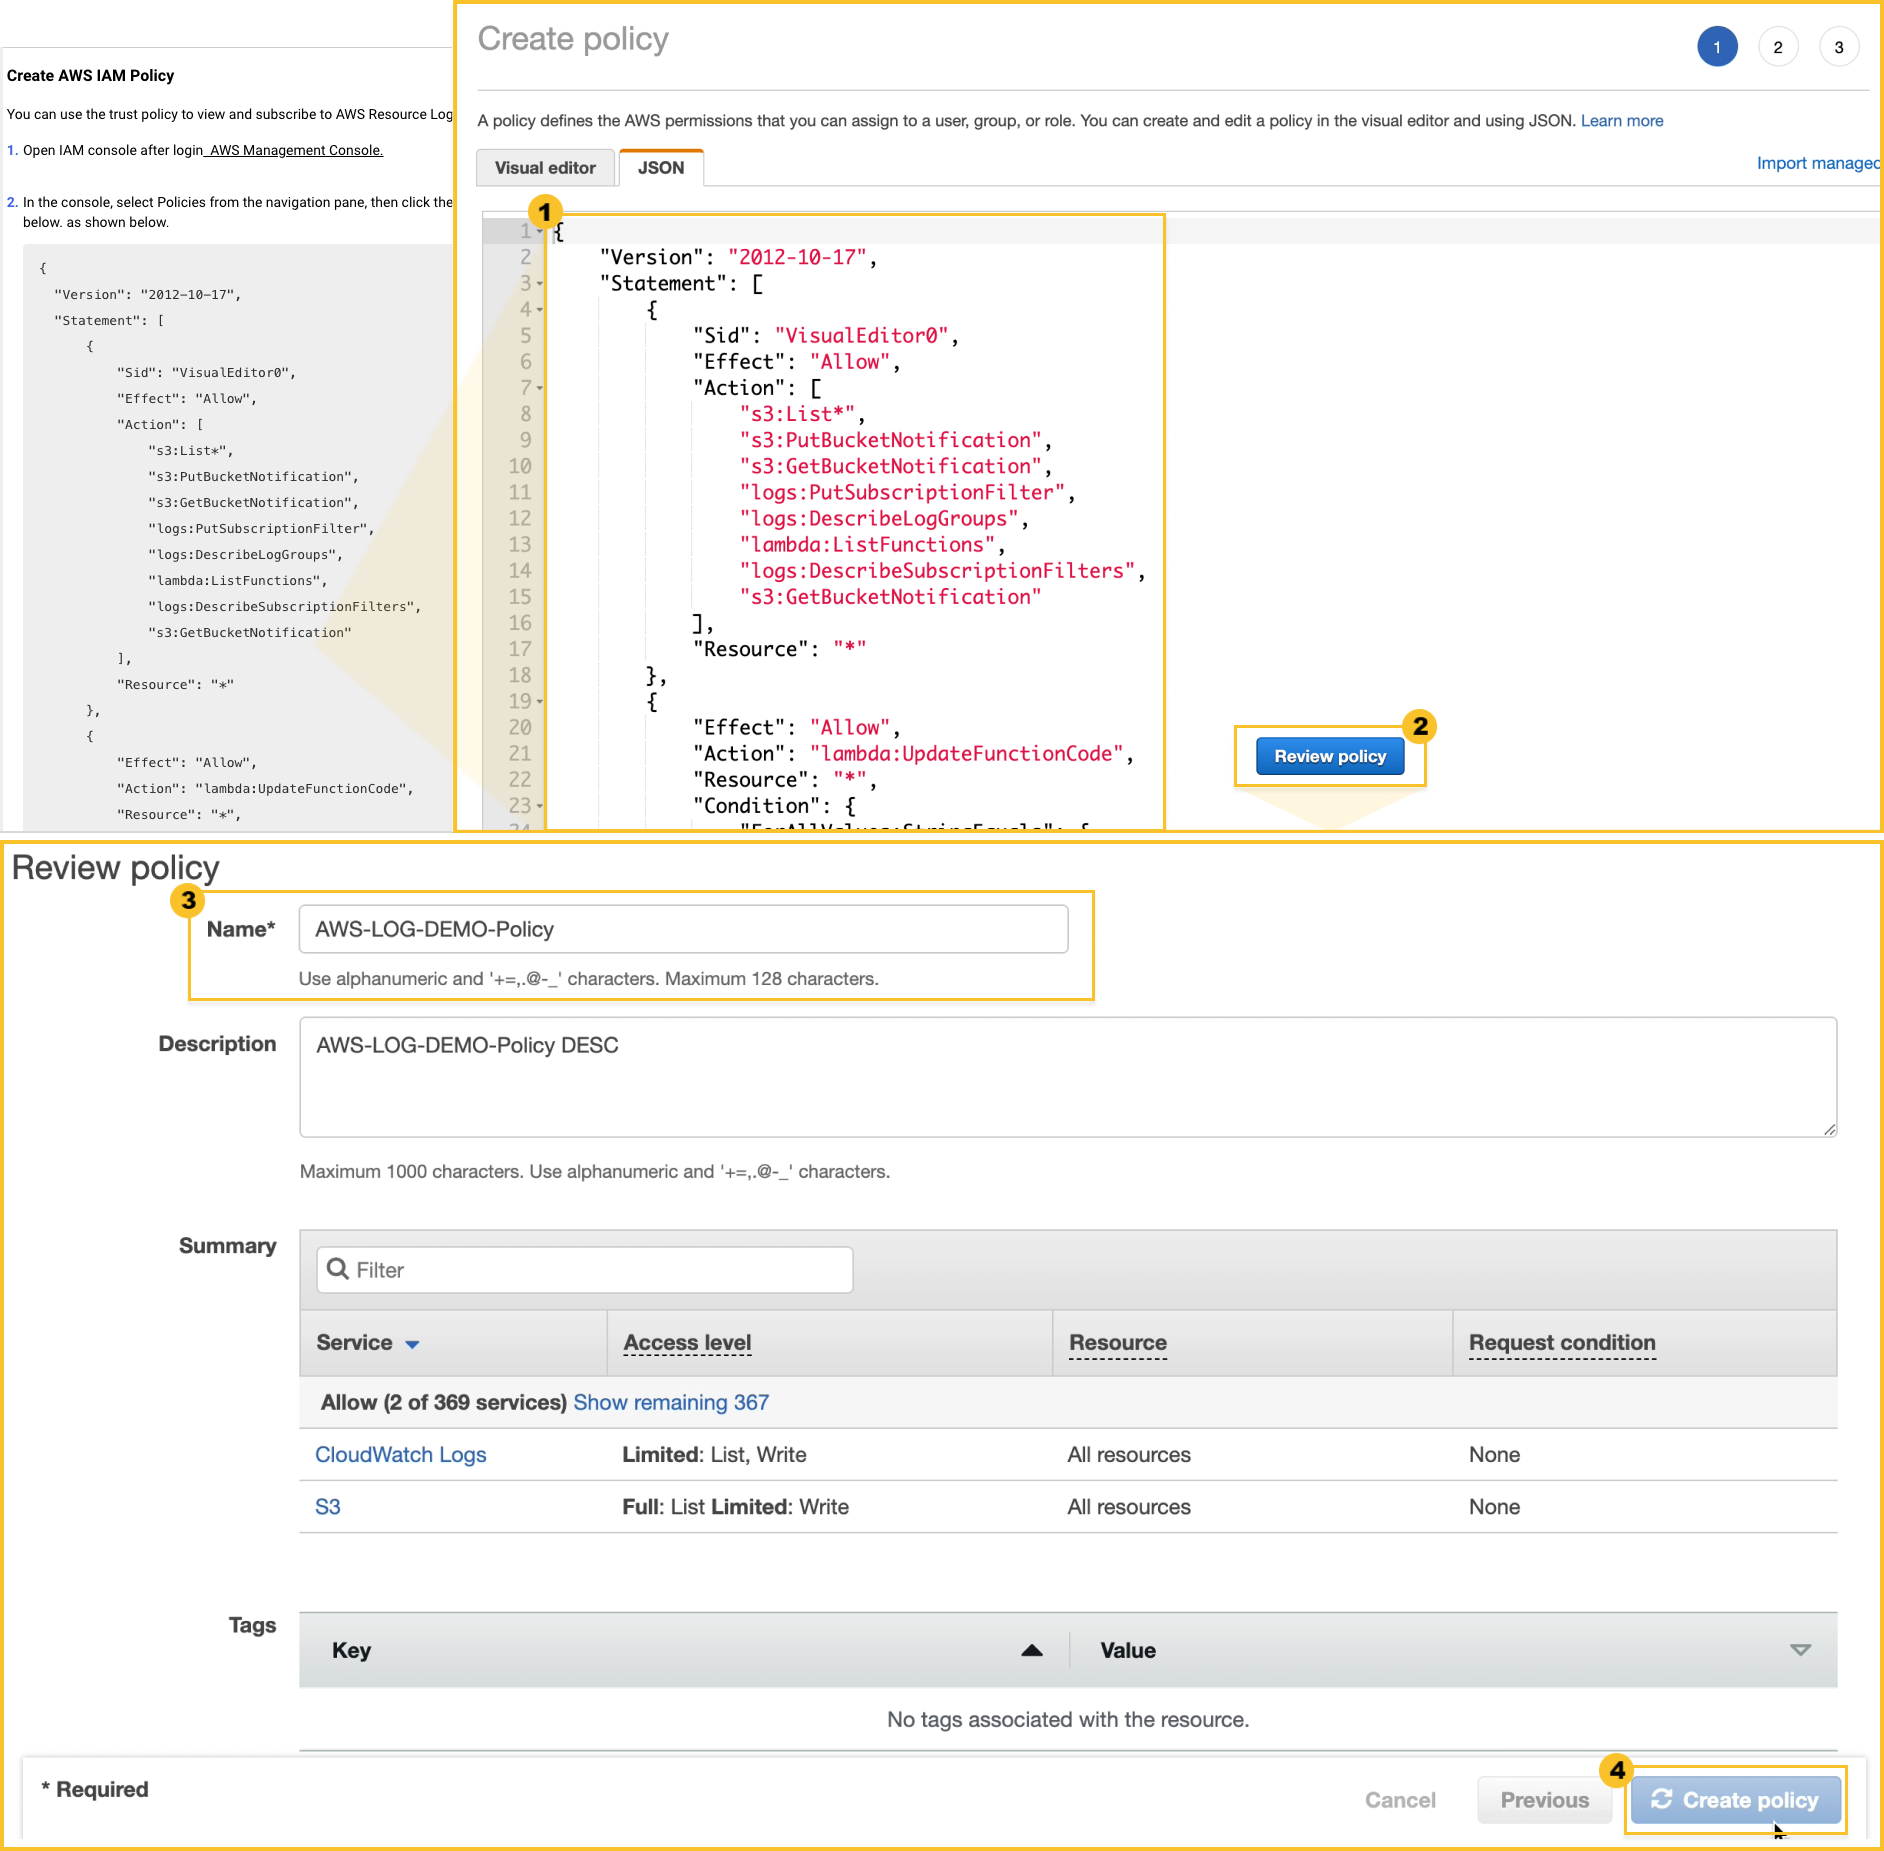
Specify whether or not to allow the access target resource. See the Create AWS IAM Policy tab in the WhaTap Agent Installation > Install guide section to proceed on. If any policy is missing, the setup does not work properly.
-
Log in to the AWS management console and open the IAM console.
-
Select the Policy tab on the IAM console.
-
Select Create Policy and copy the following policy and paste it into the
JSON tab.IAM policy{
"Version": "2012-10-17",
"Statement": [
{
"Sid": "VisualEditor0",
"Effect": "Allow",
"Action": [
"s3:List*",
"s3:PutBucketNotification",
"s3:GetBucketNotification",
"logs:PutSubscriptionFilter",
"logs:DescribeLogGroups",
"lambda:ListFunctions",
"logs:DescribeSubscriptionFilters",
"s3:GetBucketNotification"
],
"Resource": "*"
},
{
"Effect": "Allow",
"Action": "lambda:UpdateFunctionCode",
"Resource": "*",
"Condition": {
"ForAllValues:StringEquals": {
"aws:TagKeys": "WhaTapForwarder"
}
}
},
{
"Effect": "Allow",
"Action": "s3:GetObject",
"Resource": [
"arn:aws:s3:::whatapforwarder",
"arn:aws:s3:::whatapforwarder/whatap.zip"
]
}
]
} -
Select
Review Policy at the bottom. -
Specify the
policy name. -
Select
Create Policy at the bottom.
Roles in the IAM policy
The IAM policy specifies the following roles:
- Role to view the S3 storage list
- Role to get notifications when objects are mounted in S3 buckets
- CloudWatch log subscription filter role
- Role to query the CloudWatch log group
Creating the IAM role
Specify which AWS accounts are granted roles for the created resources and map the IAM policy you just created. See the Create AWS IAM Role tab in the WhaTap Agent Installation > Install guide section to proceed on.
-
Log in to the AWS management console and open the IAM console.
-
Select Roles in the console navigation bar, and then select
Create role.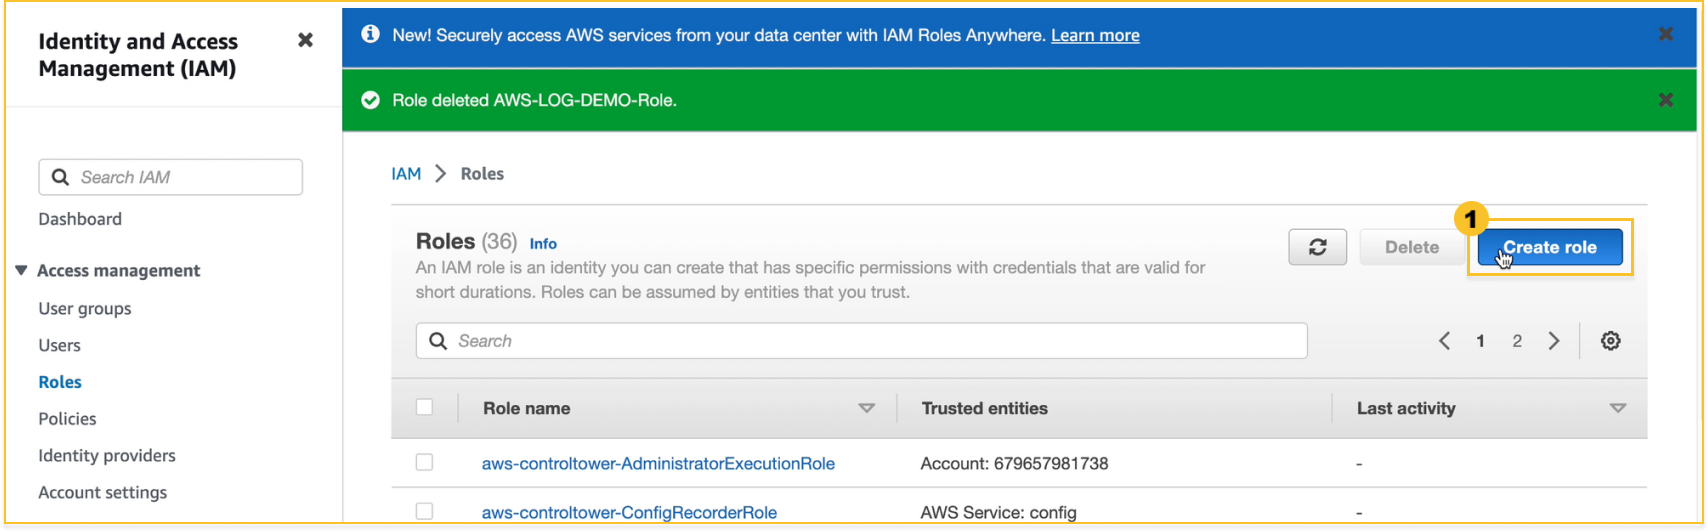
-
In Select type of trusted entity, select
AWS account and then enter the WhaTap account (911937781722) in Account ID.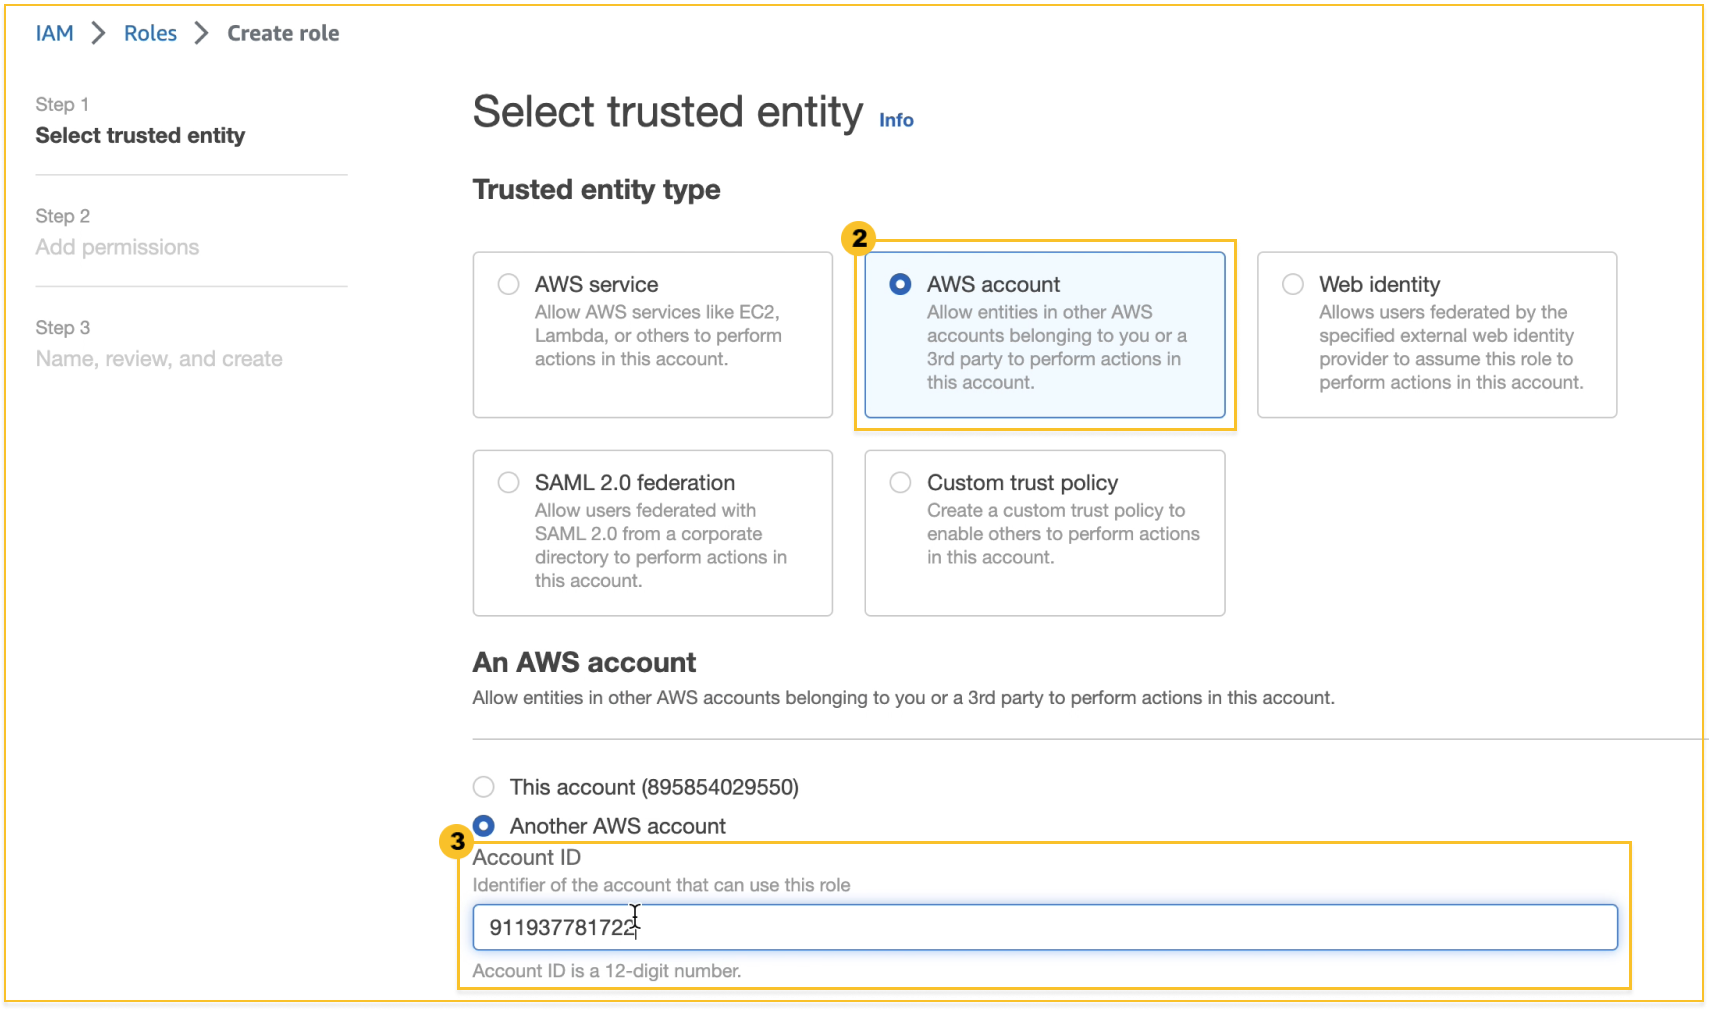
-
Select Next at the bottom.
-
Select the
IAM policy created in the previous step.
-
Select Next at the bottom.
-
Specify the
name for the role of IAM.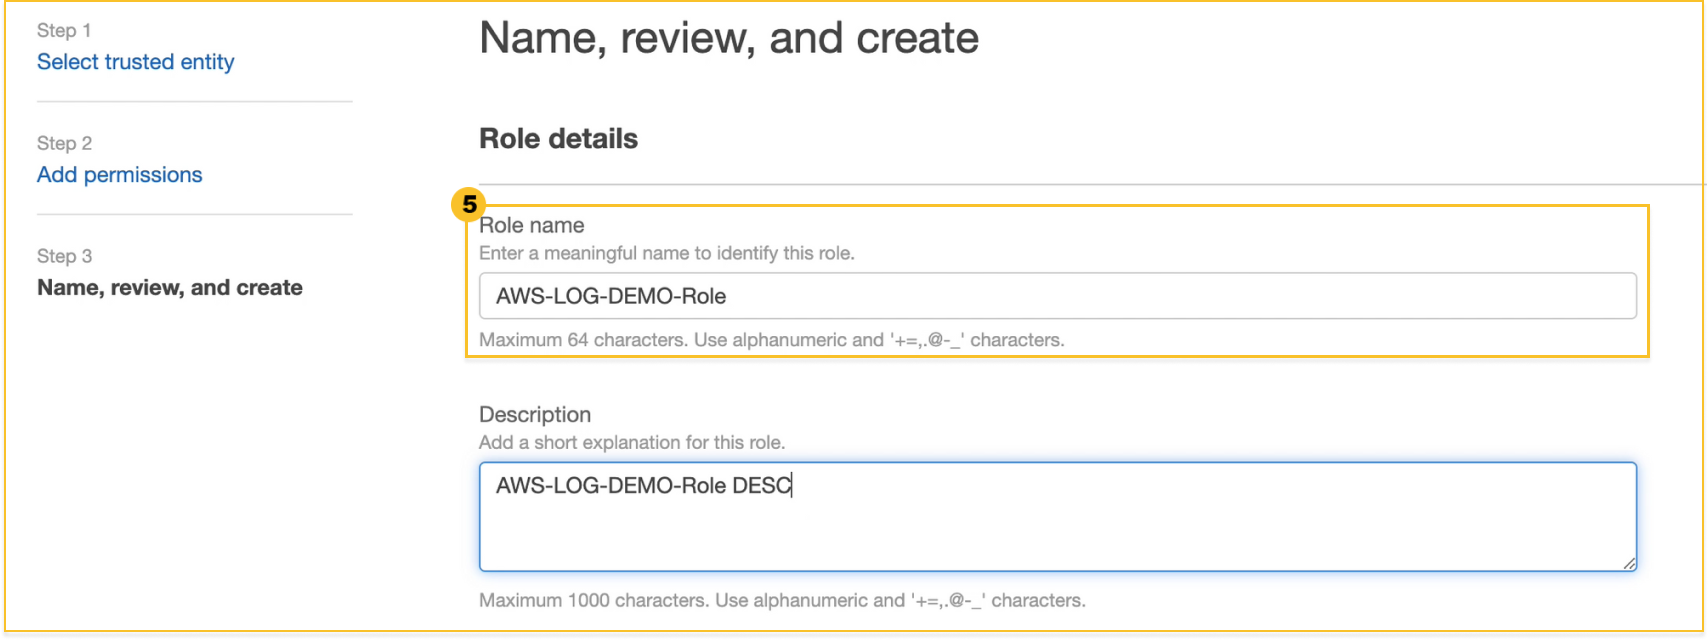
-
Select Create Role.
-
You can check
 IAM Role ARN created in the Information tab.
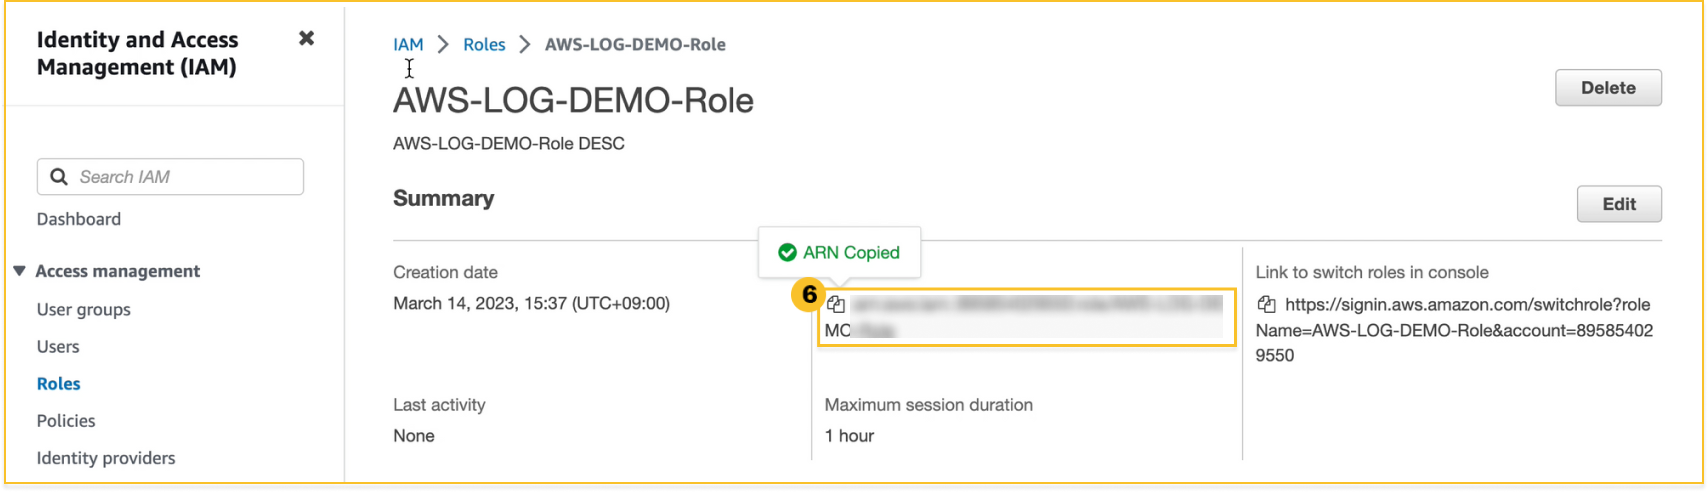
-
Copy IAM Role ARN for the next step.
AWS Log Subscription
You can subscribe to CloudWatch Log and Archive Log mounted to S3.
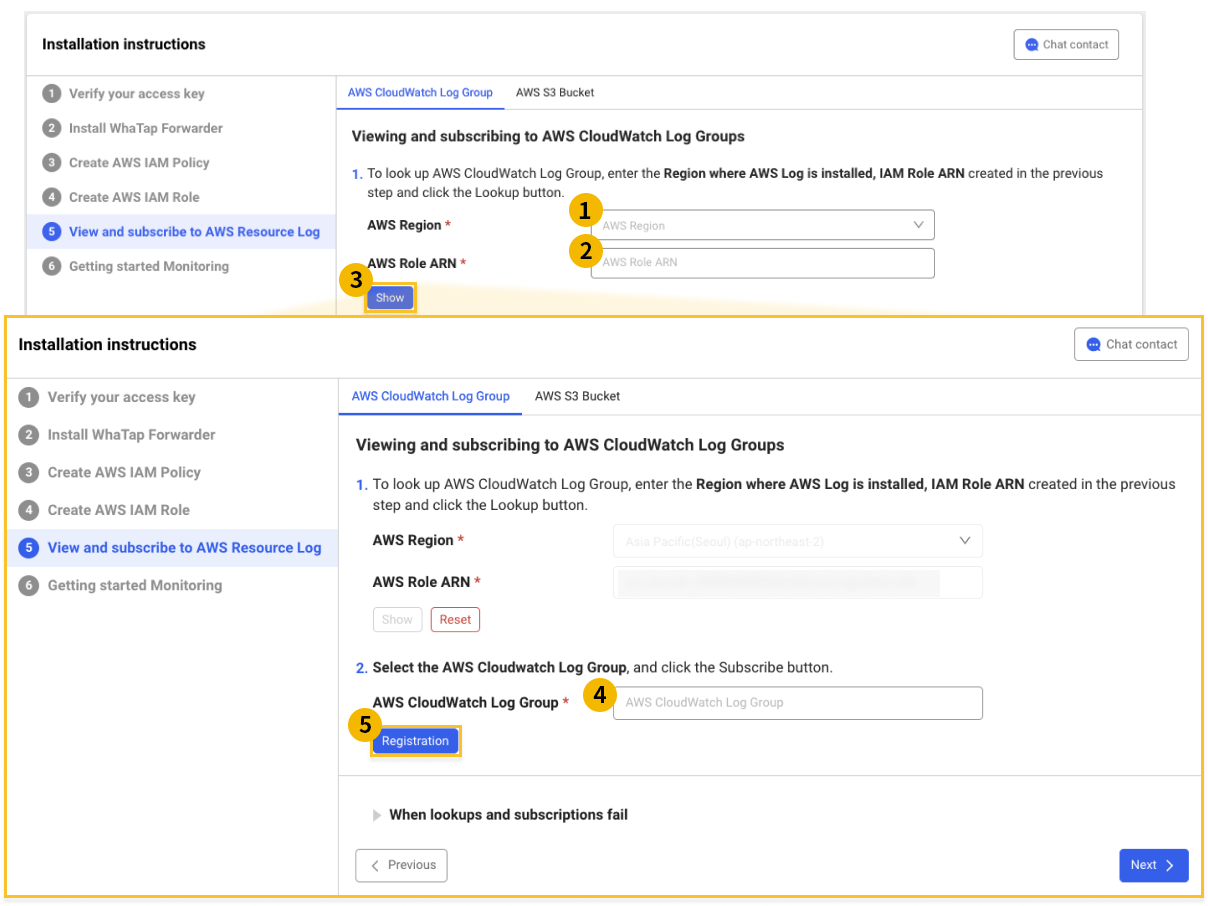
Viewing and subscribing to AWS CloudWatch Log
At the top of the AWS Resource Log Search and Subscription tab in the Agent Installation > Install guide, select AWS CloudWatch Log Group to proceed on.
-
Select the
AWS region where AWS Log has been installed. -
Copy Whatap Forwarder ARN from the previous step and paste to
AWS IAM Role ARN. -
Select
View to view the AWS resources that can be subscribed to. -
Among the resources queried, select the
target to subscribe to. -
Select
Register.
In case of a query and subscription failure
- Make sure no policies are missing under IAM Role Policy.
- Check that the trust policy has been correctly set during creation of IAM role.
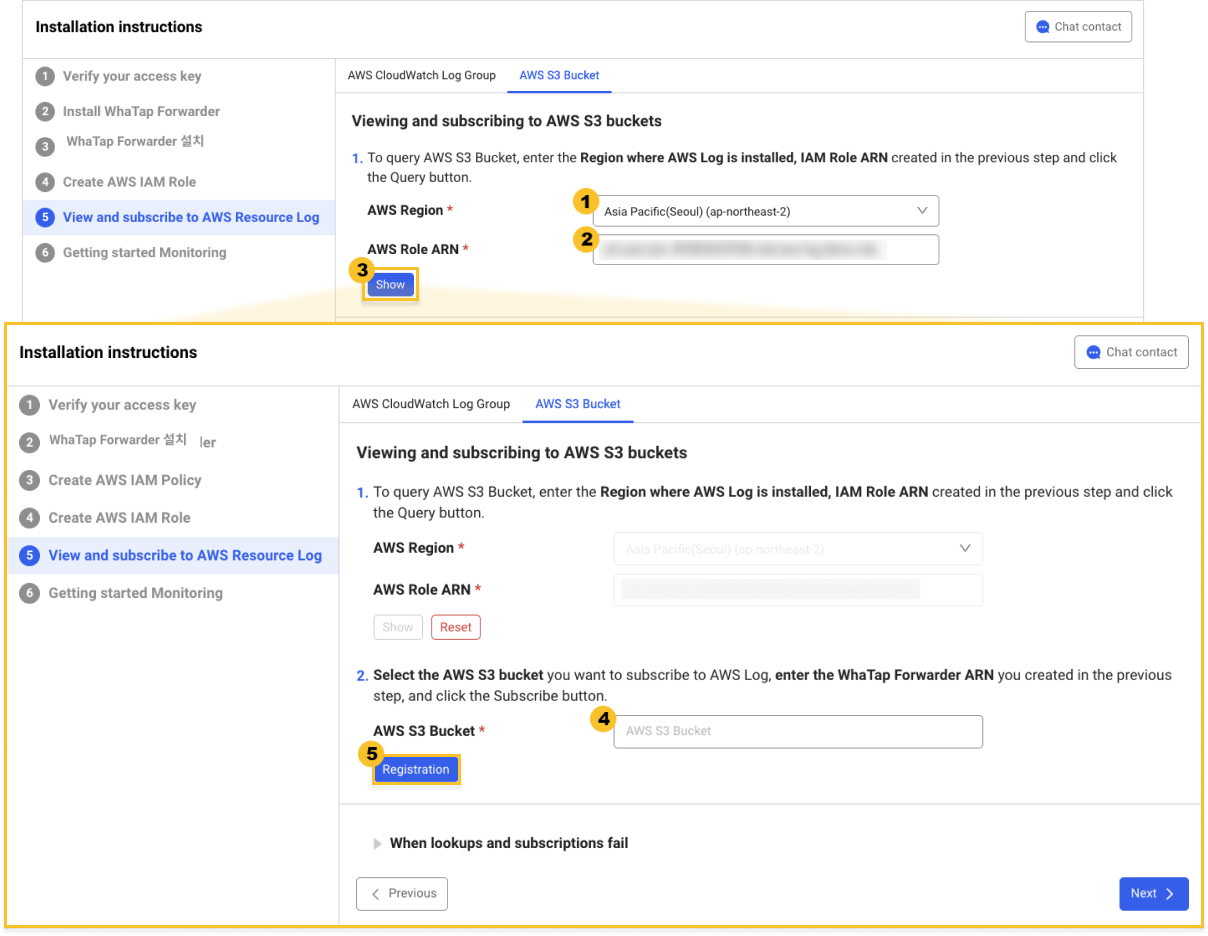
AWS S3 bucket subscription
At the top of the AWS Resource Log Search and Subscription tab in the Agent Installation > Install guide section, select AWS S3 Bucket to proceed on.
-
Select the
AWS region where AWS Log has been installed. -
Copy Whatap Forwarder ARN from the previous step and paste to
AWS IAM Role ARN. -
Select
View to view the AWS resources that can be subscribed to. -
Among the resources queried, select the
target to subscribe to. -
Select
Register.
Starting the monitoring
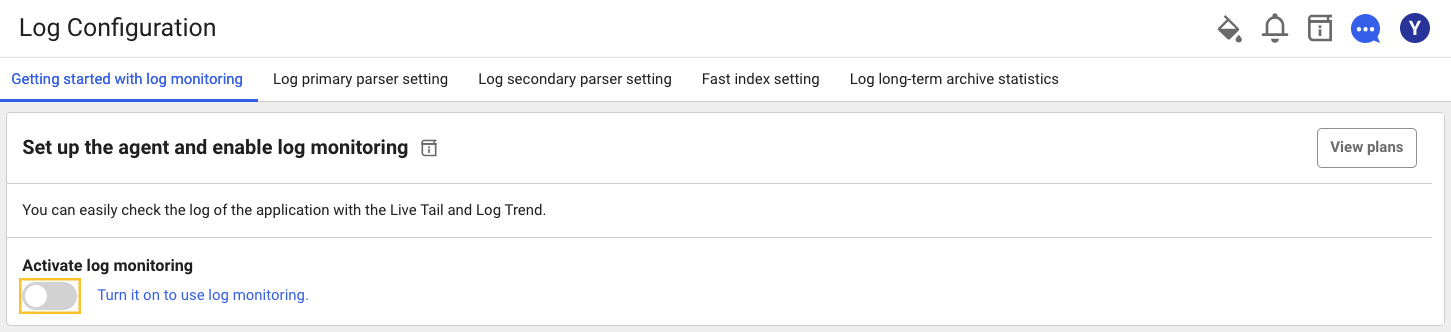
After installation, go to Management > Log Setting. In the Start Log Monitoring section, select the Activate Log Monitoring toggle button to start monitoring AWS logs.
- If you turn on the
 toggle button, the log monitoring is enabled.
 - If you turn off
 , the log monitoring is disabled. Logs are no longer saved.
If monitoring is enabled, you can check the output of incoming logs in Dashboard > Live Tail.
You can enable the log monitoring only when you have the Edit role on the project. For more information about roles, see the following.