Installation
WhaTap Amazon ECS Monitoring collects resource usage for each Docker container in real time via the META API and Cgroup directory. It retrieves and collects the status of Amazon ECS service, deployment, and container's instance through the WhaTap tasks linked with the Amazon ECS API.
To use the WhaTap monitoring service, after signing up Sign up, create a project. For more information about registration, see the following.
Role
Edit role is required for installation.
Project Creation
Create a project before installing the agent.
-
Log in WhaTap monitoring service.
-
To create a project, on the left of the screen, select All Projects > + Project.
-
Select a product in Select product for installation.
-
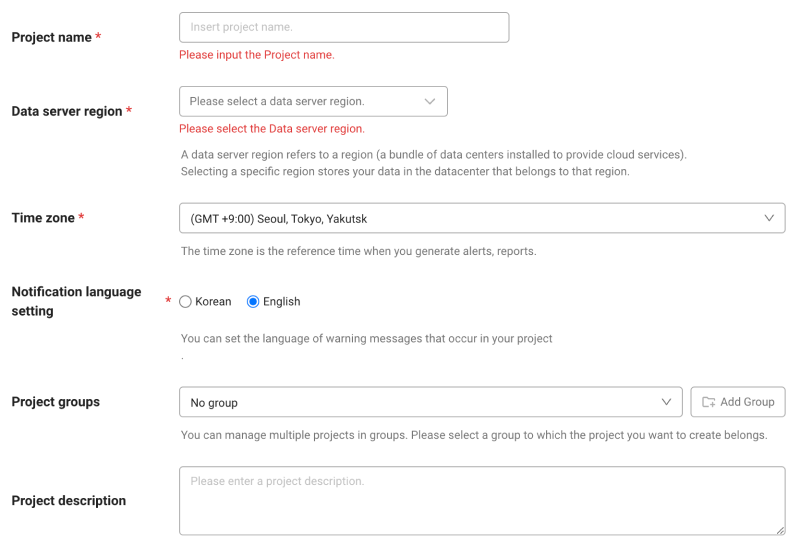
Set items for Project name, Data server region, Time zone, and more in order.
-
In Notification language setting, select the language for alert messages.
-
After all settings are finished, select Creating a project.
-
A Data server region refers to a region (a bundle of data centers installed to provide cloud services). Selecting a specific region stores your data in the datacenter that belongs to that region.
-
Time zone is the reference time for generating alerts and reports.
- To group multiple projects for management, select a group from Project groups or add a group. For more information about grouping, see the following.
- To add a project with an organization selected, Groups of organization must be set.
After creating a project, you can install items in Management > Agent Installation. See the installation guide to proceed with installation. Project access key is the unique ID for activating the WhaTap services. In the installation guide section, select Getting the access key. After automatic reception of project access key, proceed to the next step. After a project has been created, the Agent installation page appears automatically. If the Agent installation does not appear, select All projects on the left and then select a newly created project.Checking the project access key
Project access key
If you have already been granted a project access key, the key appears instead of the button.
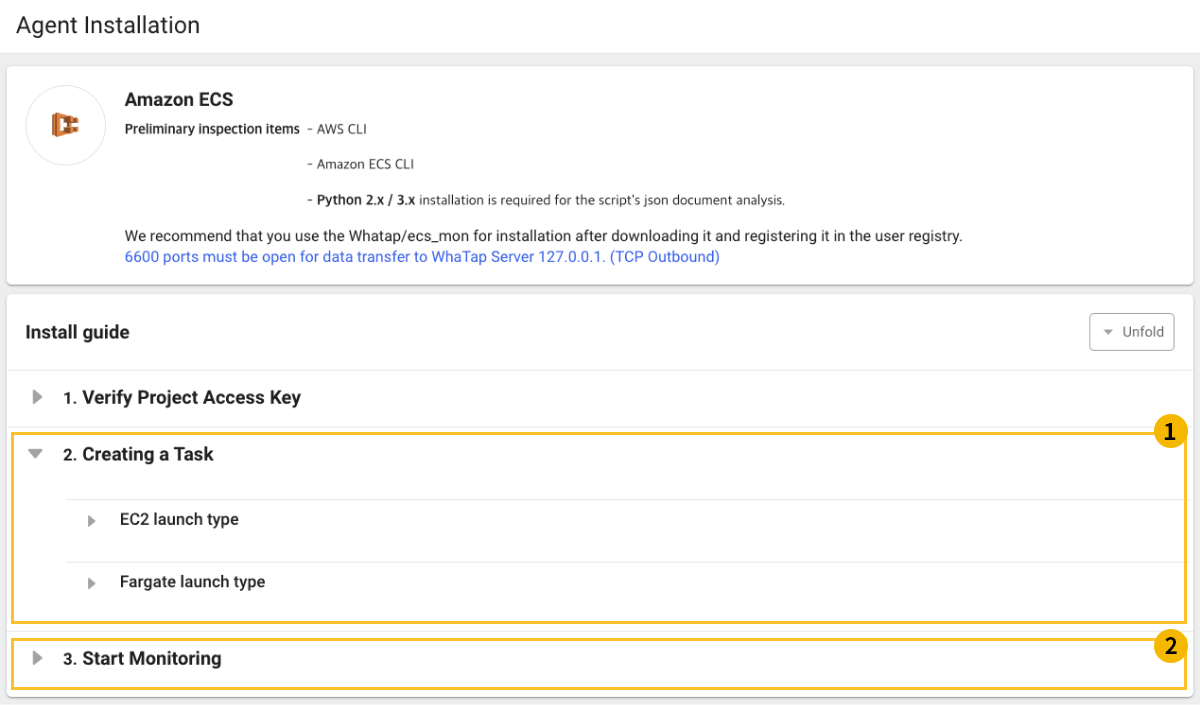
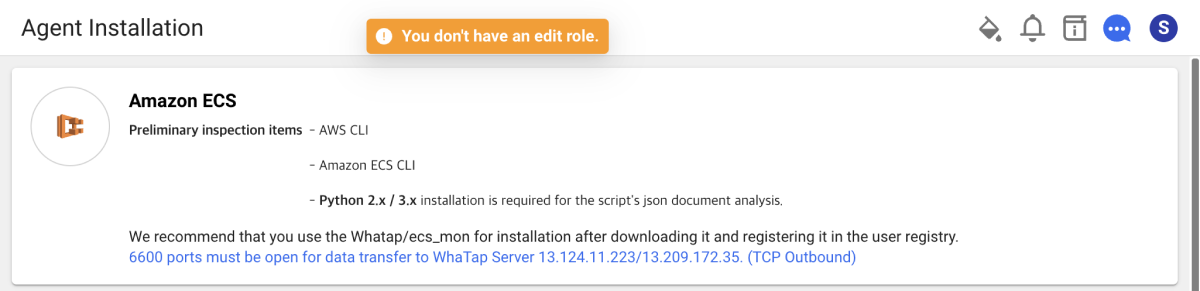
Preliminary inspection
-
AWS CLI
For more information about installation, see the following.
-
Amazon ECS CLI
For more information about installation, see the following.
-
Python 2.x/3.x
For analysis of the json documents by the script, installation is required.
- After downloading the WhaTap image (whatap/ecs_mon) for installation, it is recommended to register it in the user registry.
- The 6600 port must be open to send data to the WhaTap server.
Supported Platforms & Products
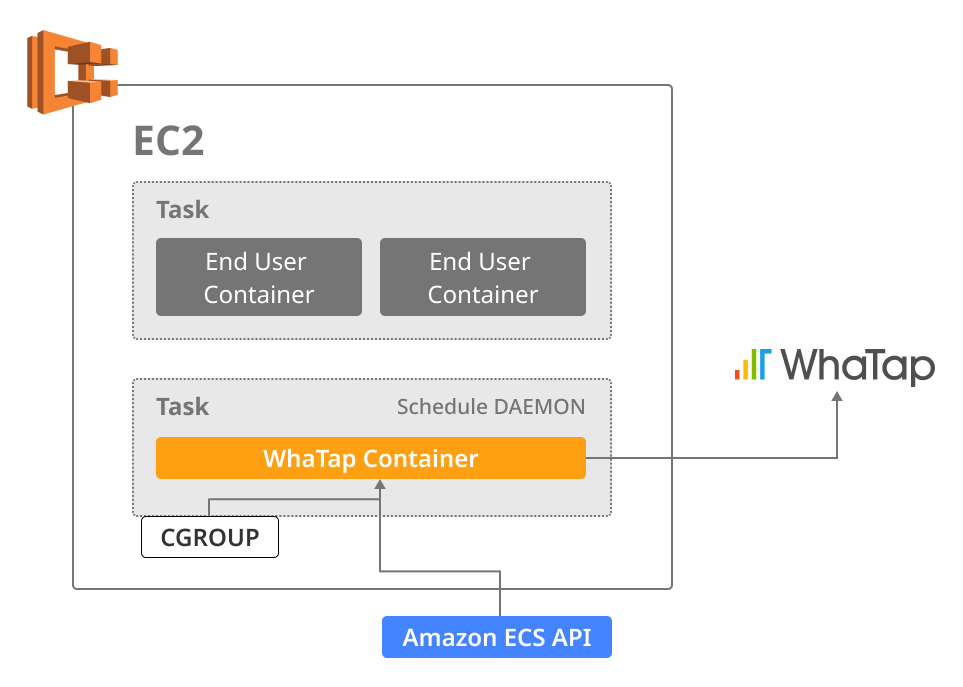
Items are distinguished depending on the launch type of Amazon ECS. Monitoring targets are task, service, deployment, and container instance.
-
EC2 Launch Type: Task, Service, Deployment, Container Instance
-
Fargate Launch Type: Task, Service, Deployment
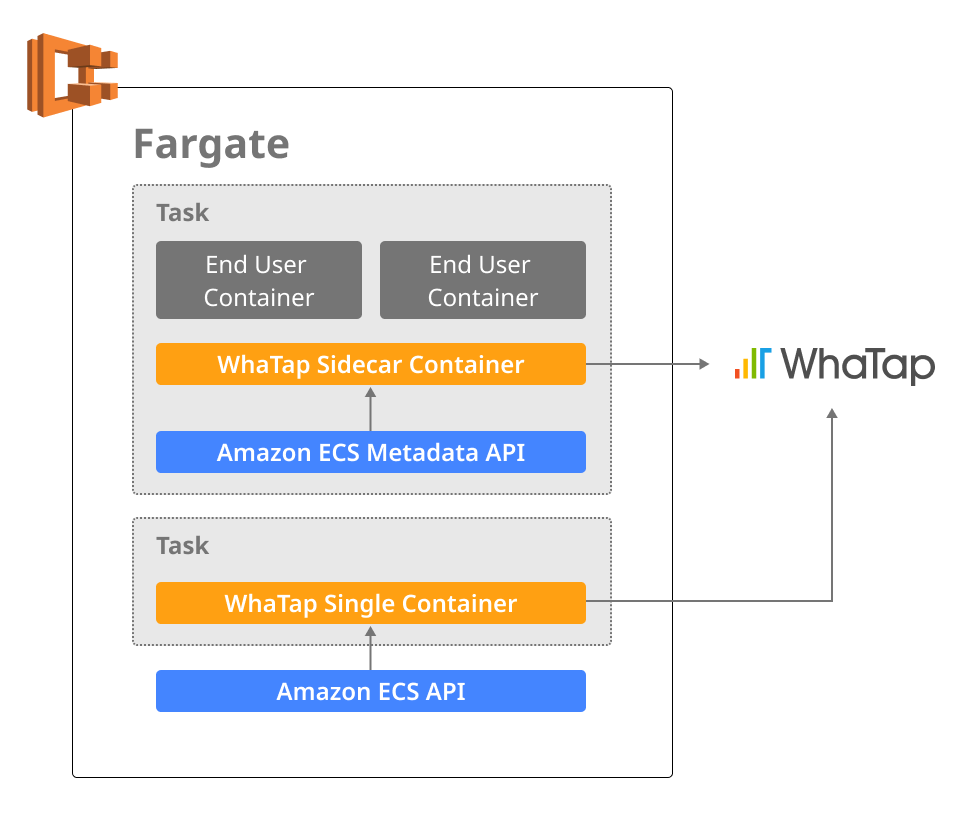
The following monitoring procedures are also divided into the procedure for EC2 Launch Type monitoring and the procedure for Fargate Launch Type monitoring.
For more information about the Amazon ECS launch types, see the following.
Monitoring procedure
-
By referencing the installation guide section
 tab, release the WhaTap Amazon ECS agent through the dedicated task or sidecar.
 -
By referencing the installation guide section
 tab, start the WhaTap monitoring service by enabling the monitoring service.
EC2 Launch Type
-
If you have created a project and then checked the Preliminary inspection, go to the installation guide section under Management > Agent Installation.
-
In the Create Task tab, select EC2 Launch Type.
-
Run the following script to create daemon type tasks. Add
CLUSTERandREGIONand then setACCESSKEYandWHATAP_HOSTto communicate with the collection server.Linux#!/usr/bin/env bash
export ACCESSKEY=x4u5j20mdbj98-x3btmtjfhffmrc-z6ogidu7vm3shg
export WHATAP_HOST=127.0.0.1
export CLUSTER=xxxx
export REGION=xxxx
export LAUNCH_TYPE=EC2
cat >whatap_ecs.json <<EOL
{ "containerDefinitions": [ {
"name": "whatap-node-agent",
"image": "whatap/ecs_mon",
"cpu": 100,
"memory": 50,
"essential": true,
"mountPoints": [{
"containerPath": "/var/run/docker.sock",
"sourceVolume": "docker_sock",
"readOnly": true},{
"containerPath": "/rootfs",
"sourceVolume": "rootfs",
"readOnly": true}],
"environment": [{
"name": "ACCESSKEY",
"value": "$ACCESSKEY"
},{
"name": "WHATAP_HOST",
"value": "$WHATAP_HOST"}
],
"linuxParameters": {
"capabilities": {
"add": [
"SYS_ADMIN",
"SYS_RESOURCE",
"SYS_PTRACE",
"NET_ADMIN",
"NET_BROADCAST",
"NET_RAW",
"IPC_LOCK",
"CHOWN"]
}}}],
"requiresCompatibilities": ["EC2"],
"volumes": [{
"host": {"sourcePath": "/var/run/docker.sock"},
"name": "docker_sock"},{
"host": {"sourcePath": "/"},
"name": "rootfs"}],
"family": "whatap-agent-task"}
EOL
aws ecs register-task-definition \
--cli-input-json file://$(pwd)/whatap_ecs.json \
--region $REGION
aws ecs create-service --cluster $CLUSTER \
--service-name whatap-node-agent \
--task-definition whatap-agent-task \
--scheduling-strategy DAEMON \
--launch-type $LAUNCH_TYPE \
--region $REGION-
The following are the items required to run the script.
-
ACCESSKEY(WhaTap project access key) -
WHATAP_HOST(WhaTap collection region IP) -
REGION(AWS Region) -
CLUSTER(ECS Cluster)
-
-
Fargate Launch Type
-
If you have created a project and then checked the Preliminary inspection, go to the installation guide section under Management > Agent Installation.
-
In the Create Task tab, select Fargate Launch Type.
-
Run the script to create the AWS ECS API Readonly IAM role.
NoteIt is required for the WhaTap task to query the ECS service and collect service status in real time.
-
The following are the items required to run the script.
ACCESSKEY(WhaTap project access key)WHATAP_HOST(WhaTap collection region IP; multiple IPs are connected with/)REGION(AWS Region)PROFILE(ECS Profile)CLUSTER(ECS Cluster)CLUSTER_CONFIG(ECS Cluster Config)TASK_EXECUTION_ROLE(Executing the WhaTap agent's ECS task)SUBNET_1(WhaTap agent's Task SUBNET#1)SUBNET_2(WhaTap agent's Task SUBNET#2)SGGRP(WhaTap agent's Task Security Group)
-
See the following example:
Linux#!/usr/bin/env bash
export REGION=xxxxx
export WHATAP_ECS_ROLE_READONLY=WhatapEcsReadonly
export WHATAP_ECS_POLICY_READONLY=WhatapEcsReadonly
cat >ecs_trust.json <<EOL
{
"Version": "2012-10-17",
"Statement": [
{
"Sid": "",
"Effect": "Allow",
"Principal": {
"Service": "ecs-tasks.amazonaws.com"
},
"Action": "sts:AssumeRole"
}
]
}
EOL
aws iam create-role --role-name $WHATAP_ECS_ROLE_READONLY --assume-role-policy-document file://ecs_trust.json | python -c 'import json,sys;print(json.load(sys.stdin)["Role"]["Arn"])' > role_arn.txt
cat >ecs_readonly.json <<EOL
{
"Version": "2012-10-17",
"Statement": [
{
"Effect": "Allow",
"Action": [
"ecs:Describe*",
"ecs:List*"
],
"Resource": [
"*"
]
}
]
}
EOL
aws iam --region $REGION create-policy --policy-name $WHATAP_ECS_POLICY_READONLY \
--policy-document file://ecs_readonly.json | python -c 'import json,sys;print(json.load(sys.stdin)["Policy"]["Arn"])' > policy_arn.txt
export POLICY_ARN=$(cat policy_arn.txt)
aws iam --region $REGION attach-role-policy --role-name $WHATAP_ECS_ROLE_READONLY \
--policy-arn $POLICY_ARN
-
-
Start the whatap-single agent with the created IAM ROLE. Service status is collected in real time by using the ECS API.
Linux#!/usr/bin/env bash
export ACCESSKEY=xxxx-xxxx-xxxx
export WHATAP_HOST=xxx.xxx.xxx
export PROFILE=xxxxx
export REGION=xxxxx
export CLUSTER=xxxxx
export CLUSTER_CONFIG=xxxx
export TASK_EXECUTION_ROLE=xxxx
export SUBNET_1=xxxx
export SUBNET_2=xxxx
export SGGRP=xxxx
export WHATAP_ECS_ROLE_READONLY=WhatapEcsReadonly
export PROJNAME=whatap-monitoring
export LAUNCH_TYPE=FARGATE
export WHATAP_ROLE_ARN=$(cat role_arn.txt)
cat >docker-compose.yml <<EOL
version: '3'
services:
whatap-ecs-agent:
image: whatap/ecs_mon
environment:
- ACCESSKEY=$ACCESSKEY
- WHATAP_HOST=$WHATAP_HOST
- FARGATE_HELPER=true
EOL
cat >ecs-params.yml <<EOL
version: 1
task_definition:
task_execution_role: $TASK_EXECUTION_ROLE
task_role_arn: "$WHATAP_ROLE_ARN"
ecs_network_mode: awsvpc
task_size:
mem_limit: 0.5GB
cpu_limit: 256
run_params:
network_configuration:
awsvpc_configuration:
subnets:
- "$SUBNET_1"
- "$SUBNET_2"
security_groups:
- "$SGGRP"
assign_public_ip: ENABLED
EOL
ecs-cli compose --project-name $PROJNAME service up \
--cluster-config $CLUSTER_CONFIG \
--ecs-profile $PROFILE --region $REGION -
Release the WhaTap sidecar agent to the end user task as follows. Add
ACCESSKEYandWHATAP_HOSTas environment variables to allow communication with the collection server.Linuxversion: '3'
services:
xxxxx:
image: xxxx
ports:
- "xx:xx"
...
whatap-ecs-agent:
image: whatap/ecs_mon
environment:
- ACCESSKEY=
- WHATAP_HOST=
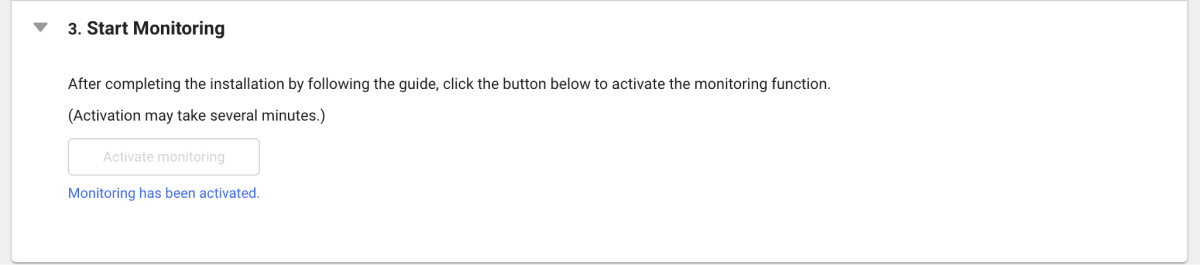
Activate monitoring
![]() In the Start Monitoring tab, select Activate monitoring to start the monitoring service.
In the Start Monitoring tab, select Activate monitoring to start the monitoring service.
-
Enabling the monitoring service
-
Disabling the monitoring service
Precautions upon removal
To completely avoid incurring costs, delete the following items:
-
ECS Service:
whatap-ecs-agent -
Task Sidecar:
whatap-ecs-agent -
Role:
WhatapEcsReadonly