Integrated Report
Home > Integrated Report
On the initial screen of the WhaTap monitoring service, select Integrated Report from the side menu without selecting a project. Integrated Report allows you to easily generate reports for multiple projects.
You can proceed with creating a report after selecting a report type and a desired report, and then you can check its progress in the report generation list. If an error occurs in a project during creation, you can check the error details. You can view a created report right away or share it with others by downloading and printing.

The functions of the Integrated Report are as follows.
-
Supporting multiple projects
In Integrated Report, you can easily select and create multiple projects at a time. Under the previous Report menu, the reports must be created for each project.
-
Create Report by Kind
In Create Report, you can select a project by the business and save it as a template. This function is useful in the micro service architecture (MSA) environment where projects are divided into business units.
-
Big Data Optimization
With an aid of Integrated Report, the report creation time has been drastically reduced. Even if an error occurs while creating a project report, you can view the result of the report.
-
Simultaneous operation during report generation
In Integrated Report, you can create a report while performing other tasks. In the previous Report menu, you have to wait until the generation task is finished.
In Integrated Report, you can go to another page while creating a report. You can also see its progress and view the created report from the report result list.
-
Sharing the report work
Any user with project permission can view the created reports. You can check whether the related report has already been created, so you can avoid creating duplicates.
Difference between the report and integrated report
Report menu generates a report for a single project. Accordingly, this menu can be accessed through Stat/Report or Report after selecting a project.
Integrated Report menu is used to create a report for multiple projects. It can be accessed from the main menus without selecting a project. For more information about the Report, see the following.
How to create reports
-
Selecting the report type
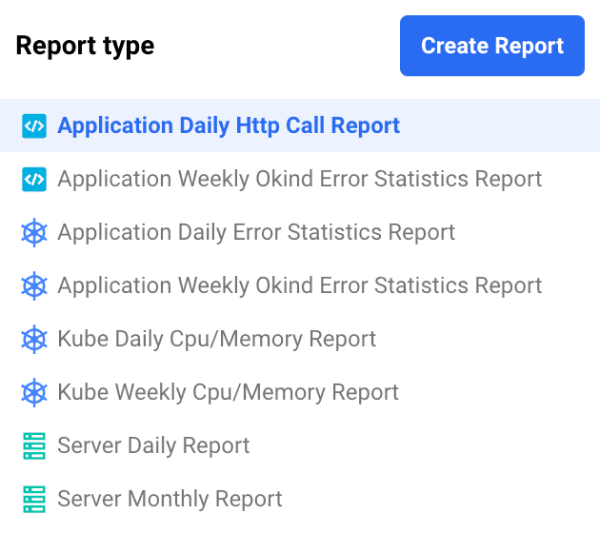
If you select a desired report type in Report type, the Create Report button is activated. The icon before the report name indicates the project platform supported by the report form.
 indicates the Application project platform.
 indicates the Kubernetes project platform.
 indicates the Server project platform.
-
Detailed settings
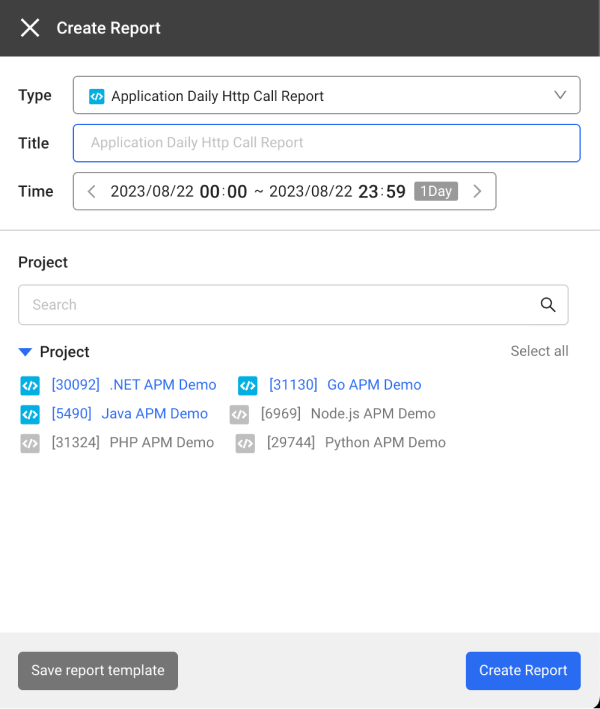
After selecting a report type, click Create Report. The detailed settings are configured as follows:
-
Report Title
If there are multiple reports of the same type, the report names make it easier to distinguish the report results.
-
Time
Select a period for the data to be used in the report. The period differs depending on the report type (daily, weekly, monthly).
-
Select Project
Select a project for report creation. Selection is possible on the group and project basis.
-
Saving and importing report forms
You can save the specified report settings as a template and import it from the type list upon later creation. This function is useful for those who frequently use projects on a task basis.
-
-
Create Report
After configuration, click Create Report to create a report.
Checking the job list
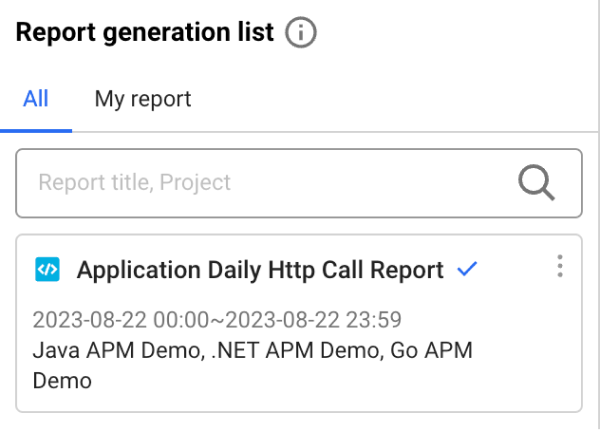
You can see the reports that were created and are being created in Report generation list.
In the All list, as well as the reports created by you, the reports created by other people with the same permission can be seen. In the My report list, you can see your own reports after being filtered.
A report created with no error has the ![]() check icon. In case of a report with any error, the
check icon. In case of a report with any error, the ![]() warning icon is displayed together. If you click the
warning icon is displayed together. If you click the ![]() warning icon, you can see in which project the error occurred.
warning icon, you can see in which project the error occurred.
Viewing and sharing reports
The reports are provided in three different ways:
-
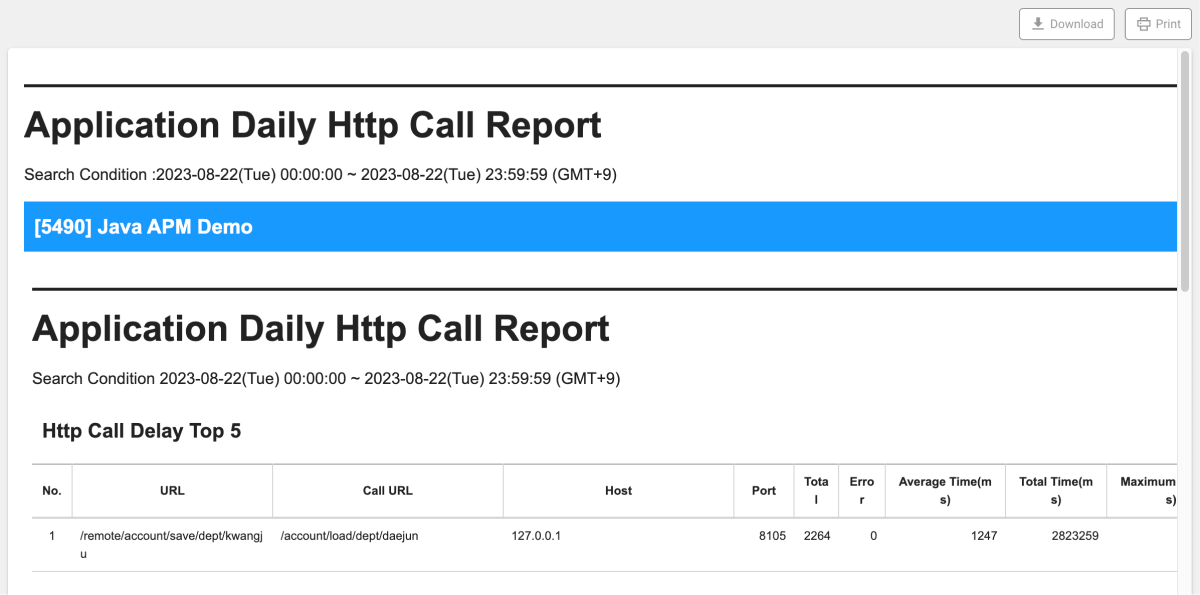
Viewing on the screen
If you select a report created in the job list, the report can be seen on the screen.
-
Download
If you click Download, the files same as reports in the quick view are downloaded in HTML format. Reports can be shared with the people with no management permission for monitoring.
-
Printing and saving PDF
If you click Print, you can print it with the printer connected to your computer or save it in PDF format.